Tag: improvised

  • How to Make Improvised Lock Nuts

    How to Make Improvised Lock Nuts


    Improvised Lock Nuts
    Improvised Lock Nuts

    I would not recommend using improvised lock nuts in any life safety application.  However, there are times when a nut may vibrate loose but you are in a position where you can’t get to the store.

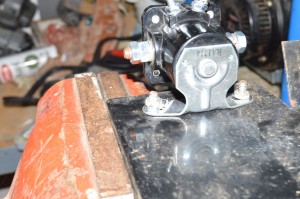
    The solenoid I installed while Converting a generator to electric start was just such a problem.  I needed to finish before the wife got home and could not waste another hour in a round trip to the store.

    Additionally, I couldn’t have any more hardware store charges on the debit card that day.  I was already dipping into the joint account for YouTube projects that did not have prior spousal approval.

    What I did was tighten down nuts mounting the solenoid.  Next I wrapped a couple turns of teflon tape to the bolt.  Then I screwed another nut over the tape.

    The teflon tape acts like the nylon ring inside of a real lock nut.  Having two nuts also helps with reducing loosening from vibration.

    Yes, it is an improvised solution.  No it it not as good as a store-bought solution.  However, it does work, and I am pleased with it for this use.  Especially as my wife is happy the generator can now be started without a lot of struggle.

  • How to Improvise a Hydraulic Line End Cap

    How to Improvise a Hydraulic Line End Cap


    Improvised Hydraulic Line End Cap
    Buy at Amazon

    In working on the backhoe I had to keep removing lines and valves.  Unfortunately I had no idea how long the hydraulic shop would take.  I was working with a good, fast, cheap, pick any two mechanic and I choose good and cheap.  Therefore, I had no idea how log the hose lines would be disconnected.

    Old tractors use non-detergent oil for hydraulics and that means water in the system causes havok.  I needed a plug but out in the middle of the woods I had to make an improvised end cap.

    To make my hydraulic line cap I tried to fit the fingers of thick latex gloves over the lines and tie them in place.

    This worked very well for the non-pressurized lines, but on the cylinders under pressure, the back pressure blew my finger caps up like balloons.  Some even popped over time.

    If you are going to do this, I would recommend putting the hydraulic cylinders in a non-pressurized position, for a backhoe, that means resting on the ground.  Luckily I also taped the hoses into groups and places the ends of the individual groups inside ziploc bags and taped the bags shut around the line ends, so even the improvised caps that failed did not get water in the line.

  • How to Improvise a Winter Water Spigot Cover

    How to Improvise a Winter Water Spigot Cover

    Quick Tip: Improvised Water Faucet Winterization
    Buy at Amazon

    With all the ice and snow lately a friend of mine sent me this idea for an improvised method to winterize a water spigot. I tried it and it works.

    Unfortunately due to the weather I was working a lot of overtime and I could not get this video out until now.

    Basically a outdoor winter water spigot cover works by insulating the faucet from the cold outside temperatures.

    Today’s video shows a way to do this without buying a cover. I think this is easier, but my wife would probably prefer a store bought solution.

    Since trapped air can make an effective insulator, My friend wondered if multiple layers of plastic grocery bags could work.

    Since I keep and reuse my grocery bags I simply grabbed a handful and loosely wrapped them in layers over the spigot and then held it in place with some duct tape.

    I think this is a good idea to keep in the back of your head just in case.  Especially as a way to keep your mind open to work around solutions.

    Thanks for the great idea Raging Main…

    I know this improvised attempt at winterize a water spigot looks pretty rigged up,.  However, we had a really cold winter, including an ice storm that was big enough to rate a Presidential disaster declaration.  Through it all my pipes didn’t freeze.  Which is not a scientific measure, but it was free, easy, and seems to work so I am happy with it.

  • How to Use a Play Dough Machine to Make Pasta

    How to Use a Play Dough Machine to Make Pasta

    Improvised Pasta Maker from Play Doh Toy
    Buy at Amazon

    I have always wanted to make my own pasta, and its been on my list for a long time, but I really didn’t want to mess with hand cutting my own noodles, and I did not want to buy a $50 dollar pasta machine.

    However, while researching another project I happened to find a $20 sheet press for polymer clay that looks exactly like a pasta roller. Being the cheapskate I am, I started thinking about even cheaper ways to solve the problem when it hit me. Play Dough is Dough… A play doh fun factory is around 6 dollars, and if it didn’t work, my wife could use it in her class (she is a special educator that works with autistic children).

    Here is my attempt to make an Improvised Pasta Maker from a play doh fun factory toy.

    To test I just made a simple pasta dough recipe 2 cups flour, 2 eggs, knead until you have a ball of pasta dough.

    I dug through the package to get the dough press and the two sliding bars with different sized holes and shapes.

    After some experimentation, I found that the bar with the 4 small squares made the best compromise between shape and ease of use. If I tried to press the dough through the very small holes, the pressure created caused the dough to escape from every available orifice on the machine.

    Once I had the noodles made, I simply dumped them in a pot of boiling water and cooked for about 3 minutes.

    This works, but unless you want to make stars or some other funky shaped noodle, then I found it much easier just to hand cut the dough into noodles. But I think it was a neat experiment, and as I said in the video, once my boy gets to the age where he likes playing with play dough, we will recreate this experiment to start crossing over into cooking.

  • How to Make a Improvised Cooking Stand from Shelf Brackets

    How to Make a Improvised Cooking Stand from Shelf Brackets

    52 Unique Techniques for Stocking Food for Prepper
    Buy at Amazon

    This is one of those “why didn’t I think of that” posts – I first saw this on Stealth Survival and later on pinterest.

    By repurposing shelf brackets you can make a really cool improvised cooking stand for any pots that do not have handles to hold over your campfire.

    Somewhere I acquired a couple boxes of metal shelf brackets that were in need of a use, so I jumped on trying this out.

    I will say that using 4 brackets and have each end rest on the next bracket makes a very study platform, but using three in a triangular setup works if you don’t have that extra bracket.

    The brackets are designed to nest, so that they don’t take a lot of space in your bug out or camping kit, and you can throw in some nuts and bolts to connect them together so you don’t spill the beans…

    Two other nice things about this is that you can push the brackets into the ground before building your fire to make it even more sturdy, and because most brackets have a long leg and a short leg, you can experiment with different configurations to fit your pots.

    As with all of my heating methods, stay tuned and we will try this without survival still to see how study this is…