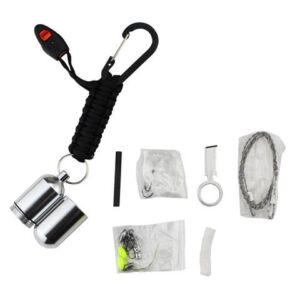
This is a pretty cool little EDC Keychain from Survival Hax. I have reviewed some of there stuff before, and it is perfect for the budget prepper.
The keychain is a simple paracord weave that you can unravel to get a lenght of cord, it has a whistle and an easy to use carabiner to attach it to your gear (my plan is to clip it to the rifle sling of my M6 Scout Survival Rifle.
I really like the contents of the survival kit – the knife is pretty cool and its always nice to have a means to start a fire.
The kit has:
Fishing line
Hooks
Weights
Floaters
Sinkers
Swivels
Eye knife
Cotton tinder
Fire starter rod
Safety pins
Wire saw
With this kit and a nice rifle I could make myself comfortable for an extended stay in the woods. It is a pretty decent set up that is light and small enough to go on all of your outdoor adventures and at under $15.00 its a steal.
I have to say while I did get this keychain for free in order to do a review, I am planning on buying another to go on my the sling of my son’s cricket rifle. (not that he will be outdoors alone, but so he and Daddy can match.
In this post I will show how I go about Installing an AR-15 Single Point Sling Mount. This is an easy project that a new AR-15 owner can complete with little experience.
I think it is an easy thing to add to the gun, and even if you don’t always use a single point sling you can keep it without adding a lot of clutter and weight.
Personally I prefer a 2 point sling based upon my marksmanship training in the Marines, but many people prefer the one point sling.
To do this modification you don’t need much in the way of tools, but you will need a buffer tube wrench which is a specialty tool tool made for an AR-15.
Installing an AR-15 Single Point Sling Mount
First remove the stock. In the one I have there is a long screw that holds it in place, others have a nut around the buffer tube.
As you remove the stock beware that there is a long skinny spring that holds the detent pin for your rear take-down.
Don’t let that spring shoot out or get kinked up.
Unscrew the buffer tube,
Next add your AR-15 Single Point Sling Mount it goes between the lower and the buffer tube.
Screw your buffer tube back in. Take care to ensure you do not cross thread the fine aluminum threads.
As you must take care that the spring that holds the detent pin is pressed in straight and it does not get kinked.
Tighten the buffer tube hand tight.
Screw on the castle nut snug using the buffer tube wrench.
Why a Single Point Sling?
To conclude, I don’t think a single point sling is appropriate for all occasion. Most times I thing a two point sling is better. However they work well when you are working around vehicles. It allows you to drop the gun and go “hands on” without losing your gun. However, a single point sling it is worthless for carrying a gun long term while hiking. Finally, it does not support the rifle while shooting like a 2 point sling can.
One of the first guns I ever bought for myself was a Springfield Armory M6 scout rifle. Like almost all owners of the M6 scout, I really like the concept, but I find it needs a sling swivel to really fit my needs.
What is the M6 Scout
For the uninitiated, the M6 scout started life as a survival item for Air Force pilots. It is a hinge action over under that breaks into two parts for storage. The air force version is normally a .22 hornet over .410, but mine is a .22 long rifle over .410. The actual military model’s barrel is shorter than the National Firearm Act allows for unregistered firearms, so the civilian barrel is about 4 inches longer. It has two cutouts on the sheet metal stock that are supposed to be improvised wrenches, but I have never attempted to use them. In my opinion, other than the size and weight of the gun, the best feature is that the butt-stock opens to hold 4 .410 shells and 15 .22 (only 9 if it’s a .22 hornet).
While I am an unreconstructed tinkerer that loves messing with things, I am pretty conservative with my firearms, and do not modify them without having a clear and specific goal in mind. I don’t own any “safe queens” or Barbecue guns, all of my firearms are tools, primarily for my family’s or my own self defense. Over the years I have seen too many overly modified guns lose reliability with each “improvement” to the designer’s specifications.
A Few Nice Modifications
However, there were four areas that my scout needed improvement, and none of them modified the actual mechanical function of the firearm in anyway. Since the purpose of this gun is to forage in a E&E (escape and evasion) scenario its intended use makes it perfect for a GHB (Get Home Bag) kept in a car trunk. My first addition addressed this and was the purchase of the optional blue plastic case to hold both the gun, a 100 round box of .22 long CB caps and two .45 caliber bianchi clips that I stretched and forced 12 .410 shells into (an appropriate mix of 6 #6 shot, 4 slug, and 2 00 buck).
Remove the Trigger Guard and Add Para-cord
My next mod was to remove the trigger guard from the “trigger” which is actually a bar that you can squeeze with you entire hand if needed. All I did was pry the stock apart slightly and pull the guard out (its stamped steel).
Next, I wrapped a long length of para-cord along the barrel as the gun does not have any furniture on it. This provides me with a cool place to put my hand if I somehow shoot enough to heat the barrel, and it gives me some cordage for emergency use. According to some, crewmen were taught to do this using paracord from their chutes if they ever bailed out.
Adding a Sling Swivel
My last modification, and the subject of the video below, was the addition of a sling swivel on the butt-stock. For years I have tried to find a factory sling swivel to attach to my scout. The barrel has a hole at the muzzle for attachment, but the butt-stock does not. The only furniture on the gun is a small rubber pad on the butt-stock, but the screw that holds it in is not substantial enough to do its designed job and hold a sling.
While at the reloading store the other day, I saw a sling swivel for an AR-15 hand guard. I knew immediately that it would work. It was a normal QD swivel on a stud, a round spacer/washer, and an aluminum nut with a round base.
Basically, I used a drill press to drill a hole the aluminum nut could fit into, then screwed the swivel stud into it through the washer. Later I may trim it up a little with my Dremel, but for now it works well enough for my purposes.

 This is a pretty cool little EDC Keychain from Survival Hax. I have reviewed some of there stuff before, and it is perfect for the budget prepper.


