Tag: canning

  • 3 Simple Homestead Canning Recipes

    3 Simple Homestead Canning Recipes

    Buy at Amazon

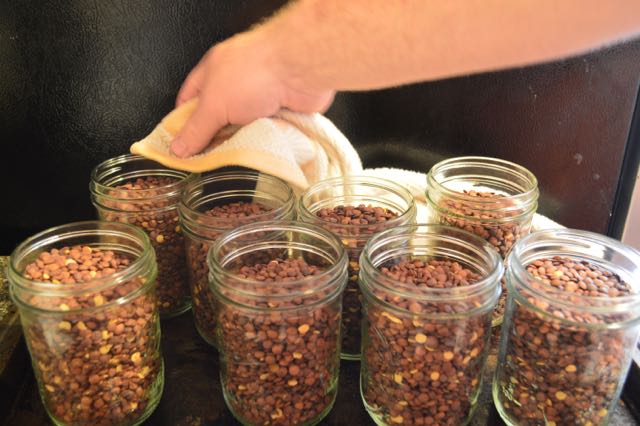
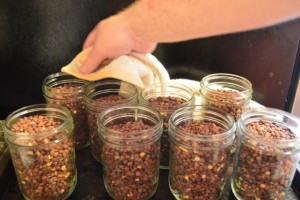
    If you want to try making food by yourself, you should try the homestead approach. In this kind of lifestyle, you are going to grow food in your backyard. But if there is one thing more fun than this, it must be homestead canning.

    Canning is actually a great hobby and survival project. It allows you to preserve your grown food as long as possible. These food items could come to your rescue, whenever you are trying to be frugal. But of course, canned foods are also great gift ideas!

    When you are canning, it is recommended that you only create a recipe that you are familiar with. In this way, you won’t have any trouble in making the food. As a result, you are simplifying the overall cooking process.

    But if you are still new to homestead canning, then don’t fret. I can pull certain recipes on my cooking repository that you can try. They are fairly simple to create since they only involve minimal ingredients and preparation. Take a look at each of these recipes and see which one you can try first!

    Homestead Canning Recipes

    Canned Tomatoes

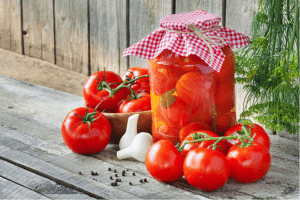
    Tomatoes are always a favorite ingredient when it comes to homestead canning. They are very accessible and relatively cheap, too. Since there are a lot of tomato varieties today, your options are pretty limitless. However, for those tomatoes that are relatively sweet, you should include a minimal amount of acid in the equation. With this, you can prevent botulism from happening.

    Ingredients:

    • Tomatoes (2 pounds)
    • Lemon juice
    • Salt

    Materials:

    • Mason jars

    Instructions:

    1. Start by peeling the tomato. Use a sharp knife to this process. If you are working with huge amount of tomatoes, the peeling could take time. Therefore, it is better if someone will help you out.
    2. Next, blanch the tomato. You can do this by removing its core. After that, make an X cut on its bottom. Once done, you can put the tomatoes in a pot of boiling water. Let them be simmered for around 30 seconds. After simmering, put the tomatoes in a bucket of water with ice.
    3. If the tomatoes are all naked already, you should start preparing the jars. Make sure that your jars are clean by running them on a dishwasher.
    4. Put the tomatoes in the jar. Include at least two tablespoons of lemon juice per jar. This will stabilize the acidity level of the canned tomatoes. Adding the salt is optional, but you can still add one teaspoon of it per jar.
    5. Fill the jar with water. After that, put the lids and close the jars tightly. Afterwards, put the jars in simmering hot water. Let them be boiled for around 45 minutes.
    6. Store the canned tomatoes in a cold and dark storage.
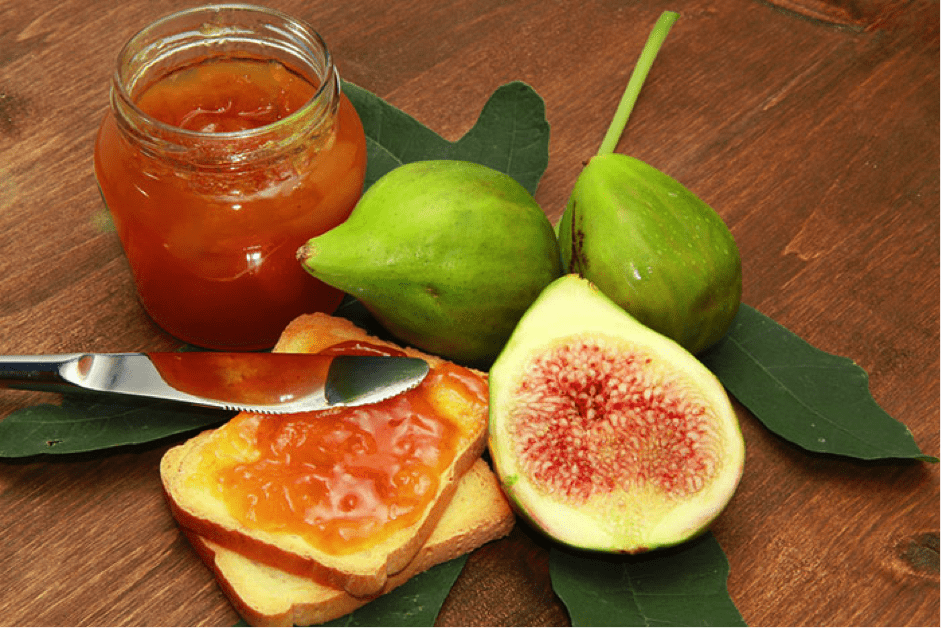
    Canned Fig Jam

    The fig is a seasonal fruit. Therefore, it would be a pain to crave it on the wrong season of the year. But if you are quite ingenious and creative, you can solve this problem by canning the fruit. One way to do it is making a puree or jam out the figs. They are great ingredients for various desserts like smoothies! The fig jam is also a great baby food, too.

    Ingredients:

    • Figs (2 pounds)
    • Sugar (1/4 cup)
    • Lemon juice (1/2 cup)
    • Dash of cinnamon

    Materials:

    • Mason jars

    Instructions:

    1. Slice the figs into small quarters.
    2. Put the quartered figs in a pan together with the sugar. I recommend that you will use an unrefined sugar for this canning recipe. But of course, you can utilize whatever sugar you have right now!
    3. Cook the mixture in a low heat setting. Stir them properly until they become a puree.
    4. For better results, you can use a handheld blender to mash the puree while the cooking. This is not a necessary procedure, but doing this can smoothen the texture of the puree.
    5. Throughout the heating process, you can notice that the color of the mixture turns dark while its texture begins to thicken. Just continue stirring until such time the mixture is thick enough to be called a jam.
    6. Before you remove the jam in the pan, add the cinnamon and lemon juice. They can certainly enhance the flavor of this recipe.
    7. Store the now fig jam into the jars. Let them be cooled before you store them in your refrigerator.

    Canned Apple Butter

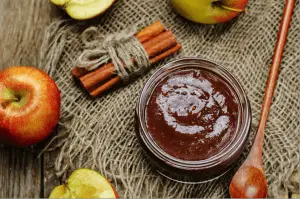
    We like making food from scratches. Even if we have the option to buy them, the pleasure and satisfaction of making your own food are still an irreplaceable thing. That is the story of the apple butter.

    We can see a lot of commercial variants for this food item. But didn’t you know that you can actually make this delectable treat by yourself? Check out the procedure below to get started.

    Ingredients:

    • Applesauce (9 quarts)
    • Cloves (1 teaspoon; ground)
    • Cinnamon (2 tablespoons; ground)
    • Sugar (4 cups)
    • Allspice (1/2 teaspoon)

    Materials:

    • Mason jars

    Instructions:

    1. The first thing that you need to acquire is the applesauce. You can make this ingredient, or you can buy it on the market. It is your choice.
    2. Use a crockpot and pour the applesauce there. The pot should be semi full. If you have a lot of applesauce, you can pour them later. Put the pot on the stove and cook it over low heat until the applesauce boils.
    3. While the applesauce is not yet boiling, add the rest of the ingredients. You can use honey as an alternative to sugar if you are quite distancing yourself from the latter.
    4. The cooking process of the pot will take around 8 hours. Therefore, if you want to quicken the process, you can increase the heat of the stove to medium heat.
    5. Once the mixture is already cooked, cover the pot with the lid. Don’t tighten the lid too much. Otherwise, the moisture won’t be able to escape. Leave the pot for another 10 hours. You can stir the mixture from time to time to prevent it from sticking to the sides of the pot.
    6. After the period, the mixture will only be half of its original volume. This time, you can already pour additional applesauce and some sweeteners. Let it be cooked for another 4 hours.
    7. Once the cooking is done, pour it into a bowl. Let it be cooled for awhile before putting it in your blender. Blend the mixture until the texture becomes fine and smooth. Pour the apple butter in your jars and cover them tightly. Place them in your refrigerator afterward.

    Conclusion

    These are just a few recipes that you can try for homestead canning! If you can finally learn all these, you can already explore some other options, too. Don’t limit your food palette. I am pretty sure that you can discover other great homestead canned recipes sooner!

    Hello! Rose here! I am a full-pledge mother and a kitchen warrior at the same time. I created the GimmeTasty.com blog so that I can share my cooking knowledge to each interested individuals out there. If you want to catch up with my culinary adventures, just visit and subscribe to my site! I am excited to see you there!

  • Food Storage: Oven Canning

    Food Storage: Oven Canning

    Oven Canning
    Oven Canning
    Food Storage: Oven Canning
    Buy at Amazon

    You will never find this Oven Canning technique in a USDA or National Center for Home Preservation website; there are just too many variables to say that the process works 100% every time with every food type.

    However, if you reread the section on food safety and see that for botulism to grow it needs moisture as well as anaerobic conditions.

    That means that the only items you should oven can should be dried. This makes it really good for items like pancake mix or flour.

    This process should not be used with wheat berries or anything you plan on sprouting as the temperatures will most likely kill them. Luckily the process will kill any meal worms or other insects that tend to infest (and have allowable levels by FDA standards) wheat or flour process.

    What happens is, the heat kills any live infestations, and as the air expands with the heat it is pushed out of the jar, so as it cools, the lids will seal creating a good vacuum seal – which prevents any moisture or bacteria from entering.

    Equipment:

    • Canning jars
    • Canning lids and screw bands
    • Wide mouth funnel
    • Dried goods
      • White rice, oats, and other grains
      • Beans and lentils
      • Flour
      • Baking mixes
      • Spices, salt, baking soda, etc.
    • Oven
    • Potholders and towels

    Procedure:

    1. Preheat oven to 2000 Fahrenheit
    2. Fill your sterile canning jars with dried goods, leaving 1/2″ head space. Do not put lids on yet
    3. Place in oven and heat for one hour
    4. Use pot holders or towel to remove jars from oven
    5. Quickly wipe rim of jar with damp (but not dripping) towel
    6. Place metal canning lid on jar and screw metal band on tightly
    7. Return jars to oven and set timer for 30 minutes
    8. Remove jars from oven and allow to cool
    9. Check lids for tight seal

    Yield:

    Variable

    Notes:

    Do not use plastic canning lids

    Oven canning is not a safe method of preserving anything other than dried goods. Do NOT use this method for canning wet foods such as fruits, vegetables, or meats unless they have been thoroughly dehydrated. Be sure to label your jars with the contents, date canned, and how to prepare.

    Once your jars of dried goods have cooled, and you checked the seal to ensure it “popped” store them in a cool, dark, and dry location. The seal will prevent moisture from getting into the jars, but moist air will rust metal canning lids and bands.

    Whole grains store better than grains that have been ground into meal or flour.

    If you are canning baking mixes. Ensure they do not contain shortening (it will melt), oil (will turn rancid), brown sugar (has moisture).

  • Preserving Food without Freezing or Canning

    Preserving Food without Freezing or Canning

    Preserving Food without Freezing or Canning
    Click the Picture to Purchase

    Typical books about preserving garden produce nearly always assume that modern “kitchen gardeners” will boil or freeze their vegetables and fruits.

    Yet Preserving Food without Freezing or Canning goes back to the future—celebrating traditional but little-known French techniques for storing and preserving edibles in ways that maximize flavor and nutrition.

    Translated into English, and with a new foreword by Deborah Madison, Preserving Food without Freezing or Canning deliberately ignores freezing and high-temperature canning in favor of methods that are superior because they are less costly and more energy-efficient.

    As Eliot Coleman says in his foreword to the first edition, “Food preservation techniques can be divided into two categories: the modern scientific methods that remove the life from food, and the natural ‘poetic’ methods that maintain or enhance the life in food. The poetic techniques produce… foods that have been celebrated for centuries and are considered gourmet delights today.”

    Preserving Food Without Freezing or Canning offers more than 250 easy and enjoyable recipes featuring locally grown and minimally refined ingredients. It is an essential guide for those who seek healthy food for a healthy world.

    I can’t stress how much food production is important for preppers.  I don’t care how much you store, you will eventually run out.  Being able to produce and store food is vital.

  • Kitchen DIY: Cooking in a Pressure Cooker

    Kitchen DIY: Cooking in a Pressure Cooker

    Kitchen DIY: Cooking in a Pressure Cooker
    Buy at Amazon

    In any disaster situation, energy is a premium. If you are cooking over a fire – every second of heat is paid for several times over with work finding, carrying, chopping, and stacking firewood. If you are using a petroleum based fuel you have to rely on your supply – which is something you may not be able to replace easily.

    Therefore, anything you can do to cook your food faster is something to consider. Besides energy costs – time saved cooking is time gained to take care of other things (which is useful outside of a disaster).

    Today’s article talks about one such time saving method of cooking. For simplicity sake we are going to use potatoes as our video example – but as you can see from the chart below – cooking in a pressure cooker works with all manner of foods.

    Cooking Times Chart

    Obviously many factors will influence you cooking times. Use this information as a guideline, but the actual cooking times may vary depending on your pressure cooker, heat source and the quality and/or quantity of the food.

    All times are for 15psi pressure using a cooking rack.

    For most vegetables, the cold water release method is recommended for tender-crisp results, and the quick release will produced a more ‘cooked’ result. Dense vegetables like whole potatoes and yams, or winter squash can benefit from the natural release. For instructions on the release method please look at the instructions at the end of the chart.

    Vegetables

    Cooking Times

    Liquid

    Release

    Artichokes, small whole, trimmed 4 to 5 minutes 1/2 cup Cold water or Quick
    Artichokes, medium whole, trimmed 6 to 8 minutes 1/2 cup Cold water or Quick
    Artichokes, large whole, trimmed 9 to 11 minutes 1/2 cup Natural release
    Artichoke, hearts 2 to 3 minutes 1/2 cup Cold water or Quick
    Asparagus, thick whole (fresh or frozen) 1 to 2 minutes 1/2 cup Cold water or Quick
    Asparagus, thin whole 1 to 1 1/2 minutes 1/2 cup Cold water or Quick
    Beans, green, or wax, (fresh or frozen) 2 to 3 minutes 1/2 cup Natural release
    Beets, small whole 12 minutes 1/2 cup Natural release
    Beets, large whole 20 minutes 1 cups Cold water or Quick
    Beets, 1/4 inch slices 4 minutes 1/4 cup Cold water or Quick
    Broccoli, florets (fresh or frozen) 2 – 3 minutes 1/2 cup Cold water or Quick
    Broccoli, spears 3 minutes 1/2 cup Cold water or Quick
    Broccoli stalks, 1/4″ slices 3 to 4 minutes 1/2 cup Cold water or Quick
    Brussels sprouts, large (fresh) 4 to 5 minutes 1/2 cup Cold water or Quick
    Brussels sprouts, small (fresh or frozen) 3 minutes 1/2 cup Cold water or Quick
    Burdock Root; cut 1 inch thick 10 minutes 1/2 cup Cold water or Quick
    Cabbage, any variety – shredded 2 – 3 minutes 1/2 cup Cold water or Quick
    Cabbage, any variety – quartered 3 to 4 minutes 1/2 cup Cold water or Quick
    Carrots, whole 3 to 5 minute 1/2 cup Natural release
    Carrots, 1 inch chunks 4 minutes 1/2 cup Cold water or Quick
    Carrots, 1/4 inch slices 1 minute 1/2 cup Cold water or Quick
    Cauliflower, florets 2 to 3 minutes 1/2 cup Cold water or Quick
    Cauliflower, whole 6 minutes 1/2 cup Cold water or Quick
    Celery, 1 inch slices 3 minute 1/2 cup Cold water or Quick
    Corn, kernels (fresh or frozen) 1 minute 1/2 cup Cold water or Quick
    Corn on the cob (fresh or frozen) 4 minutes 1/2 cup Cold water or Quick
    Eggplant, sliced 1/8- to 1/4 inch slices 2 to 3 minutes 1/2 cup Cold water or Quick
    Eggplant, 1/2 inch chunks 3 minutes 1/2 cup Cold water or Quick
    Endive, thickly cut 1 to 2 minutes 1/2 cup Cold water or Quick
    Escarole, coarsely chopped 1 to 2 minutes 1/2 cup Cold water or Quick
    Greens, Beet, coarsely chopped 1 to 4 minutes 1/2 cup Cold water or Quick
    Greens, Collard coarsely chopped 5 minutes 1/2 cup Cold water or Quick
    Greens, Kale, coarsely chopped 1 to 2 minutes 1/2 cup Cold water or Quick
    Greens, Kohlrabi, cut in pieces 3 to 4 minutes 1/2 cup Cold water or Quick
    Greens, Mustard, cut in pieces 3 to 4 minutes 1/2 cup Cold water or Quick
    Greens, Swiss chard, coarsely chopped 2 minutes 1/2 cup Cold water or Quick
    Greens, Turnip greens, coarsely chopped 4 minutes 1/2 cup Cold water or Quick
    Leeks, Whole, large (white part only) 3 to 4 minutes 1/2 cup Cold water or Quick
    Leeks, Whole, small (white part only) 2 to 3 minutes 1/2 cup Cold water or Quick
    Mixed Vegetables, frozen 2 minutes 1/2 cup Cold water or Quick
    Okra, small pods 2 to 3 minutes 1/2 cup Cold water or Quick
    Onions, whole 7 – 9 minutes 1/2 cup Cold water or Quick
    Onions, quartered 3 minutes 1/2 cup Cold water or Quick
    Parsnips, 1 inch chunks 4 minutes 1/2 cup Cold water or Quick
    Parsnips, 1/4 inch cubes 2 minutes 1/2 cup Cold water or Quick
    Peas, shelled (fresh or frozen) 1 minute 1/2 cup Cold water or Quick
    Pepper, whole sweet, or Bell (green, red, yellow), mild Mexican chilies 3 minutes 1/2 cup Cold water or Quick
    Potatoes, new, or small (2 inch diameter), whole 8 minutes 1/2 cup Natural release
    Potatoes, red, whole 10 minutes 1/2 cup Natural release
    Potatoes, red, halved 6 minutes 1/2 cup Natural release
    Potatoes, red, cubed 4 minutes 1/2 cup Cold water or Quick
    Potatoes, large baking-size russets, whole 25 minutes 1 cups Natural release
    Potatoes, russet, peeled & quartered 8 minutes 1/2 cup Natural release
    Potatoes, russet, 1 1/2 inch chunks or slices 5 minutes 1/2 cup Cold water or Quick
    Potato, Sweet, sliced or chunks 5 minutes 1/2 cup Cold water or Quick
    Potato, Sweet, whole 18 minutes 1/2 cup Natural release
    Potatoes, white, whole 7-10 ounces 16 minutes 1/2 cup Natural release
    Potatoes, white, half 10 minutes 1/2 cup Natural release
    Potatoes, white, cubed 4 – 5 minutes 1/2 cup Cold water or Quick
    Pumpkin, 2 inch chunks 3 to 4 minutes 1/2 cup Cold water or Quick
    Pumpkin, half of a 7-8 inch 10 minutes 1/2 cup Natural release
    Rutabagas, 1 inch chunks, peeled 4 minutes 1/2 cup Cold water or Quick
    Rutabagas, 2 inch cuts, peeled 6 – 8 minutes 1/2 cup Natural release
    Spinach, (fresh or frozen), coarsely chopped 1 minute 1/2 cup Cold water or Quick
    Spinach, fresh, whole leaves 0 minute 1/2 cup Cold water or Quick
    Squash, Acorn, halved 8 minutes 1/2 cup Cold water or Quick
    Squash, Banana, cubed 3-4 minutes 1/2 cup Cold water or Quick
    Squash, Butternut, 1 inch chunks 4 minutes 1/2 cup Cold water or Quick
    Squash, Butternut, halves 6 minutes 1/2 cup Cold water or Quick
    Squash, Chayote or merliton, halved 5 minutes 1/2 cup Cold water or Quick
    Squash, Chayote or merliton, peeled, 1/2 inch sliced or cubed 2 minutes 1/2 cup Cold water or Quick
    Squash, Hubbard 1 inch chunks 8 – 10 1/2 cup Cold water or Quick
    Squash, Patty Pan, sliced or cubed 0 minutes 1/2 cup Cold water or Quick
    Squash, Spaghetti, 2 lbs. whole or halves 9 minutes 1/2 cup Cold water or Quick
    Squash, Summer, or Yellow, 1/2 inch slices 0 minutes 1/2 cup Cold water or Quick
    Squash, Zucchini, 1 1/2 inch slices 2 to 3 minutes 1/2 cup Cold water or Quick
    Tomatoes, quartered 2 minutes 1/2 cup Cold water or Quick
    Tomatoes, whole 3 minutes 1/2 cup Cold water or Quick
    Turnips, small, quartered 8 minutes 1/2 cup Cold water or Quick
    Turnips, 1/2- inch chunks 5 minutes 1/2 cup Cold water or Quick
    Yams, 1/2 inch slices 6 minutes 1/2 cup Cold water or Quick

    Cold Water Release Method

    This is the fastest method, used to immediately stop the cooking process by lowering the heat AND the temperature. If an immediate release of pressure AND temperature is desired, the pot is carried to the sink and cold water run over the lid (but not the valve).

    Always position the cooker in the sink so that it is tilted at a slight angle. Let the cold stream of water run over top of the lid, but not directly over the vent pipe or valve, letting it rundown the side of the cooker to cool it quickly.

    If your faucet is too short to allow water to run over the top of the cooker use the sprayer attachment if available, otherwise partially filled with sink with cold water before setting the cooker in it.

    This method is mainly used for food with very short cooking times, or where it is essential to stop the cooking process as fast as possible. Use this method for serving fresh, tender-crisp vegetables, or delicate seafoods. Owners of electric pressure cookers do not have the cold water option, and that limits some of the foods and recipes they can cook.

    Precautions for the Cold Water Release Method

    NEVER run water directly over the pressure release vent or valve when using the cold water release method. Direct the water to the outer edge of the lid so that it runs down the side of the pot. A variation on this method is to fill the sink with several inches of cold water and then sit the pressure cooker in the cold water bath. (When the pressure cooker is removed from heat the air molecules inside the pot begin to cool and contract, and if the vent opening is blocked by the stream of water, then no air molecules can get inside to replace the volume. The air inside the cooker rapidly contracts as it cools so there is less air pressure inside the pot than outside. This creates a very powerful vacuum that can actually cause the lid (or the weakest area of the metal) to collapse as the vacuum sucks it down inside the pot.)

    Quick or Touch Release Method

    Some pressure cookers with this option can vent the pressure without lowering the heat of the food. There is a special release valve on some new pressure cookers that allows for the rapid release of pressure by just turning a knob or pushing a button.

    Precautions for the Quick or Touch Release Method

    Do not use the quick release method for foods that increase in volume, froth or foam, or those that are mostly liquids, like soup or broth because the contents could foam, or boil up and vent through the release valve.

    (Puffed cereals are made in HUGE versions of this type of device – cooked rice in a hot pressurized container is suddenly vented to normal atmosphere and the difference in internal pressure and external pressure causes the rice to puff – I wonder if this can be done in a cooker with this feature?)

    Natural Release Method
    This is the slowest method to gradually drop the pressure and the temperature to finish the cooking process. (This is the only method to use when you are CANNING)

    In this method you remove the pressure cooker from the heat source and to allow the pressure to subside naturally. If you are cooking beans, potatoes, or other foods which have a skin that you wish to remain intact, this is the preferred method.

    Use this release method for foods that increase in volume, froth or foam, or those that are mostly liquids, like soup or broth. Most meats and other long cooking recipes are finished this way to complete the cooking process.

    If you own an electric model, keep in mind that the heating element will retain heat and that will prolong the cool down period which may result in foods that are overcooked.

    Precautions for the Natural Method

    The food inside the cooker continues to cook throughout this slow cool down process. This method is commonly used for finishing large cuts of meat; foods that foam froth or expand during cooking; and foods that are mostly liquid, such as stock or broth. The natural release method should not be used for delicate vegetables or fish, or any food or recipe with very short cooking times.

    As you see cooking in a pressure cooker saves time and energy.  It is also extremely easy.

    I have even took this to another level as I just bought an instapot that adds a pressure cooker to a crock pot.  It makes cooking in a pressure cooker even easier.

  • Canning Funnel Review

    Canning Funnel Review


    Kitchen DIY: Canning Funnel
    Buy at Amazon

    I just wanted to share my favorite design for a canning funnel.  For those that don’t know, a canning funnel sits in or on the lip of mason jars to funnel whatever you are trying to preserve into the jar without getting crud all over the lip.

    This is important because if you have any remnants of food on the jar lid it can prevent the jar from achieving a seal.

    I have owned many kinds of canning funnels in my attempts at learning how to do things, but the type pictured is my favorite.  It has an outer cover as well as an inner funnel so it sits in and on the jar so it is sturdy.

    It also has measurements on the outside which help you determine headspace.

    All in all, I think this is the best type of canning funnel you can get.