I want to do two things in this article on the Pact III Club Timer;
I want to not only talk about what a shot timer is and why you need to use one in your firearms training program. Additionally, I wanted to review and demonstrate the Pact III Club timer.
If you are already familiar with shot timers you can skip the introductory paragraphs.
A shot timer is a chronograph that measures elapsed time
What makes it of use is that instead of having a button to start and stop a shot timer responds to the pressure wave of a gunshot. Most of them have a countdown timer attached to a buzzer. This buzzer allows for solo training. You can activate the timer and then wait until it buzzes to begin firing.
I think shot timers are invaluable to good firearm skill advancement. They give the shooter a way to measure the second half of the accuracy/speed equation.
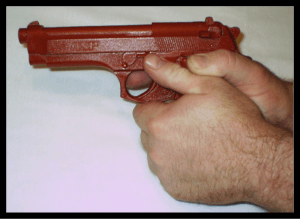
When working with shooters that are trying to increase their defensive capabilities with a pistol I like working with a 9 inch paper plate at 7 yards. We work on being able to quickly draw and put multiple rounds in the plate without missing. If the shooter’s target shows a tight accurate group then it is time to speed them up, if they miss the plate then they need to slow down.
A Timer is Objective
Having a shot timer lets the shooter get objective and measurable times. You can then compare them with past exercise times. It allows fact based observations. Being able to say “by changing my grip I shoot an average of .06 seconds faster” is more useful to a shooter than “this feels faster”.
To get full use you need to know the difference between split and par times.
Split time is the time between shots. This is useful if your exercise involves multiple rounds in a scenario.
Par time is total time, and is similar to the par at golf. If you set the device with a par of 7 seconds (which is a very respectable time for an el president drill) the buzzer will sound to let you start. Next then buzz will sound again at 7 seconds to let you know you hit the limit.
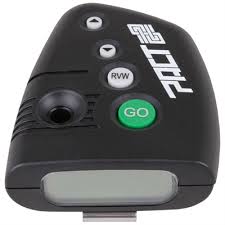
Timers, especially the Pact III are simple to use and only have a few buttons.
On this model you have four buttons; Go, Rvw (Review), and Up & Down arrows.
To use, simply press the go button and wait to hear the buzzer to initiate your training scenario.
If you look at the picture at the top of the article you will see the face of my Pact III timer.
At the upper left is the total number of shots fired in that string. You can see I fired 5 rounds.
The 41.16 is the total time measured to the hundredth of a second.
It is also the time that I fired my 5th shot.
At the bottom left, the .82 is the delay between the beep and my first shot.
Finally, the 39.43 is the split, the time between the 4th and the 5th shot.
Using the Review function will show you when every shot was fired. It will also show the splits between them.
In this case you can see that the delay between the fourth and fifth shot was almost 40 seconds. This left me with about one second to fire the first 4 shots.
Since you can also see it took me 8 tenths of a second to fire the first shot, the second, third and fourth shots were fired extremely fast.
You can correctly deduce from this, that I was just trying to make noise and was not firing very consistently or accurately…
The review button and the arrow keys to cycle through the shots. You can see the splits between each shot to get an exact picture of what happened.
In my opinion as a firearm instructor, I think that a shot timer is a vital piece of training gear. When used to evaluate your shooting and identify trends, progress and plateaus can make you a better shooter.
At around 125 dollars at Brownells. This piece of equipment can definitely make your training dollars more effective and help you become a better shooter.
To order a timer, or see one of the thousand of other great gun related items please visit Brownells from the link below.