Tag: fencing

  • Cutting Techniques: Four Knife Cuts That You As A Cook Should Know

    Cutting Techniques: Four Knife Cuts That You As A Cook Should Know


    Knife Cutting
    Buy at Amazon

    Working in a kitchen is not a child’s play, and those who work are completely aware of this.

    Cooking in the kitchen could be boring or fun.

    Those who find it boring are not experimenting at all, which is not right because kitchens are like laboratories.

    People should experiment with different food items in order to create something magical.

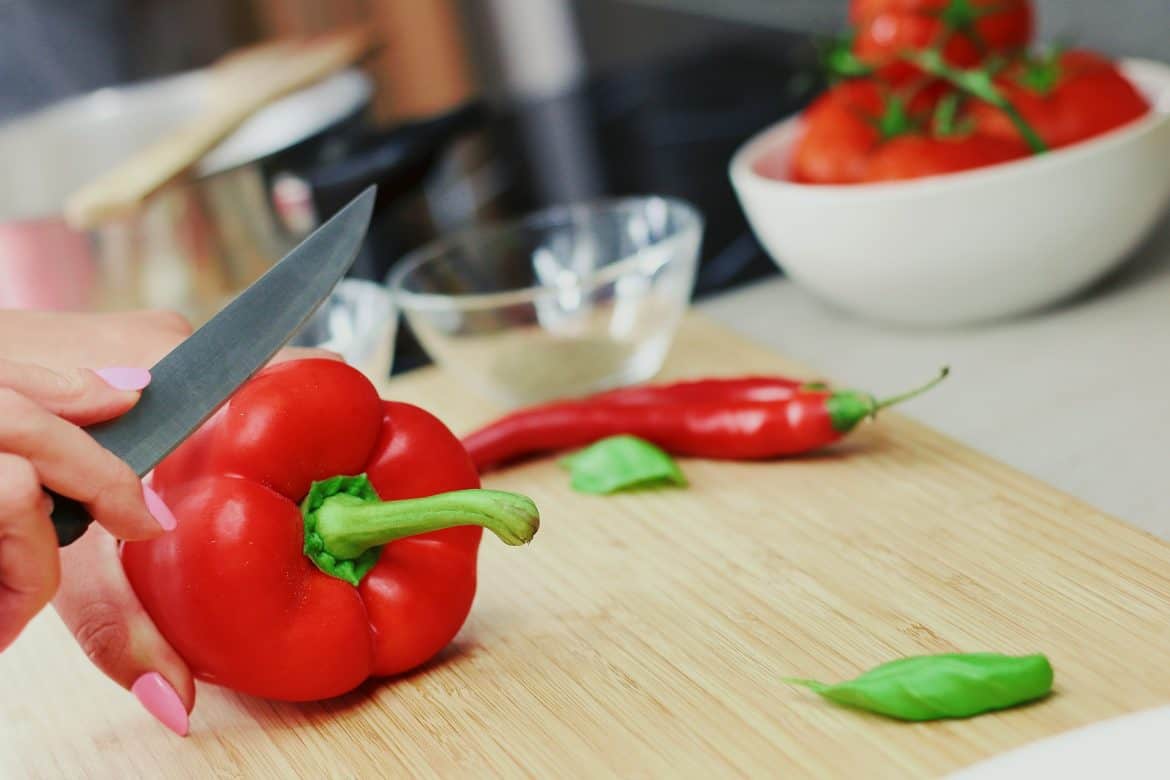
    One of the important kitchen related tasks is ‘cutting’. If you know how to cut properly, then working in the kitchen will be a lot more interesting for you.

    It is important for you to know how a knife cuts and in how many ways a knife can be used.

    But first, you need to have the best kitchen knife set for cutting vegetables.

    Four Main Cutting Strokes You Should Know:

    1. Slicing
    2. Chopping
    3. Back-slice.
    4. Back-chop.

    You can’t use all these strokes with a single knife, so you need to have a set of different knives that you can use for performing different tasks. For chopping and back-slicing, you can use santoku-style knives, whereas, for slicing and rock-chopping, you can use western-style curved blades.

    If you have no idea regarding using a knife for a particular stroke, then you will get a decent idea by the end of this post.

    The Slice:

    Slicing is a stroke with which you cut meat and vegetables. You can also cut herbs with a knife that is used for slicing. In order to slice vegetables or meat, you must place them on a solid and stable surface. Then, slice the food item in half followed by holding the food item with your free hand and curling your fingers to a claw. Tuck your knuckles underneath.

    The tip of the knife should be in constant contact with the cutting board with the angle of the knife in an upward direction. Press the knife in the downward and forward direction and use the entire length of the knife to slice food. Repeat the process using a circular motion, but make sure that the tip of the knife remains against the board all the time.

    The Chop:

    If you are looking for a precision while cutting your vegetables or herbs, then the concept of chopping is used. Chopping is same as slicing, but it’s just that chopping is done to style up the vegetables. For chopping, you need a very sharp knife in order to get precise cuts. The surface on which the vegetables are placed needs to be firm and stable. If chopping a long vegetable, then cut it in half. Hold the vegetable with your free hand and curl your fingers to make a claw followed by tucking your knuckles underneath.

    Use your knuckles to hold the flat side of the knife blade and life the knife above cutting board. Press the knife in the downward direction making smooth and even stroke. Move the knife in the forward direction to chop further. Lift the knife after one stroke and repeat.

    The Back-Slice

    This stroke allows you to cut vegetables or herbs into fine, small slices. While slicing herbs, you need to stack leaves and roll them up so as to create a bundle. Hold the bundle tightly with your free hand and curl your fingers into a claw followed by tucking your knuckles underneath.

    After that, place the knife’s tip against the cutting board with the rest of the knife resting against your knuckles. You should hold the knife at a very low angle and pull the knife in the backward direction after each stroke, as this will result in the slicing of the food properly. Don’t move the knife in the downward direction.

    The Rock-Chop

    This stroke is used to finely mince fresh herbs or zest. You don’t have to be that much precise while chopping as you were at the time of back-slicing. Just roughly chop the ingredients using the chop or the slice, then accumulate those into a small pile. Start rocking the knife up and down from one side and regather the ingredients in between. Keep repeating the process until you get finely minced ingredients.

    When accumulating the ingredients, make sure to drag the knife blade at a low angle to the cutting board as dragging the blade perpendicular to the cutting board is going to make the blade dull at a much faster pace.


  • New Fence as a Thief Deterrent

    New Fence as a Thief Deterrent

    New Fence as a Thief Deterrent
    Buy at Amazon

    After having a lot of small stuff stolen from the land, the thieves graduated to taking something of real value.My dad’s commercial grade backpack blower came up missing when he left the land for the day.

    Hopefully the new gate will make it harder.

    Now they have to either come from the neighbor’s place or through the woods. – I am working on things to prevent those types of threats also.

    Besides my new fence working as a Thief Deterrent, I also have a wireless camera on the way to help with catching them.

    Also, I soon hope to have my perimeter fence started, we found all the corners, and I have most of the posts.  I still need to clear the brush along the perimeter and get some more gates so that I can access areas when I need them.

    Right now, everything of value is locked in the shipping containers, but there are some larger items like the sawmill that are chained up.  I don’t feel comfortable with chains as any one low enough to steal would have no problem cutting a chain.  I want to set the sawmill trailer back up permanently and take the wheels off.

    However, I hope a gate and a camera will do a lot to tell the neighborhood crackheads that there are easier sources of pill money than my place.  However, that may be wishful thinking as getting caught is not even a good thief deterrent when the scum is a druggie.

  • How to Make Your Own Meat Curing Chamber

    How to Make Your Own Meat Curing Chamber

    How to Make Your Own Curing Chamber
    Buy at Amazon

    This post is about how to make your own curing chamber.
    Our ancestors cured meat to survive, so it can’t be that complicated, right? Well, as humanity has advanced so has the science of food preservation.  Curing meats is part of the cooking field called charcuterie.

    Curing Process Basics

    A combination of spices and drying methods preserve meats.   Modern technology allows chefs to finely tune the environment used for curing meats.

    Bacteria is unable to survive once the water content in a meat reaches a low lever.  This is also helped by having a high salt content.

    However, the ability to monitor the conditions of a curing chamber does not necessarily boost taste or quality.  Although it can help the novice charcuterie chef to develop a safe and efficient methodology.

    Control the Conditions:

    Even without modern technology, curing meat requires a certain control of environmental factors. The conditions that must be controlled during the meat curing process are temperature, humidity and air flow. Although you may be able to use a storage room, basement or other area for curing meat, the ideal area will be isolated from volatile external elements. For example, curing meat in a garage can expose meat to exhaust fumes as well as various temperature and humidity changes.

    For most people, building a meat curing chamber is the best option. The chamber protects meat from fluctuating conditions and can be closely regulated. Surprisingly, a meat curing chamber is relatively easy to construct.  It is between the beginner and intermediate DIY level.  Luckily it is also extremely inexpensive.

    Materials:

    An old frost-free refrigerator

    Search your local classified listings or Craiglist for an old refrigerator. Free is the best price and $25 should be the maximum. Remove the shelves as needed.  Perhaps leaving the top shelf as a hanging mount. There should be enough room in the bottom of the refrigerator for additional equipment.

    A Freezer Temperature Controller

    Those old refrigerators produce temperatures much too cold for curing. A Freezer Temperature Controller regulates the temperature of a refrigerator.  It works by turning power on and off to achieve the pre-set conditions.

    A Humidity Controller and an Ultrasonic Humidifier

    A Humidity Controller measures and regulates the power needed to reach the ideal humidity levels in your curing chamber,  As that occurs, the Humidifier adds moisture to the air.  Only add distilled water to your Humidifier.  Also, choose one that will power up automatically in response to the Humidity Controller.

    A Fan

    Humidity Controllers are built with a power outlet, and by connecting a power strip to this outlet, you can simultaneously power the Humidifier and a Fan. The Fan will circulate the air and disperse the moisture in the air.

    A Dual Temperature and Humidity Sensor

    This tool makes it easy to monitor the conditions of your curing chamber and can catch any discrepancies between measurements from your Freezer Temperature Controller or Humidity Controller. Additionally, a Calibration Kit is an inexpensive, optional tool that will ensure accurate measurements.

    Additional Notes: Recipes and Rodents

    Curing chambers are located in areas without a lot of activity.  However, this positioning, paired with food, can be rather inviting to rodents.

    If you are concerned about rodents, you may want to drill holes in the side of the chamber to run all electrical cords.  Small mesh openings provide airflow.

    In conclusion, your curing chamber is going to look awfully funny without any meat! You can find recipes. on sites like this one as well as Honest-Food.Net.  Honest Food has simple, straightforward approach to living and eating as our ancestors have.