Tag: military

  • How to Build an AR-15 Lower Build

    How to Build an AR-15 Lower Build

    AR-15 Lower Build
    Buy at Amazon

    I’m no lawyer, so check this yourself.  My understanding is that as long as you can legally own a rifle you can make one for your own use.  But you can’t build them with the intent to resale.  Additionally, the firearm you build must meet the legal guidelines in your area.   (i.e no 3 inch anti-aircraft guns).

    If you can do so legally, building your own rifle is a very worthwhile experience.  In this post we will show how we completed our own AR-15 lower build for much cheaper than what the same rifle would have cost already assembled.

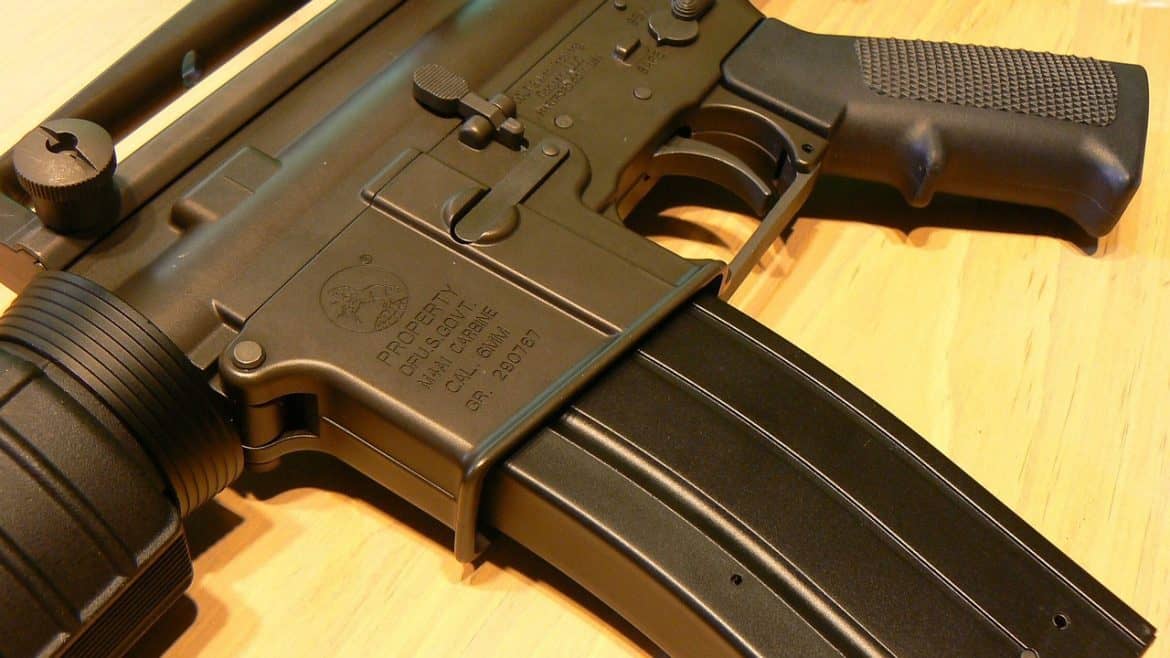
    When I bought my stripped AR-15 Lower Receiver, I had to give my $10 background check and thumbprint just like I was buying a functional firearm.  According to BATFE, a receiver is considered a firearm even if it is is not functional.  All the other parts are just “accessories”.

    This is the second AR-15 lower I have built.  It took me less than an hour.  I did not have any specialty tools to make it easier.  I would say that this is a simple project if you have good instructions.

    You Can get Good Information from Military Manuals

    You can use the military technical manual (TM-9-1005-319-23&P) but remember its for M-16s so some of the fire control parts will look different because your rifle is semi-automatic.  A simple search search on the internet for AR-15 construction guides will help.  Also you can always buy a book on the AR-15 in your local bookstore.

    TM 9-1005-249-14 is the operator manual for the M16 Rifle.  Like the technical manual, it is not exactly the AR-15, but it is close enough to work

    In our free downloads section I have a good amount of manuals and blueprints for the  AR-15/M-16.  I post them with the hope the manuals will help you.  I suggest you visit AR-15.com and look in their forums as they have great step by step instructions.

    Some Things Need to Be Done in Order

    Some steps can be done in any order, and some pins can be installed from either side, but some steps need to be done in sequence, and certain pins need to be placed a specific way, so be sure you get a decent set of instructions and follow them.

    I build my own lowers for two reasons, the first is cost.  I save about 100 dollars (sometimes more) by DIYing them, but I also like the feeling of taking MY gun to the range.  By putting one together you learn a lot about your rifle which makes troubleshooting and repair a lot easier.

    I had to split up the video into two parts and seriously cut it for time, as youtube has a strict 10 minute video policy.  Also for those that get torqued over someone calling a magazine a clip, there are several occasions where I misspoke a part name, you make me nervous….

    Part 1 of 2

    Magazine Catch, Trigger Guard, Bolt Catch Assembly, Pivot Pin Assembly


    Part 2 of 2

    Trigger Assembly, Hammer, Selector, Pistol Grip Assembly, Rase Stock, and function check


  • The Handgun (Home Workshop Guns for Defense & Resistance, Vol.  2)

    The Handgun (Home Workshop Guns for Defense & Resistance, Vol. 2)

    Book Review: The Handgun (Home Workshop Guns for Defense & Resistance, Vol. 2)
    Buy at Amazon

    Home Workshop Guns for Defense & Resistance Volume II is a clear and simple guide to building a semi- or full-auto pistol or a single-shot, falling-block handgun from common materials in the privacy of your home workshop.

    In addition to offering many alternative workshop gunsmithing tips, the author explains how each part and section of the gun is made and discusses thoroughly the subjects of heat-treatment and bluing.

    I haven’t built any guns more complicated than slam fire shotguns like what is illustrated in the improvised munitions manual or assembling an AR, but this is a fine book with easy to follow instructions.

    As long as you don’t make anything fully automatic or bigger than .50 caliber (and stay within all the other insane regulations) of the BATFE making your own guns are legal.

    I enjoy thumbing through Home Workshop Guns for Defense & Resistance – between it an Luty’s book on expedient homemade firearms I know that no matter what happens the citizenry of America will always have guns.

    I find that books like these (and the publishers willing to print books like these) are becoming more and more rare as our society changes.  It is my desire that every prepper household buys books like this to ensure that the information is always present in out society.  Ben Franklin would have wanted this also.

  • Home Workshop Guns Vol V the AR-15

    Home Workshop Guns Vol V the AR-15

    Book Review: Home Workshop Guns Vol V the AR-15
    Buy at Amazon

    Like the earlier Home Workshop Guns for Defense & Resistance, Vol. 2 – the Handgun, the latest volume in this popular and timely series offers detailed instructions, complete with photos and machinist’s drawings, for making a pistol-caliber AR-15/M16 entirely from raw materials, as either a rifle or pistol, open or closed bolt and in semi or full auto.

    I have put together several AR-15’s from stripped lowers and parts kits, and find that it is much cheaper to do it yourself, I also find that by putting your own rifle together from scratch you understand it.

    This book tells how to build your own AR-15 lower from square pipe.  This lower can either be used with a commercial upper receiver, or you can go deeper into the Home Workshop Guns manual to build your own AR upper also.

    These types of books are rapidly becoming non-politically correct, which is all the more reason for owning them.  I do not advocate breaking federal law by constructing homemade machine guns, but I do advocate knowing how.  During the Britich Bombings during WWI the country was unable to supply enough weapons to gear up for war, but bicycle shops and home workshops started mass producing sten guns.  The security of a free state depends on the populace being able to construct these machines in the event of invasion.

  • How to Install a Sling Swivel on a M6 Scout

    How to Install a Sling Swivel on a M6 Scout


    M6 Scout Sling Swivel Modification
    Buy at Amazon

    One of the first guns I ever bought for myself was a Springfield Armory M6 scout rifle. Like almost all owners of the M6 scout, I really like the concept, but I find it needs a sling swivel to really fit my needs.

    What is the M6 Scout

    For the uninitiated, the M6 scout started life as a survival item for Air Force pilots. It is a hinge action over under that breaks into two parts for storage. The air force version is normally a .22 hornet over .410, but mine is a .22 long rifle over .410. The actual military model’s barrel is shorter than the National Firearm Act allows for unregistered firearms, so the civilian barrel is about 4 inches longer. It has two cutouts on the sheet metal stock that are supposed to be improvised wrenches, but I have never attempted to use them. In my opinion, other than the size and weight of the gun, the best feature is that the butt-stock opens to hold 4 .410 shells and 15 .22 (only 9 if it’s a .22 hornet).

    While I am an unreconstructed tinkerer that loves messing with things, I am pretty conservative with my firearms, and do not modify them without having a clear and specific goal in mind. I don’t own any “safe queens” or Barbecue guns, all of my firearms are tools, primarily for my family’s or my own self defense. Over the years I have seen too many overly modified guns lose reliability with each “improvement” to the designer’s specifications.

    A Few Nice Modifications

    However, there were four areas that my scout needed improvement, and none of them modified the actual mechanical function of the firearm in anyway. Since the purpose of this gun is to forage in a E&E (escape and evasion) scenario its intended use makes it perfect for a GHB (Get Home Bag) kept in a car trunk. My first addition addressed this and was the purchase of the optional blue plastic case to hold both the gun, a 100 round box of .22 long CB caps and two .45 caliber bianchi clips that I stretched and forced 12 .410 shells into (an appropriate mix of 6 #6 shot, 4 slug, and 2 00 buck).

    Remove the Trigger Guard and Add Para-cord

    My next mod was to remove the trigger guard from the “trigger” which is actually a bar that you can squeeze with you entire hand if needed. All I did was pry the stock apart slightly and pull the guard out (its stamped steel).

    Next, I wrapped a long length of para-cord along the barrel as the gun does not have any furniture on it. This provides me with a cool place to put my hand if I somehow shoot enough to heat the barrel, and it gives me some cordage for emergency use. According to some, crewmen were taught to do this using paracord from their chutes if they ever bailed out.

    Adding a Sling Swivel

    My last modification, and the subject of the video below, was the addition of a sling swivel on the butt-stock. For years I have tried to find a factory sling swivel to attach to my scout. The barrel has a hole at the muzzle for attachment, but the butt-stock does not. The only furniture on the gun is a small rubber pad on the butt-stock, but the screw that holds it in is not substantial enough to do its designed job and hold a sling.

    While at the reloading store the other day, I saw a sling swivel for an AR-15 hand guard. I knew immediately that it would work. It was a normal QD swivel on a stud, a round spacer/washer, and an aluminum nut with a round base.

    Basically, I used a drill press to drill a hole the aluminum nut could fit into, then screwed the swivel stud into it through the washer. Later I may trim it up a little with my Dremel, but for now it works well enough for my purposes.