How to Cast Lead Bullets


Casting Lead Bullets
Buy at Amazon

First of all, let me just say, I am no expert at casting lead bullets and this article is only a basic guide to get started and to show you that this is do-able for the lay person. Please visit forums like cast boolits and read manuals like Lee’s Modern Reloading, and the Lyman Cast Bullet Handbook before you get too involved in this hobby.

Realize that man has been casting lead for thousands of years.  Our forefathers one several wars casting their bullets over a fire using nothing but lead, a spoon, and a mold.  Understand that this is something almost everyone can do.

Factor in the dangers inherent to molten metal, the toxicity of lead, and the engineering problems of casting for modern firearms with their higher tolerances and pressures.  Understand that there are steps you should take to ensure a safe experience and a good finished product.

First thing after doing your research is to find some lead. It is getting harder to find.  In my experience when I find some its free (or cheap) and there is usually at least 100 pounds.

The way I get my lead is either through asking on sites like craigslist, or driving around to tire shops. Some smaller tire shops will give you a bucket full (bring your own bucket) or sell it to you for $20. I know many people that just buy their lead at a reloading store or for about a buck a pound on eBay.

Wheel weights are about 95% lead, .5% tin, and about 5% antimony.  The tin and antimony are added to the lead in wheel weights to help the lead flow and cast a good weight.  I find this ratio of lead to be soft enough to make good pistol bullets without alloying any additional metals to the mix.  The problem with lead wheel weights is that they are not always lead.

A lot of modern weights are made of zinc. Zinc makes casting a nightmare as it makes the lead not flow as easily which makes your bullet mold not fill out properly.

You can do an internet search on this problem, and castboolits has lots of posts on this but:

You can ID zinc weights by hardness, sound, label, or melting point.

  • If you drop zinc on the ground it makes a ringing noise and lead makes a thud.
  • Most zinc weights are actually labeled as “Zn”.
  • I have also noticed that the zinc weights look cleaner than lead, but that may not happen all the time.
  • Zinc has a higher melting point than lead.  If any make it past the sorting process you have a second chance to pull them out before they melt.
    • Zinc melts at 787º F, Lead melts at 621ºF so it helps to keep your pot just hot enough to melt the lead but not enough to melt the zinc.

The way I do it is in steps.

Some years I go on a binge and drive around to every mom and pop tire shop I can find until I get 5 or 6 buckets of wheel weights.  Each bucket is about 75 pounds. I then take a Saturday and dig out my turkey fryer and a cast iron pot.  I only use that pot for lead.  Additionally, I always keep some solid lead in it to make sure its ONLY used for this purpose.  Next I sort and melt all the wheel weights.

Wear gloves as you would not believe all the extra junk that gets thrown in here.  You will find tobacco spit, razor blades, and all types little bits and pieces of all sorts of nastiness…

Do this melt outside (melt all lead outside).  Don’t breathe the smoke and vapor as lead is toxic to your body. Once the pot is full of nice molten lead, I will break off a piece of candle to flux off the oxides that form as scum on the top of the pot. I let that burn off.  Next I ladle the molten metal into my ingot molds.

You don’t have to have special molds.  I use an old muffin pan.  Just ensure that you never use it for anything else besides lead.

I have more than one ingot mold so I can ladle one as the other cools.

When I cast lead I keep a metal bucket nearby.  This is to collect all the steel wheel clips and other junk that comes off the lead. The scrap dealer gets this bucket.

By law it is not hazmat until it’s at the end of its life.  Consequently, as long as its being recycled it is not hazardous waste. If you get caught throwing this junk away you can get hit with HUGE fines.  To learn more check out the Comprehensive Environmental Response, Compensation, and Liability Act also known as the superfund law.

Once I have a couple hundred ingots I have enough to cast bullets for the year.

Personally I use Lee molds. I recommend Lee equipment (as long as its metal) as its cheaper and of good quality.  Some of their stuff (like the Shotshell loaders) take some handiness to get to work perfectly.  However, I have nothing but good things to say about their molds.

Since their bullet molds are aluminum, you don’t have to coat them in oil after use to keep them from rusting.  This means they are really easy to work with.

However, since they are aluminum they aren’t durable enough to use professionally.  This means dont use them to cast thousands of rounds a month. I cast several thousand rounds a year and have done so for several years though and have not had any problems.

The Process is Simple.

Melt your ingots. I use an electric bottom pour pot, but you can use almost anything as a heat source if you have a ladle.

Preheat your mold. I keep mine on the edge of the pot so it gets warm with the lead. If the mold is not hot enough, the lead will solidify as it enters the mold and will not fully form the bullet.

Lube your mold at the pins and moving surfaces,  Don’t lube the mating surfaces.  Ensure you use lube not alox.

This next part takes practice, and is best done than read about.

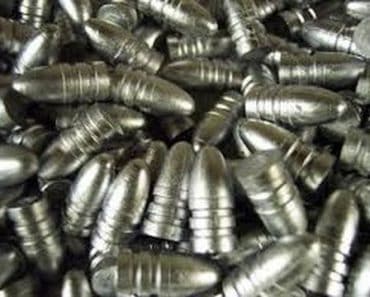
Fill the mold with melted lead. I find my first couple attempts each time never seem to fill completely.  However, as the molds heat up I quickly get back into the game. I find that if I tilt the mold SLIGHTLY and start at the far end of a 6 mold block and pour the lead at the chamfer at the top of the sprue plate rather than directly into the hole it tends to fill better. As I fill each bullet mold I make sure to leave a little puddle of lead at the top of the sprue.  This is because the lead will shrink as it cools.  The puddle gives the bullet some additional lead to pull from as this happens.

As the lead cools and solidifies, but before it becomes totally solid I take a hardwood stick (wood never metal) and give a good sharp wack to the sprue plate.  This cuts off the sprue of metal and gives a flat base to the bullet.

If I am casting blackpowder bullets that need to be really soft.  I then open the mold and dump them out onto a slightly damp towel folded up nice and thick.

If your casting bullets for centerfire pistols and especially rifles (that will also require gas checks) the bullets need to be harder.  In that case, I drop them into a 5 gallon bucket of water and the sudden cooling helps harden them.

Here is a word of warning.

If we ever meet you can see the scar on my hand and the little shiny bits on my boots. Never, ever, EVER allow anything wet or moist near your lead pot. If you do it WILL explode. Steam is created in the pot faster than it can be released.  A single raindrop will cause a huge bubble of molten lead to coat what ever is closest to the pot. (I know this as I gilded my hand once… luckily only the thickest glob of lead burned me sever enough to scar.)

If you drop a bad bullet into the bucket, or damp towel then pull it out and save it to melt the next time. You can and should re-melt your sprue plates in your pot as they are hot and will melt quickly.

Like I said before, I use Lee’s molds, and mine don’t require sizing, so I am not going to get into that in this article, but depending on the mold you may need to lubricate and size your bullet with a special die for your reloading press. I will do an article on that later if needed.
Casting bullets is not hard, its kinda fun, but you need to be cautious and pay attention to detail. If you are reloading to save money, then this is a nice skill to pick up, but if your reloading in preparation for a time you cannot buy commercial ammunition, then this is an essential skill to put in your tool box.

Quick and Easy Tips to Make Sure Your Household is Prepared

Emergency Management Principles for Prepping

Emergency Management Principles for Prepping
Buy at Amazon

Just like everybody else, I am unique. In the disaster prepper field I am unique in that I am both a diehard personal prepper and a college trained emergency management professional. I did not become one because of the other; my personal preparedness mindset comes from my parents, as well as my internal system of ethics and belief structure.

My career path grew out of my military and correction background. However, even though they are separate, I find that my skills in one translate to the other even though the goals of the two are not always identical.

I would like to take a few moments and describe how you can take government emergency management doctrine and personalize it as well as scale it to your needs.   Here is information on how to use emergency management principles for prepping.

The first thing I grabbed from my training manuals to apply to my personal emergency plan is the all hazards approach. I have seen people jump into panic mode over single issue events like Y2K, 2012, New Madrid, CME, or whatever is going to kill us all on exactly 12 pm Sunday whatever…. These people then run around and throw money at their fear, and then feel taken when whatever disaster failed to occur. But just like government evacuation orders – If they call for an evacuation, and people leave, but nothing happens, the next time nobody wants to evacuate. In the case of Y2K so many people that prepped for it, that once it did not happen they now have a bad taste in their mouths about prepping and won’t “fall for that again”. With an all hazards approach, rather than spend all your energy prepping for a specific event, you build capabilities that help with ANY event. As I tell my students, When your doing CPR on me, I don’t care if my heart stopped because I was electrocuted, was shot, or ate too many hamburgers with too little exercise – I just want you to keep pumping…

The next thing I took was the cyclical nature of disaster and the 5 phases of emergency management. You have a planning phase where perform a risk assessment and then make plans based upon your threats and hazards. Once you begin planning, you move into the preparedness phase where the planning takes shape – you take training to better prepare. The lists you wrote in the planning phase become deep larders and tangible goods. Along with preparedness and planning you need to worry about mitigation. What can you do to make the disaster either less likely or less disruptive? Personally I have to plan for the New Madrid Earthquake, so I make sure my water heater is strapped down, and my shelves of glass mason jars are secured so that the jars cannot fall off and break. Appropriate amounts of insurance are a mitigation step we all can get. When disaster strikes (We don’t know WHAT or WHEN it will happen, but rest assured you will have an emergency at some point in your life) you enter the response phase where you have to deal with your incident priorities of

1. Life Safety (Pull the people from the burning building)
2. Incident Stabilization (Keep the fire from getting worse and spreading)
3. Property Conservation (Put the fire out and save as much of the building as possible)
4. Environmental Conservation (Keep the runoff of water from polluting the creek)

Once the emergency phase is over, recovery mode begins. At some point you have to get back to normal. Even if it’s a catastrophic event that ends in TEOTWAWKI, you have to create a new normal. It’s critical to understand that these phases blend into each other and the lessons learned from one disaster turn into the planning phase to improve your plan. But keeping the cyclical nature in mind, as you create a plan of action based upon your most reasonable estimate of your hazards you need to test and refine, then retest and refine some more. The more you sweat now, the less you bleed later.

Mutual Aid Agreements and Memorandums of Understands is common among government jurisdictions and agencies. During a disaster everybody wants to help, but knowing who is responsible for what and what their capabilities are is very helpful. Its also important to spell out how damaged or used equipment gets replaced. Two weeks into a multi year grid down disaster is not the time to get into a fight with your neighbor over who gets to use the tractor first. Of course OPSEC is a priority, but no man is an island. The time to network is now.

Have a plan, but be willing to scrap the plan if it does not work. I tell my students that before you can think outside the box, you better understand everything about the box. The very act of planning helps with response. The more you think about your capabilities and what you would do in situations the better prepared your brain is to react flexibly to a situation. Your mind is a wonderful creation, but you have to program it to work. If you’re worried about disasters your program it by creating disaster response plans.

The last concept of emergency management I will share today is incident command. This system came out of the California wildfires in the 70’s. Military vets turned fire jumpers created a management system called fire scope to deal with the rapidly changing fire situations. After the attacks on 9/11 the lack of communication, coordination, and chain of command was identified as areas we needed improvement on. ICS was then adopted as the national standard and all responders in all disciplines were mandated to be trained to a basic level. Free training in the incident command system is available online at the FEMA training website. The ICS system is a flexible system geared toward emergency events. This flexibility is derived from a few essential concepts:

• There is only ONE overall commander.
• The incident commander is responsible for everything, but can delegate roles to qualified staff based upon incident complexity and size
• Span of control for optimal leadership is 5-7 individuals under a supervisor.
• Everybody reports to only one supervisor, and everyone knows who their supervisor is.

Obviously there is more to the system, but it allows anyone trained in incident command to rapidly integrate themselves into the command structure because it has clear roles and responsibilities. Knowledge of this system is important because EVERY responder has been trained in this system and it will provide the basis of ANY response. It does not matter if your dealing with a volunteer fireman or a military civil support team, any agency with a role in emergency response has to have this training to receive federal funding. While I don’t agree with the mandate, I have seen this system work several times, and the disasters I have worked that were not as successful as others also deviated from the plan more than the others.

The more you understand about the ICS system the more you will know what to expect from the government. The other reason you should learn about this system is that it works if you apply the fundamentals. It does not matter if you’re working in a government agency, a local neighborhood preparedness group, or a family these concepts are timeless and reduce confusion.

Besides concepts and theory on emergency management FEMA has also created many courses in disaster preparedness. Many of these are geared to first responders, but at this time, most of them are available free of charge to civilians. If you visit the FEMA training website the Emergency Management Institute (EMI) has a distant study program, and has classes in Radiological Response, Hazardous Materials, Guides to Disaster Assistance, Active Shooters, Dam Failure – literally almost any aspect of interest to Federal emergency officials. I have personally taken several hundred hours worth of their courses and while distance education is not as good as hands on with a qualified instructor, the materials are a very handy and inexpensive resource to put back in your binder.

For neighborhood organization and home preparedness, don’t overlook the Citizens Emergency Response Teams. I wish this program would have caught on in more areas, but you can download the training materials for free without any sort of login or identification.

Knowledge is power, and by taking the concepts our federal government has spent billions developing and testing in real life incidents in both large and small scale will give you a head start in creating and employing your own personal preparedness plan.

How to Pull Bullets The 2 Best Methods

How to Pull Bullets: The 2 Best Methods


How to Pull Bullets: The 2 Best Methods
Buy at Amazon

Some Shooters like to reload, so do many preparing for TEOTWAWKI or WROL, it’s also a skill for those like to DIY or roll their own.  Many of the types of people that visit my sight reload themselves or are interested in it.  Therefore, I am going to start publishing articles on reloading and reviews on some of the equipment I have.

That being said, I am a relative novice with reloading.  I do hold instructor credentials in this field, but I stick to published loads and am pretty conservative when it comes to reloading as I don’t like unplanned explosions….

Before we do any serious reloading I want to cover one thing very well, you are going to have waste, you’re going to have mistakes, and your going to have to be able to take ammunition apart – mostly to recover components, but also to prevent anyone from attempting to shoot your goofs.  This post will show the two main ways of how to take apart your mistakes – otherwise know as How to Pull Bullets

There are two main ways of pulling bullets from their case, and each has individual’s drawbacks and benefits so you would be wise you invest in equipment to do both.

The cheapest and simplest way to deconstruct ammunition is to use an inertial puller.

Inertial Puller

How to Pull Bullets
Click to View on Amazon

This is basically a plastic hammer with a hollow head.  One end unscrews and the cartridge is placed bullet down inside a special collet and the end screws back on tightening the collet on the head of the cartridge.

When the puller is smacked briskly down on a block of wood the cartridge stops moving, but the law of inertia makes the heavier bullet to want to continue to move.  With enough raps of the hammer the bullet will eventually slide out of the cartridge case and be collected in the hammer head along with any powder that was inside the case.

The collet is made out of three small pieces of metal and a small rubber band, and some reloaders find it to be pain in the neck to use, some resourceful reloader began using shell holders instead of the collets and the trend caught on UNTIL a couple shells detonated in the puller.

ANYWAY, this should not turn you away from inertia pullers, just using them incorrectly.

This type of puller costs around $15-$20 and works best with pistol calibers with heavier bullets.  Bullets like .223 or with a heavy crimp may not come out at all, or at least without a lot of effort.  For cartridges of that type you may need a collet puller.

Collet Puller

How to Pull Bullets
Click to View on Amazon

A collet puller screws into your press just like a die, and is used in much the same way.

The round is placed in the ram’s shell holder and then raised into the collet die.  The collet is then tightened around the bullet and the ram is lowered.  This separates the case from the bullet.

You get much more mechanical leverage this way.  It works on rounds that cannot be broken down with the inertial puller.  The powder also stays in the casing, unlike in the inertial puller.  This lets you recover it more easily.  If your doing a lot of deconstruction, this method is faster than the inertial puller.  You must be careful or you can tighten the collet too tightly on the round.  This leaves either “pull marks” or is may change the size or shape of the bullet.

A collet puller starts around $15.00.  Unfortunately, you will have to buy a collet for each diameter of round want to pull.  A collet costs around $10.00.

Personally I like my inertial puller the best when I am only doing one or two rounds.  It is fast and not a hassle to set up.  However, when I have a lot of rounds to dismantle, I use the collet puller.