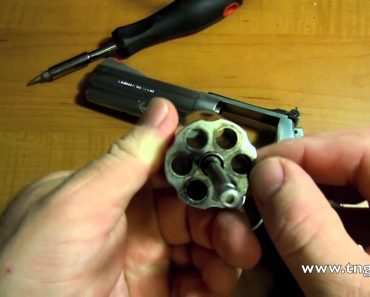
Do you want to know how to easily remove carbon from a revolver cylinder? It is easy. Remove the cylinder from the revolver first.
I really love shooting revolvers.
(I love shooting double action so much I modified my Glock 17 to have a trigger that is more like a double action revolver.)
However, cleaning the cylinder is not something I enjoy, rubbing lead remover cloth around the face of the cylinder has always annoyed me because the crane and extractor rod always get in my way.
When I was going through the TN Department of Correction firearm instructor course (TDOC uses revolvers at its institutions) I learned this really cool trick.
How to Remove a Revolver Cylinder
If you remove the screw that holds the cylinder crane to the frame the crane and the cylinder will slide out. This will allow you to easily clean the cylinder.
The cylinder will slide back in the firearm when you are done. (Generally this is the single screw right below the bore end of the cylinder, on the frame, on the side opposite the cylinder release)
Do not over tighten the crane screw. If you do, the revolver will not easily open and close. Use proper screwdrivers, as this is a common place to “bugger” up your gun.
This tip is pretty simple, just don’t loose the screw, and always use the proper screwdriver for the screw.
According to Wikipedia Massad Ayoob is an internationally known firearms and self-defense instructor. He has taught police techniques and civilian self-defense to both law enforcement officers and private citizens since 1974.
He was the director of the Lethal Force Institute (LFI) in Concord, New Hampshire from 1981 to 2009. Ayoob now directs the Massad Ayoob Group (MAG).
More than that bio Mr. Ayoob writes some of the best firearm books on the subject of the legal aftermath of a self defense shooting. I widely quote his work in my classes, and recommend his books courses and videos to my students.
I own his stressfire books, and am happy to share this clip of him explaining the stressfire reload for revolvers.
What I like about the stressfire system is that it explains current training methods and shooting techniques, dissects them and then shows his techniques with explanations of why they solve current problems. It advances current techniques rather than supplants them.
An example of this, while I teach the FBI method of revolver reloading, the revolver can get hot after firing numerous rounds and that is uncomfortable. In the stressfire reload for revolvers the way you hold the gun prevents burns.
This prepper precept is one I teach often when discussing why laws are written they way they are.
Common sense cannot be legislated. Laws are made in a vacuum by people that don’t always fully understand the problems. I don’t go looking to laws to see if I CAN do something. My right to liberty says I can do whatever I want. That is unless a law specifically prohibits it. However, depending on the situation, I’d rather be in jail than dead.
I am no anarchist. Actually, in my circle of friends I am the annoying one that mentions the law. So I tend to be the guy that prevents us from doing the cool things we want to do. I know prison first hand and it is not for me. Fortunately, I can handle prison much better than living with knowing a loved one got hurt because I was afraid to break a rule.
Remember that just because common sense cannot be legislated that does not believe senators and congress-critter that think islands can tip over if you put too many people on them sure will try.
These precepts are my creed, and having prepper precepts guides me when I face tough choices. A wise man once told me that when facing a moral problem, the right choice is usually the action you don’t want to take.
I am not a pollyanna person that is wishy washy or blindly follows rules, heck I have a little rebellious streak and love to know the WHY of rules, but I do respect and understand the need for law and know how vital it is for a society to have a moral code.
By knowing what I believe in you can know how I will act. This is very important in times of stress. If you don’t want to read these precepts one by one, the completed list can be found here: Completed 27 Prepper Precepts.
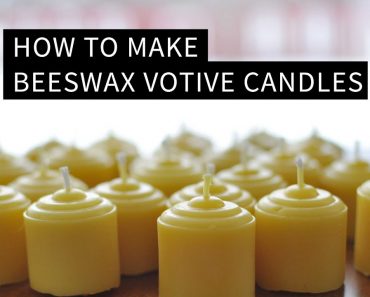
When I got into beekeeping I wanted the wax as much as I wanted the honey. Beeswax can be used for hundreds if not thousands of things. It is great bullet lube, helps hold bow strings together, has medical and cosmetic uses, and makes a great additive to woodworking varnish. But one of the biggest uses is candle making. Beeswax candles have some great advantages to paraffin based candles.
They are renewable and natural – bees make more wax each year. They burn cleaner and longer than paraffin, unlike paraffin candles they won’t deposit soot in your home. Beeswax burns brighter than paraffin, and is more similar to sunlight. Beeswax candles don’t drip wax.
I guess the only downside of beeswax is the cost. Because paraffin wax is a by-product of oil refining, there is a lot more of it so costs are lower.
However, even cost can be mitigated if you keep your own bees and make your own candles.
Be Safe While Making Candles
Before we get into How to Make Beeswax Votive Candles, I want to give you two safety caveats.
Beeswax gets HOT. I have melted several plastic measuring cups and molds working with it. It is also very flammable. If you are not careful and use a stove without a double boiler you will most likely have a fire. Never leave heating beeswax unmonitored.
It’s not really hard to do; all you need to start is just get a mold, some wicks, and some beeswax.
Melt Wax
To melt my wax, I used wax that I had previously strained. Raw wax will have bee bits and other unattractive items. If you don’t have any hives, or a friend with hives to barter with, you can buy beeswax from a craft store or order it online.
To melt it, you either need a double boiler (in a pinch you can use two pots – just make sure they are Pyrex or stainless steel. Anything else will probably stain your wax.) I used a Pyrex measuring cup and a couple minutes in the microwave.
The microwave method can get the wax super heated, so I run it long enough to get some wax melted, and then use what litte patience I have to let the melted wax melt whatever is left. If you run your microwave until all the max is melted it will be VERY hot, and can melt plastic….
Mold Candles
For a mold I bought a multiple votive mold from a bee supply store, but you can use just about anything. I have heard paper Dixie cups work outstanding, but I heard that after I dropped money on the metal mold. For wicks I bought a bag of pre-tabbed wicks that were cut to length and have a little metal mounting tab attached. You can buy a roll of wick if you want, but its more trouble to make it stick in the bottom of your mold. If you were using paper cups, generally you would need to punch a hole in the center and run the wick up through the cup and tie the end of the wick to a stick to hold it in place.
Add Wick
With a pre-tabbed wick, all I did was put a little dab of melted wax in the mold and stick the tab to it. Once that hardened, I poured a little more wax to cover the tab and let that harden. I then slowly poured the rest of the wax to fill the mold. You will need to pour it in slowly, as you don’t want any air bubbles.
Beeswax needs to cool slowly or it will crack. The larger the candle the longer it will take to cool. As it dries the top will shrink and may leave a little depression around the wick. The wick hole might also enlarge. Either can be fixed by pouring a little hot wax to fill it in.
Once the candle completely hardens, I turn the mold over and gently tap the bottom to knock out the candles. Just like with my interpersonal communication, gently doesn’t always work, in that case, I grab my stick and beat the fire out of the bottom of the mold until the stubborn candles drop free. If I was cheaper and used paper cups I would just peel the paper off.
If there are imperfections in the candles, and I am giving them away, I just use a little heat from my hands, a heat gun, or a quick dip in hot water to soften the wax and run the imperfection away.
After that, I just store them is a cool spot until my wife gives them away to her friends…
This video is an older (1999) video from the US Marine Corps dealing with the fundamentals of Marine Corps marksmanship. Every Marine is a rifleman, and the Corps prides itself on its marksmanship training.
This video may be old but its message is timeless.
(it was created in 1999, the year I was discharged)
Being a marksman is a vital skill for preparedness. Ammunition is only going to become more expensive and harder to find. The day is looming that ammunition will be registered or otherwise strictly controlled.
Being able to get rounds on target quickly and efficiently without waste is a key skill.
In my years as a firearm instructor I have learned that marksmanship is partly knowledge (knowledge that is found in the great video below.) but is also the willingness to apply that knowledge and the discipline to practice when it is not convenient, easy, or fun.
I learned to shoot a rifle in the Marines, and while I am rusty, some things are never forgot.
Due to the quality of Marine Corps rifle training, I can pick up a rifle and remember the hours spent aiming at the white drum pained with targets. One thing the Marine Corps does well is make riflemen out of teenagers.