How to Start Spoon Carving


Basic Spoon Carving
Buy at Amazon

Spoon carving is one of those things that can be very elegant and skill intensive.  Alternatively, it can be simple and functional.

There are a lot of specialized tools available and much in the way of instructions online.

Today I just want to go into the basics of spoon carving.  I don’t have a lot of instructions here.  This is so that someone that is interested can start, but not be overwhelmed.

The tools needed are pretty simple and inexpensive as spoons have been hand carved for thousands of years.

As I showed in my 52 Prepper Project for Kids book, the depression can be burned out with coals.  However, most use hook knives.

You Do Not Need Much to Start

Simply purchase a curved hook knife like the one shown from amazon.  You will also need a simple knife, some sandpaper, and a little bit of edible oil.  That is all that is truly necessary if you are carving from a blank.

A pencil and a small axe are helpful.

Start by designing your spoon and drawing the rough outline on the blank.  I like to start with the bowl.  This is because I don’t want to spend time carving down the handle and then ruin the spoon during the depression carving.

Once the bowl is formed I carve around it to form the rounded spoon form.

The last carving step is to trim down the handle.  That is the simplest part.  Also, I like having the leverage of the thick wood blank as I form the spoon head.

Once the spoon is fully carved, sand down the spoon.  That is to remove the tool marks and make it smooth.

Let it dry slowly and then coat with an edible oil to protect it.

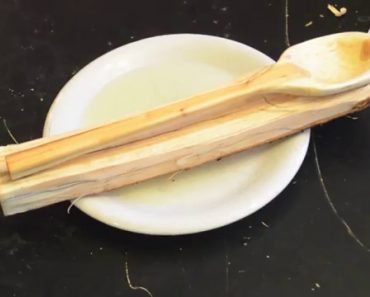
Do not use oils like olive oil as they go rancid with time.  Many like to use tung or walnut oil, but some are allergic to nut oil.  In the spoon pictured above I used normal canola oil from the grocery.

Operating Techniques for the Tractor Loader Backhoe

Operating Techniques for the Tractor Loader Backhoe
Buy at Amazon

In trying to develop my homestead, I have had problem after problem with my backhoe.  Granted most of it is because it is a 50 year old machine, but a good deal comes from me not having  clue how to operate it.

That’s where Operating Techniques for the Tractor Loader Backhoe come in.  The book teaches essential pre-operation checks, vital services, and the basics of how to actually dig and trench with a backhoe.

This book was actually designed to be a textbook so each chapter has tests.  It also spends time talking about the one-call system so you won’t disrupt utility lines.

I find this book to be helpful.  While not essential, it will save the new backhoe operator a lot of headaches and time wasted with inefficient movements.

It took me a while to get the movements down to use both hands at the same time to dig a flat and smooth trench.  If I had this book at the time I would have saved hours in learning a relatively simple, yet unobvious technique.

A backhoe is a very useful tool for those wanting to develop land.  It doesn’t move as much land as a bulldozer, but it is more versatile.

How to Baton Wood With a Knife

How to Baton Wood With a Knife

How to Baton Wood With a Knife
Buy at Amazon

Batoning wood is a common bushcraft/survival technique in which a strong knife.

The technique can be used to split wood.

I am showing it here because it is a good technique and useful and is necessary to know to get to my next post – which is basic spoon carving.

How to Baton Wood

Equipment:

  • A knife with a strong spine.  My USMC issued Ka-Bar is perfect
  • A baton (I used a stout piece of limb – which is also perfect)
  • Something to split

Procedure:

  • All you need to do is to set the log to be split up on its cut end so it stands vertically.
  • Next, the knife blade onto the log so that the blade is orientated where you want the split to occur.
  • Hold the knife handle and tap the spine of the blade smartly and evenly with the baton.
  • Finally, the blade will be driven into the log and a split will develop.

Similarly as using a froe to make shakes (split roofing shingles), you can turn the knife handle to cause the knife to exert pressure into or away from the split to make the split thicker or thinner (this takes some experience).

Do You Really Need to Baton Wood?

Bladeforums has an interesting discussion on the situations in which you would actually need to baton wood.


The Last Lecture

Book Review: The Last Lecture
Buy at Amazon

A lot of professors give talks titled “The Last Lecture.” Professors are asked to consider their demise and to ruminate on what matters most to them. And while they speak, audiences can’t help but mull the same question: What wisdom would we impart to the world if we knew it was our last chance? If we had to vanish tomorrow, what would we want as our legacy?

When Randy Pausch, a computer science professor at Carnegie Mellon, was asked to give such a lecture, he didn’t have to imagine it as his last, since he had recently been diagnosed with terminal cancer. But the lecture he gave–“Really Achieving Your Childhood Dreams”–wasn’t about dying. It was about the importance of overcoming obstacles, of enabling the dreams of others, of seizing every moment (because “time is all you have…and you may find one day that you have less than you think”). It was a summation of everything Randy had come to believe. It was about living.

In this book, Randy Pausch has combined the humor, inspiration and intelligence that made his lecture such a phenomenon and given it an indelible form. It is a book that will be shared for generations to come.

“We cannot change the cards we are dealt, just how we play the hand.” –Randy Pausch

This book means a lot to me, I had a definite change in career destination once I watched the Randy Pausch’s TED talk on The Last Lecture.  He words can change your life and is worth reading.

If it were up to me this book would be taught in schools, colleges, and employment training throughout the US.

How to Make a Meatball Roll


Meatball Rolls
Meatball Rolls

My wife loves make ahead meals, it is so much easier when you have precooked and packaged lunches and dinners for the week. I like them because cooking is cheaper than eating out, and having foods prepared in advance lessens her stress and the likelihood of my getting yelled out (for something  I probably deserve – but nonetheless).

However, with her strict diet, I get to make whatever I want since she doesn’t eat what I do, and I don’t have the desire or willpower to stick to hers.

Meatballs are a Easy Meal Prep

This means I make a lot of meatballs, as they are easy, flexible, cheap, and store well.  This post shows a recipe for a baked meatball roll that is awesome for a lunch or easy dinner.

I don’t show how to make meatballs, as I have both done this earlier, and it is dead simple.  Whatever your meatball recipe make 8 or so of them and get some premade pizza dough (the whomp biscuit kind), some cheese, and some sauce.

Once you have all the ingredients for your rolls, open the dough and cut it in half lengthwise, and cut the half’s in half width-ways to make 4 equal “squares” that are probably a little rectangular.

stretch the dough a little to make it thinner and larger, then simply add a couple spoonfuls of sauce in the center of each bit of dough, add two meatballs and some cheese over the sauce and then close the dough by folding over the ends and the sides.

Preheat the oven to 425 degrees Fahrenheit and place the dough on a cookie sheet, edge side down.

Bake for 15 minutes and remove to either heat fresh or let cool completely and store in sandwich bags for the next days lunch.  Either way, this is a great make ahead meal.