Category: Fishing | Boating

  • How to Make a PVC Fishing Button

    How to Make a PVC Fishing Button

    How to Make a PVC Fishing Button
    Buy at Amazon

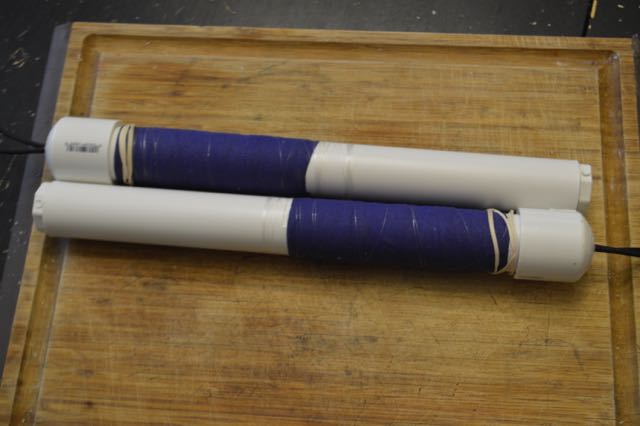
    I first saw this Fishing Button on a Doomsday Prepper video from Scott Hunt, but I have also seen it in many other places online.

    After making some modifications of my own, I decided to make a couple to stick in my bug out bags.

    It is smaller and lighter than the other PVC fishing pole used in project 26 of my 52 Prepper Project’s Book, and much more efficient to use than the sinkers in chapter 37 – which places it straight in the middle of your options.

    Depending on how much you like to fish, how good you are at it, and how likely it is that you will encounter areas where you may end up fishing while out exploring you may want to keep one or more of the three options available to you.

    As I have said online, in print, and in person, I think PCV is one of the DIYer’s best materials, and anyone with a little imagination can use this inexpensive material to solve all manner of problems them may have.

    Material:

    • Small plastic fishing bobber
    • PVC end cap – size needed is determined by the size of your bobber. The easiest thing to do is to buy a bobber and take it with you to the hardware store and match it up.
    • Small fishing hook
    • Lead split shot sinker
    • Fishing line
    • Small washer
    • Rubber band

    Tools:

    • Hacksaw blade
    • File
    • Small drill bit and drill

    Procedure:

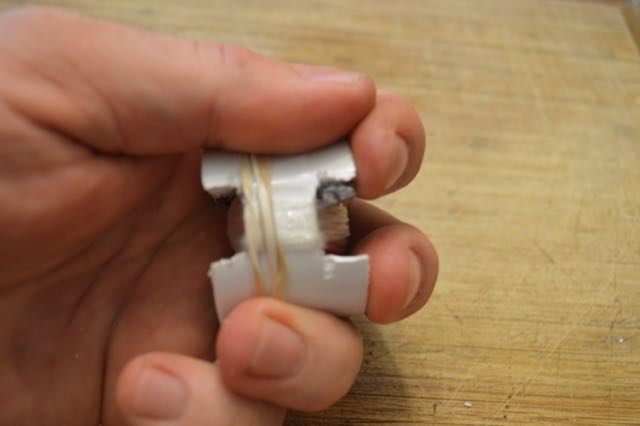
    1. Cut two slots ¼ inch deep and about 1/3 inch apart on the bottom end of the PVC Cap.
    2. Turn the cap on its side and carefully saw the plastic to connect the slots cut into the PVC cap.
    3. Once the connecting cut is deep enough, snap the square of plastic between the two slots off of the PVC end cap.
    4. Flip the cap over and repeat steps 2 and 3 on the other side of the cap.
    5. Using a file, carefully clean out the two notches made on the bottom end of the cap.
    6. Set the cap down on a firm work area and carefully cut two more parallel slots ¼ inch deep, and 1/3 inch apart across the top of the PVC cap.
    7. The cuts on the top of the cap should be in line with the cuts you made on the bottom – It should look like an “H”.
    8. Connect the slots by cutting into the side of the cap just as you did in step 2
    9. Snap off the plastic between the two slots – it may be harder on the top than the bottom, but have patience.
    10. Clean out the notches with a file, just as you did on step 5
    11. Take a small drill bit, and drill a hole about 1/8 inch away from the bottom corner of one of the notches you made.
    12. Tie a small hook to a length of fishing line, and add a couple of lead sinkers near the hook.
    13. Thread the line through the hole drilled into the PVC cap.
    14. Tie the washer to the other end of the fishing line.

    To Pack:

    1. Insert the bobber into the center of the PVC cap.
    2. Place the hook on the outside of the cap, and pull the barbed end of the hook down and into the notch cut into the cap – this keeps it from getting loose and sticking you.
    3. Pull the washer end of the fishing line through the hole, which will tend to lock the hook into the cap.
    4. Wrap the line around the notches until all the line is secure.
    5. Stick the washer between the loops of fishing line and the side of the cap.
    6. Wrap a rubber band around the fishing line to keep it from unraveling.

    To Use:

    1. Remove rubber band.
    2. Unwrap line.
    3. Remove bobber
    4. Pull fishing hook out and pull line until the washer is pulled up into the PCV cap.
    5. Wrap line around endcap, leaving enough line free to cast.
    6. Attach bobber and bait hook.
    7. Hold cap in the palm of your non-dominant hand and let string out between your index and middle fingers, wrapping the rest of your fingers into a fist.
    8. Hold the baited end in your dominant hand, swinging the hook in circles.
    9. Cast the hook, by aiming and releasing the swigging hook in the direction you wish to fish.
    10. When a fish bites – set the hook by holding the cap firmly, and pulling back sharply on the line.
    11. Enjoy your fish.
  • How to Make Portable PVC Fishing Gear

    How to Make Portable PVC Fishing Gear

    How to Make Portable PVC Fishing Gear
    Buy at Amazon

    First of all, before I show you how to make portable PVC fishing gear I want to rant about prepper plans that are not as smart as many think.

    Generally speaking, I think that for the VAST majority of preppers, having a “mountain man plan” of bugging out to the wilderness and living off the land is a dangerous fallacy.

    In fact, there simply isn’t enough land to support everyone that has the skills to do so.  Additionally, many individuals even think they have the skill level but don’t.

    Although this may be true, it does not mean I don’t think that a well-rounded prepper should not have wilderness survival skills and equipment.  Nor do I think that practicing outdoor skills is not fun and useful in its own right.

    Consequently, I am looking forward to teaching Tell about outdoor living as he grows into manhood.

    In the meantime, I want to share a outdoor living DIY tool.  It is a PVC fishing setup that takes up very little space in a pack, and is pretty versatile if you have the skill to use it.

    Alternatively, if you really want a sturdy line, you can use braided fishing line.

    How to Make PVC Fishing Gear

    Parts

    • 3/4-inch MIP PVC plug
    • 1 inch diameter schedule 40 PVC pipe (12-inch piece)
    • 1 inch diameter PVC cap
    • 18 inches black parachute cord
    • 1 roll athletic tape
    • 80 feet 3- to 10-pound-test fishing line
    • 2 thick 1-inch-diameter rubber bands
    • 3 of your favorite fishing lures
    • 6 size-10 fishing hooks
    • 8 size-5 split-shot weights
    • Black spray paint (optional)
    • Hacksaw
    • Drill with 1/4-inch bit

    Procedure

    If you’d like to have a black fishing pole, paint all of the PVC parts now. Let them dry near a heat source for an hour, or overnight at room temperature.

    1. First, insert the ¾ inch MIP PVC plug into one end of the PVC pipe.
    2. Next, cut a ½-inch-long slit into one side of the cap. Make the slit twice as wide as the saw blade is thick.
    3. After that, drill a ¼-inch hole through the top of the cap.
    4. Tie the ends of the parachute cord in an overhand knot and thread the other end of the resulting loop through the hole in the cap.
    5. At the open end, cut a ½ inch long slit into the side of the pipe.
    6. Put the cap on the pipe. Starting ¼- inch from the base of the cap, wrap 4 inches of pipe with athletic tape.
    7. Cut a 1⁄16 inch deep groove across the pipe 4 inches from the plugged end. Do not cut through to the inside of the pipe.
    8. Tie a clinch knot into the end of the fishing line. Make sure the line rests in the slit, and pull the knot tight.
    9. Pull the fishing line toward the plugged end and wrap a 3-inch piece of tape around the pipe to cover the knot. This will not only hold the knot in place but also ensure that the line doesn’t snag on the knot when cast.
    10. Wrap about 80 feet of fishing line around this piece of tape. Don’t cut the line yet. Just cover the wraps with the rubber band to hold them in place.
    11. Using a clinch knot, tie your favorite lure to the end of the line.

    Add Lures:

    The inside of the tube is now your tackle box. Fill it with extra hooks, split shot, lures, and bobbers. You can even put a pocketknife in there.

    Finally, put your newly tied lure into the pipe as well. Capture the fishing line in the gap formed by the slits in the cap and pipe. This gap will prevent the line from getting kinked and weakened.

    Now you have a highly portable rod and tackle box.

    To Use:

    1. First of all, take off the cap and pull out the tied lure. Replace the cap and remove the rubber band.
    2. Next, pull 3 feet of line off the spool and hold the rest of it on with your thumb. Swing the lure over your head in a counterclockwise motion. When you’ve got it swinging as fast as you can, whip the lure toward the water and take your thumb off the spool.
    3. Finally, slowly wrap the line around the pipe to reel it in. When you feel the fish bite, give the line a quick jerk to set the hook and reel it in.

    I like having some portable fishing gear in my kit but its not as efficient as using normal fishing gear.  Plus I miss not having my electronic fish finder.

    If you have pictures of you using such a piece of equipment send them to me, and I will post them here…