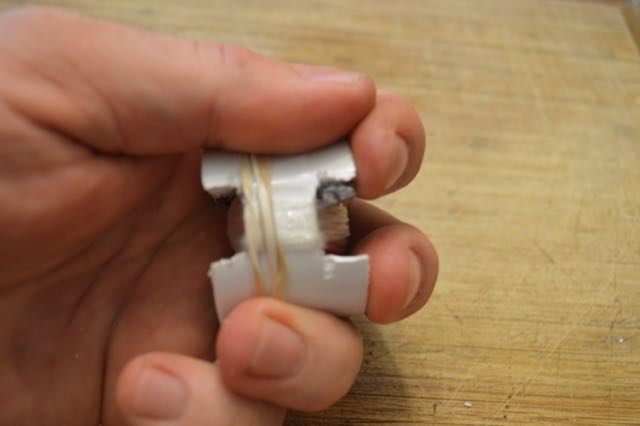
I first saw this Fishing Button on a Doomsday Prepper video from Scott Hunt, but I have also seen it in many other places online.
After making some modifications of my own, I decided to make a couple to stick in my bug out bags.
It is smaller and lighter than the other PVC fishing pole used in project 26 of my 52 Prepper Project’s Book, and much more efficient to use than the sinkers in chapter 37 – which places it straight in the middle of your options.
Depending on how much you like to fish, how good you are at it, and how likely it is that you will encounter areas where you may end up fishing while out exploring you may want to keep one or more of the three options available to you.
As I have said online, in print, and in person, I think PCV is one of the DIYer’s best materials, and anyone with a little imagination can use this inexpensive material to solve all manner of problems them may have.
Material:
- Small plastic fishing bobber
- PVC end cap – size needed is determined by the size of your bobber. The easiest thing to do is to buy a bobber and take it with you to the hardware store and match it up.
- Small fishing hook
- Lead split shot sinker
- Fishing line
- Small washer
- Rubber band
Tools:
- Hacksaw blade
- File
- Small drill bit and drill
Procedure:
- Cut two slots ¼ inch deep and about 1/3 inch apart on the bottom end of the PVC Cap.
- Turn the cap on its side and carefully saw the plastic to connect the slots cut into the PVC cap.
- Once the connecting cut is deep enough, snap the square of plastic between the two slots off of the PVC end cap.
- Flip the cap over and repeat steps 2 and 3 on the other side of the cap.
- Using a file, carefully clean out the two notches made on the bottom end of the cap.
- Set the cap down on a firm work area and carefully cut two more parallel slots ¼ inch deep, and 1/3 inch apart across the top of the PVC cap.
- The cuts on the top of the cap should be in line with the cuts you made on the bottom – It should look like an “H”.
- Connect the slots by cutting into the side of the cap just as you did in step 2
- Snap off the plastic between the two slots – it may be harder on the top than the bottom, but have patience.
- Clean out the notches with a file, just as you did on step 5
- Take a small drill bit, and drill a hole about 1/8 inch away from the bottom corner of one of the notches you made.
- Tie a small hook to a length of fishing line, and add a couple of lead sinkers near the hook.
- Thread the line through the hole drilled into the PVC cap.
- Tie the washer to the other end of the fishing line.
To Pack:
- Insert the bobber into the center of the PVC cap.
- Place the hook on the outside of the cap, and pull the barbed end of the hook down and into the notch cut into the cap – this keeps it from getting loose and sticking you.
- Pull the washer end of the fishing line through the hole, which will tend to lock the hook into the cap.
- Wrap the line around the notches until all the line is secure.
- Stick the washer between the loops of fishing line and the side of the cap.
- Wrap a rubber band around the fishing line to keep it from unraveling.
To Use:
- Remove rubber band.
- Unwrap line.
- Remove bobber
- Pull fishing hook out and pull line until the washer is pulled up into the PCV cap.
- Wrap line around endcap, leaving enough line free to cast.
- Attach bobber and bait hook.
- Hold cap in the palm of your non-dominant hand and let string out between your index and middle fingers, wrapping the rest of your fingers into a fist.
- Hold the baited end in your dominant hand, swinging the hook in circles.
- Cast the hook, by aiming and releasing the swigging hook in the direction you wish to fish.
- When a fish bites – set the hook by holding the cap firmly, and pulling back sharply on the line.
- Enjoy your fish.

