How to Punch Square Holes in Metal


Metalworking: Making Square Holes in Metal
Buy at Amazon

This is one of those posts in which I expect an expert to rip me to shreds over my technique.  I would deserve it as this is a precision machining technique.  However, I butcher it with hand tools and a total lack of precision.

I am going to show you a rough approximation of the machinist technique called broaching.  You broach in order to make square holes in metal.  Its not limited to square holes either.  You can make all manner of shapes.  This is most commonly done in making key-ways.  However, the magazine well of an AR-15 is commonly made by broaching.

According to Wikipedia:

Broaches are shaped similar to a saw, except the height of the teeth increases over the length of the tool. Moreover, the broach contains three distinct sections: one for roughing, another for semi-finishing, and the final one for finishing.

Broaching is an unusual machining process because it has the feed built into the tool. The profile of the machined surface is always the inverse of the profile of the broach. The rise per tooth (RPT), also known as the step or feed per tooth, determines the amount of material removed and the size of the chip.

The broach can be moved relative to the work piece or vice versa. Because all of the features are built into the broach no complex motion or skilled labor is required to use it.

Making a Broach:

  • Take a square length of tool steel that is the diameter of the desired hole.

    Cutting Square Holes in Metal
    Buy at Amazon
  • Remove material to taper the ends – the length of the taper is longer depending on how large the hole is to be, the depth of the material to be cut, and the hardness of the metal to be cut.
  • Cut teeth in the bar stock – start with shallow teeth,  get deeper teeth the closer you are to a finished cut.  continue the teeth as you get to the finished dimensions.
  • Harden and the tool.  I find case hardening compound, like the type pictured really helps.

Using the Broach:

  • Drill a hole in the metal, close to but smaller than the finished hole size.
  • Insert the broach and ensure it lines up at 90 degrees from the work peice or the hole will be crooked.
  • Use a hydraulic press to gradually and smoothly increase pressure until the broach is forced through the hole cutting material and forming a square
  • Use a good amount of cutting fluid as you perform this operation and wear safety gear as there is a lot of stress on the tool.

How to Retread a Lawnmower Tire


DIY: Retreading Lawnmower a Tire
Buy at Amazon

I saw this on a youtube video a few years ago and kept it in mind for the day I needed it.

Basically both the originator of this idea and I both used an old bike tire to cheaply retread a lawnmower tire.

This takes a little work, but it is much cheaper than buying new tires.

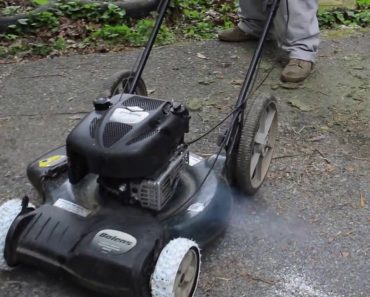
I simply measured around the circumference of my lawnmower drive wheels and cut the tire into a strip long enough to wrap around the tire.

Next, I cleaned the tire really well and glued the bike tire to the plastic lawnmower tire.

I additionally used self driving sheet metal screws to both hold the bicycle tire to the lawnmower wheel, but also to create “spikes”

Once the glue tried I tried it out, and my retreaded tires really made a difference in how my third hand lawnmower worked.

This Saved Me Money on a “Garbage” Mower

A co-worker thought he was taking advantage of me by selling me this lawnmower for $20.

However, a simple carb cleaning, blade sharpening, and tire retreading made this lawnmower work like a champ.  The so called “garbage” mower worked well for me for 2 years.

Once again, a little ingenuity  and the willingness to try new things has made my life a little easier.  Especially when my yard is very hilly and slick.

This may not be a go to trick for retreading a lawnmower tire, but it was cheap and worked well.

I am sure I will do this again.  This is the kind of money saving DIY project that I love to share on my site.

However, I kinda also want to get a reel mower.  I like how they are quiet, even if they may take a little more work.

Review on The Beginners Guide to Preserving Food at Home

The Beginners Guide to Preserving Food at Home

Book Review: The Beginners Guide to Preserving Food at Home
Buy at Amazon

A wonderful thing is happening in home kitchens. People are rediscovering the joys of locally produced foods and reducing the amount of the grocery budget that’s spent on packaged items, out-of-season produce, and heavily processed foods. But fresh, seasonal fruits and vegetables don’t stay fresh and delicious forever – they must be eaten now . . . or preserved for later.

For all the vegetable gardeners facing baskets overflowing with bright tomatoes, and for all the dedicated farmers’ market fans and CSA members, The Beginner’s Guide to Preserving Food at Home has the simple solutions that turn overwhelming bounty into neatly canned tomatoes, jars of jams and jellies, and crispy-tart relishes and pickles.

Organized in a friendly, food-by-food format, readers will find freezing, drying, canning, and storing instructions for each vegetable, fruit, and herb. In many cases, several ways to freeze or can a food are described, and there are often other preserving suggestions as well, such as making juice or fruit leather.

In the book The Beginners Guide to Preserving Food at Home everything is written with busy people in mind: these are the quickest, most efficient methods for preserving summer’s bounty. Up-to-date information and clear, step-by-step instructions show even absolute beginners the way to a fully stocked pantry.

Tiny House Delivery

Tiny House Delivery
Buy at Amazon

EDIT:  It took so long to post this that the guy that was going to pay his rent by working on the land to “heal the land” actually caused more problems than he solved – meaning dumping his composting toilet (5 gallon bucket) out on the grass, rutting over the septic lines, and basically refusing to do any work.) The tiny house is no longer on the property, instead I am working to level out an area for a small shed/pole barn to hold tools while I construct a dog trot cabin.

It took me a while to post this, as we were quite busy preparing the shed for the winter, but I am glad I finally was able to post this.

It did not take a long time for the actual Tiny house delivery.  I was amazed at how efficient the shed delivery person was.  He brought it in on a flatbed and used a little two wheeled powered tractor and some small wheels to maneuver the shed into a very tight spot between the power pole and the trailer.

I had about 30 minutes of film, but most of it had James, Smitty, and I talking and some of it wasn’t meant for some of the more gentle ears that may watch my videos – that and 30 minutes of watching a flat bed tilt a shed up and off would be boring to most people.

I was quite exited about the tiny house delivery, It has always been a dream of mine to have a homestead, and the delivery of the shed was a great first step.

We had bought some cap stones to help level the shed, but the builder supplied his own.

Once he delivered the shed and maneuvered it into place, he dropped one end on some cement blocks and then did some final adjustments to the location.

Once the tiny house was delivered exactly where we wanted it, the builder used levels and high lift jacks to ensure it was perfectly level.

Our 12×20 shed delivered cost about 4,000 including tax, while we could have done it ourselves a little cheaper, this was much easier, faster, and more efficient.

Once the shed was delivered, James and Smitty spent a lot of time building a sleeping loft, plumbing a sink, insulating, and wiring it.  I helped with the windows and wiring, but I got a little frustrated over discussions of a composting toilet (pooping in a bucket and covering it with sawdust) – especially when I ensured the shed was in the best spot to plumb into the existing septic tank.  I also didn’t like the idea of a wooden “Japanese soaking tub” in the shed when I had a brand new tub.  So, instead of having a blow up, I took some time to work on projects at my house until the building was how James wanted it – especially since he was living there…

Basic Machines and How the Work

Book Review: Basic Machines and How the Work
Buy at Amazon

Only elementary math skills are needed to follow this instructive manual.

Basic Machines and How the Work covers many familiar machines and their components, including levers, block and tackle, and the inclined plane and wedge, in addition to hydrostatic and hydraulic machines, internal combustion engines, trains, and more. 204 black-and-white illustrations.

This book is a reference guide and instruction manual used to teach military personnel how machines work so that they can make repairs to unfamiliar equipment in the middle of the ocean.

Like the Navy Foundry manual, this book helps teach vital DIY concepts that are vital to repairing material in a long term “grid down” disaster.

In a apocalyptic “Postman” or “Mad Max” world – the ability to understand machinery would make a person a vital asset to a community.  However, I don’t really believe in those scenarios, so I stick with the more realistic view that it is cheaper to know how to fix things than it is to pay someone to fix them.

I found the section on how differentials work to be fascinating, but the book’s descriptions on machines gives a great primer into how things work – by knowing this you can start to see principles and break things down into component parts.  It is books like this that turn a person into a Macgyver.