Book Review: Homegrown Whole Grains

Homegrown Whole Grains

Book Review: Homegrown Whole Grains
Buy at Amazon

A backyard field of grains? Yes, absolutely! Homegrown Whole Grains are rapidly replacing grass in the yards of dedicated locavores across the country. For adventurous homeowners who want to get in on the movement, Homegrown Whole Grains is the place to begin.

Growing whole grains is simpler and more rewarding than most people imagine. With as little as 1000 square feet of land, backyard farmers can grow enough wheat to harvest 50 pounds in a single afternoon – and those 50 pounds can be baked into 50 loaves of fresh bread.

In addition to providing information on wheat and corn, Homegrown Whole Grains includes complete growing, harvesting, and threshing instructions for barley, millet, oats, rice, rye, spelt, and quinoa, and lighter coverage of several specialty grains. Readers will also find helpful tips on processing whole grains, from what to look for in a home mill to how to dry corn and remove the hulls from barley and rice.

Chapters for each grain include inventive recipes for cereals, desserts, casseroles, salads, soups and stews, and, of course, home-baked breads, the crowning achievement of the home grain grower. Sara Pitzer shares dozens of ideas for using whole grains – from cooking sturdy wheat berries in a slow cooker to malting barley for homebrewed beer. Whether milled into nutritional flours or used in any of their unmilled states, wheat, barley, quinoa, and the other grain crops are healthful additions to every diet.

How to Make a PVC Fishing Button

How to Make a PVC Fishing Button

How to Make a PVC Fishing Button
Buy at Amazon

I first saw this Fishing Button on a Doomsday Prepper video from Scott Hunt, but I have also seen it in many other places online.

After making some modifications of my own, I decided to make a couple to stick in my bug out bags.

It is smaller and lighter than the other PVC fishing pole used in project 26 of my 52 Prepper Project’s Book, and much more efficient to use than the sinkers in chapter 37 – which places it straight in the middle of your options.

Depending on how much you like to fish, how good you are at it, and how likely it is that you will encounter areas where you may end up fishing while out exploring you may want to keep one or more of the three options available to you.

As I have said online, in print, and in person, I think PCV is one of the DIYer’s best materials, and anyone with a little imagination can use this inexpensive material to solve all manner of problems them may have.

Material:

  • Small plastic fishing bobber
  • PVC end cap – size needed is determined by the size of your bobber. The easiest thing to do is to buy a bobber and take it with you to the hardware store and match it up.
  • Small fishing hook
  • Lead split shot sinker
  • Fishing line
  • Small washer
  • Rubber band

Tools:

  • Hacksaw blade
  • File
  • Small drill bit and drill

Procedure:

  1. Cut two slots ¼ inch deep and about 1/3 inch apart on the bottom end of the PVC Cap.
  2. Turn the cap on its side and carefully saw the plastic to connect the slots cut into the PVC cap.
  3. Once the connecting cut is deep enough, snap the square of plastic between the two slots off of the PVC end cap.
  4. Flip the cap over and repeat steps 2 and 3 on the other side of the cap.
  5. Using a file, carefully clean out the two notches made on the bottom end of the cap.
  6. Set the cap down on a firm work area and carefully cut two more parallel slots ¼ inch deep, and 1/3 inch apart across the top of the PVC cap.
  7. The cuts on the top of the cap should be in line with the cuts you made on the bottom – It should look like an “H”.
  8. Connect the slots by cutting into the side of the cap just as you did in step 2
  9. Snap off the plastic between the two slots – it may be harder on the top than the bottom, but have patience.
  10. Clean out the notches with a file, just as you did on step 5
  11. Take a small drill bit, and drill a hole about 1/8 inch away from the bottom corner of one of the notches you made.
  12. Tie a small hook to a length of fishing line, and add a couple of lead sinkers near the hook.
  13. Thread the line through the hole drilled into the PVC cap.
  14. Tie the washer to the other end of the fishing line.

To Pack:

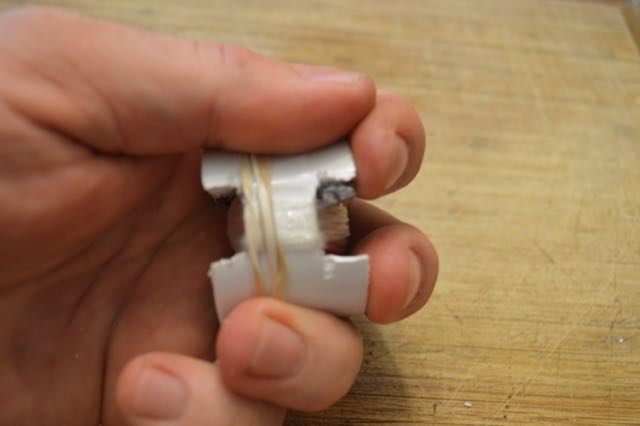
  1. Insert the bobber into the center of the PVC cap.
  2. Place the hook on the outside of the cap, and pull the barbed end of the hook down and into the notch cut into the cap – this keeps it from getting loose and sticking you.
  3. Pull the washer end of the fishing line through the hole, which will tend to lock the hook into the cap.
  4. Wrap the line around the notches until all the line is secure.
  5. Stick the washer between the loops of fishing line and the side of the cap.
  6. Wrap a rubber band around the fishing line to keep it from unraveling.

To Use:

  1. Remove rubber band.
  2. Unwrap line.
  3. Remove bobber
  4. Pull fishing hook out and pull line until the washer is pulled up into the PCV cap.
  5. Wrap line around endcap, leaving enough line free to cast.
  6. Attach bobber and bait hook.
  7. Hold cap in the palm of your non-dominant hand and let string out between your index and middle fingers, wrapping the rest of your fingers into a fist.
  8. Hold the baited end in your dominant hand, swinging the hook in circles.
  9. Cast the hook, by aiming and releasing the swigging hook in the direction you wish to fish.
  10. When a fish bites – set the hook by holding the cap firmly, and pulling back sharply on the line.
  11. Enjoy your fish.

MAKE Fun!

Book Review: MAKE Fun!
Buy at Amazon

You don’t need to own a factory to make toys. MAKE Fun! author and toymaker Bob Knetzger has been making fun stuff all his life with simple technology like vacuum forming and mold-making.

In an age where makers are tantalized by the capabilities of 3d printers and other digital fab technology, this book takes you back to old-school hand tools, simple electronics, and working with metal and plastic to make toys every bit as good as those you can find in a big-box store.

This book has something for everyone, from a marble maze to a talking booby trap; from custom cookie cutters to an “EZ Make” oven. Discover the basic principles of science, electronics, and engineering through hands-on projects that range from easy to more challenging… and are always fun!

How to Make a DIY Wire Basket

How to Make a DIY Wire Basket

DIY: Wire Basket
Buy at Amazon

This DIY Wire Basket is a neat project, which makes a useful basket – which you can use to organize or meet some

metalworking requirements on a scouting merit badge.

I like them for gardening, as I can easily wash my fruit and vegetables off with the hose before I bring them in the house.

My wife likes it because I use it to wash vegetables before I bring them into the house.

Either way, it is an easy project that is very useful and a fun way to spend an afternoon.

Material:

  • 2’x10’ Hardware cloth
  • 26 Gauge Floral wire
  • Metal Coat hanger (Optional)
  • Rubber hose (Optional)

Tools:

  • Tin Snips
  • Needle nose pliers

Procedure:

  1. When designing your basket you need to allow for the sides. We are going to make a 5 inch deep 8 by 8 inch basket to carry in our vegetables. Since the sides will fold up we will need to cut out a piece of wire that is 18 inches square.
  1. Using tin snips cut this into a cross shape with 5 inch squares taken out of each corner. This will make eight inch “wings” that stick out on each of the 4 sides.
  1. Make your creases/folds along the “wings”

    DIY Wire Baskets
    DIY Wire Baskets
  2. Cut the floral wire 1.5x the size of the side you’re going to connect. This means for a 5 inch seam, cut the wire 7.5 inches (or 8 if you want extra).
  1. Start at one end, and pull the wire almost all the way through leaving about 1″ of slack to wrap around that first corner several times before weaving up the side.
    • Hitting every square looks better, and make a stronger basket, but you can save time by only weaving every other square if you desire.
  2. Lastly, trim the ends of your wire, and tidy up the basket.
  3. If you desire you can make handles by cutting up a metal coat hanger and using needle nose pliers to create loops on each end
  4. You can make the handle fit your hand better by sliding a rubber hose (like an aquarium hose) over the coat hanger before attaching it to the basket.

T-Post Puller Review

Gear Review: T-Post Puller
Buy at Amazon

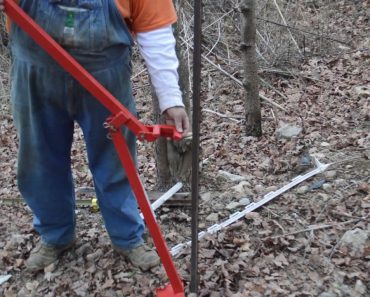
I have tried all manner of ways to pull t-posts.  I finally spent the money on a dedicated t-post puller.  Let me tell you the $40 was well spent.  I recently was offered a bunch of posts from my father in law if I came and took down a fence.  I allotted 4 days to do it based upon my experiences with DIY hacks.  I pulled over 100 poles in just a few hours.  They were deeply embedded, goat tight posts that were in the ground for over 10 years.

I only bent one pole.

It is a very easy tool to use, the arm has a grooved arm that snags on the t-post teeth and since the fulcrum is so close to the arm, it pulls almost straight up.

I also like how the arm has a chain hook, but I haven’t gotten a chance to see how it pulls small saplings yet.

My video does not show the deeply set and time embedded posts I pulled out at my in-laws.  They decided to get out of the goat business and turned much of their pasture into grape arbors.

The cross fences made it hard for them to do work on the grapes so they gave me the poles.  I allotted several days to dig them all out, but I did it in two short mornings.