Dutch Oven Tips

Kitchen DIY: Basic Dutch Oven Tips

Kitchen DIY: Basic Dutch Oven Tips
Buy at Amazon

Dutch Oven TipsIf you are a prepper then a Dutch Oven is a must have item.

The dutch oven tips in this article make it versatile enough that you can use it cook anything you cook in a regular oven.

You can make pies, bread, stew, roasts outdoors using hot charcoal instead of inside using a traditional oven.

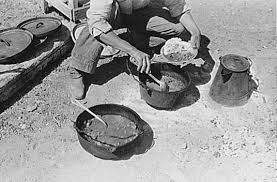
Dutch Ovens are just metal cooking pot. Most often they are made of heavy cast-iron. They come in all sorts of dimensions and configurations, but if you plan on cooking on a fire, get one that has three short legs on the bottom, and a tight fitting lid with a rim to hold coals.

Dutch Ovens that do not have legs, are flat on the bottom, and have a highly domed lid without the coal ring are more useful inside the home to cook beans or stews on the stove.

In order to cook using a Dutch Oven you must properly season. I prefer to get “antique” cast iron from auctions, but my current “Kitchen” version was bought new from Lodge. These new ovens come coated with a waxy material to protect it. They call this “pre-seasoned” or even “seasoned”, but in my experience it is not.

Seasoning is needed to create the non-stick properties of a well-used cast iron cooking implement, and it takes some time.

To season your new Dutch Oven:

  • Wash the Dutch Oven with mild soapy water, rinse, and dry completely.
  • Grease inside and out (pot, legs, and lid) lightly with a good grade of olive or vegetable oil (I prefer solid shortening e.g., Crisco). If you are not going to use this often do not use lard or other animal products as they can turn rancid!
  • Do not use a spray in coating, but rather use an oil soaked paper towel or new sponge.
  • Place greased Dutch Oven upside down on oven rack with lid separate and put aluminum foil underneath to catch any excess oil. Bake in a 300-350 degree oven for at least 1 hour (Do this when your spouse is gone, because it will smoke up the house).
  • It will take more than this initial seasoning for the pot to obtain the desired uniform carbon coating that makes the pot non-stick as well as protects it from rust.

Luckily the seasoning on your Dutch Oven will improve with each use if it is properly oiled and cared for.

Once your Dutch Oven is seasoned it should never be scrubbed with soap.

Store the oven in a warm, dry place with the lid cracked so air can circulate inside.

Now For Some Cooking Tips:

  • For easy cleanup, line the bottom and the sides of the Dutch Oven with aluminum foil.
  • Use a wooden spoon to stir, and always cook with the lid on.
  • Unless you like ashes in your food, don’t tilt the lid when you remove it.
  • A Dutch oven seems indestructible, but it will shatter if dropped on hard cement or it will crack if cold water is poured into a very hot Dutch oven.
  • NEVER, REPEAT, NEVER! pour very cold water into an empty hot pot or you may cause permanent damage to the oven (cracking)!
  • Heat control is the hardest thing to master when learning to cook with a Dutch Oven. Remember to start with moderate temperatures. You can always add more heat if desired or necessary. Be cautious, as most guests don’t enjoy burned food!
  • High quality briquettes are recommended. Briquettes provide a long lasting, even heat source and are easier to use than wood coals. (but as preppers learn to cook using coals from a wood fire)
  • Briquettes will last for about an hour and will need to be replenished if longer cooking times are required.
  • Group the smaller briquettes and add new ones (hot) as required to maintain the desired temperature.
  • Rule of thumb: Each briquette adds between 10 & 20 degrees.

Different types of cooking requires different placement of the briquettes. Here are a few general rules for briquette placement:

  • For Roasting: The heat source comes from the top and bottom equally. This requires twice as many coals on top as on the bottom.
  • For Baking: The heat source comes from the top more than the bottom. Place 3 times as many coals on the lid.
  • For Boiling, Frying, Stewing, Simmering: All of the heat comes from the bottom. All coals are placed beneath the Dutch Oven.

Place the required # of briquettes under the oven bottom in a circular pattern so they are at least 1/2″ inside the Dutch Oven’s edge. Arrange briquettes on top in a checkerboard pattern.

Do not bunch the coals as this causes hot spots.

To prevent hot spots during cooking, rotate the entire oven 1/4 turn and then rotate just the lid ¼ turn in the opposite direction. Rotate every 10-15 minutes.

If you use wood coals, remember that the flame will be much hotter than the coals! Avoid direct flames on the pot or turn frequently.
Keep in mind that the weather, ambient temperature, and ground conditions can affect cooking temperature.

Here is a guide for the amount of charcoal briquettes needed for different sized Dutch Ovens to reach a desired temperature level:

8″ DUTCH OVEN:

  • 325 degrees – 15 coals …OR… 10 on top / 5 on bottom
  • 350 degrees – 16 coals …OR… 11 on top / 5 on bottom
  • 375 degrees – 17 coals …OR… 11 on top / 6 on bottom
  • 400 degrees – 18 coals …OR… 12 on top / 6 on bottom
  • 425 degrees – 19 coals …OR… 13 on top / 6 on bottom
  • 450 degrees – 20 coals …OR… 14 on top / 6 on bottom

10″ DUTCH OVEN:

  • 325 degrees – 19 coals …OR… 13 on top / 6 on bottom
  • 350 degrees – 21 coals …OR… 14 on top / 7 on bottom
  • 375 degrees – 23 coals …OR… 16 on top / 7 on bottom
  • 400 degrees – 25 coals …OR… 17 on top / 8 on bottom
  • 425 degrees – 27 coals …OR… 18 on top / 9 on bottom
  • 450 degrees – 29 coals …OR… 19 on top / 10 on bottom

12″ DUTCH OVEN:

  • 325 degrees – 23 coals …OR… 16 on top / 7 on bottom
  • 350 degrees – 25 coals …OR… 17 on top / 8 on bottom
  • 375 degrees – 27 coals …OR… 18 on top / 9 on bottom
  • 400 degrees – 29 coals …OR… 19 on top / 10 on bottom
  • 425 degrees – 31 coals …OR… 21 on top / 10 on bottom
  • 450 degrees – 33 coals …OR… 22 on top / 11 on bottom

14″ DUTCH OVEN:

  • 325 degrees – 30 coals …OR… 20 on top / 10 on bottom
  • 350 degrees – 32 coals …OR… 21 on top / 11 on bottom
  • 375 degrees – 34 coals …OR… 22 on top / 12 on bottom
  • 400 degrees – 36 coals …OR… 24 on top / 12 on bottom
  • 425 degrees – 38 coals …OR… 25 on top / 13 on bottom
  • 450 degrees – 40 coals …OR… 26 on top / 14 on bottom

16″ DUTCH OVEN:

  • 325 degrees – 34 coals …OR… 22 on top / 12 on bottom
  • 350 degrees – 36 coals …OR… 24 on top / 12 on bottom
  • 375 degrees – 38 coals …OR… 25 on top / 13 on bottom
  • 400 degrees – 40 coals …OR… 27 on top / 13 on bottom
  • 425 degrees – 42 coals …OR… 28 on top / 14 on bottom
  • 450 degrees – 44 coals …OR… 30 on top / 14 on bottom

NOTE: For cooking times over an hour additional charcoal may be necessary. Either have another batch ready to go after about an hour and a half or, at about an hour, place unlit briquettes next to those on and under the oven to ignite them.

Rustic Carpentry

Book Review: Rustic Carpentry
Buy at Amazon

With an introduction by master craftsman Ralph Kylloe, this manual on rustic carpentry is a superb resource for woodworkers, furniture makers, and carpenters of all skill levels.

Here are clear and concise instructions for creating beautiful pieces with unfinished timber, utilizing the unique texture and shape of tree branches, trunks, and shrubs. In addition, rustic woodworking requires few tools and relatively little skill to make decorative and practical flower stands, tables, chairs, gates, porches, aviaries, footbridges, verandas, tool sheds, and more.

All these projects are included here with detailed advice on collecting and drying sticks; what kind of wood works best for various items; how to varnish both indoor and outdoor pieces; using battens and mortises to secure furniture; and successfully employing a range of other techniques.

Chicken with Vinegar

Recipe Chicken with Vinegar

52 Unique Techniques for Stocking Food for Prepper
Buy at Amazon

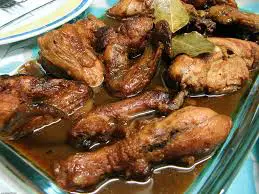
Chicken with VinegarToday’s recipe of cooking chicken with vinegar is a pretty basic cooking skill.  This of method cooking meat “Adobo” is a cultural cooking process from the Philippines, where meat is marinated in vinegar, browned, and then simmered in the marinade. This process is worthwhile for preppers, homesteaders, or outdoorsmen to know because leftovers keep well without refrigeration because the vinegar inhibits bacteria.

In my experience it softens up tough meat, and I especially like using this process with rabbit.  As a matter of fact, I make “chicken with vinegar” far more often with rabbit more than I do with chicken.

Today we will cook some chicken with vinegar, so you can see that cooking mellows the vinegar, as well as tenderizes the meat – the end result will be about as tart as cooking chicken with tomatoes. It is actually pretty good, and I end up keeping a jug of my homemade wine vinegar near my stove so I can throw in a cup or two into my cooking whenever the wife is not looking….

Ingredients

  • 2 tablespoons olive oil
  • 1 3-pound cubed chicken
  • Salt and freshly ground black pepper
  • 1/4 cup minced shallots or scallions
  • 1 cup good red-wine vinegar
  • 1 tablespoon butter (optional)

Procedure

  1. Preheat the oven to 450 degrees.
  2. Set a large ovenproof skillet over medium-high heat. .
  3. Add oil
  4. When it is hot, place chicken in the skillet, skin side down.
  5. Cook undisturbed for about 5 minutes, or until chicken is nicely browned.
  6. Turn and cook 3 minutes on the other side. Season with salt and pepper.

Mask of Command

Book Review: Mask of Command
Buy at Amazon

In The Mask of Command, John Keegan asks us to consider questions that are seldom asked:

What is the definition of leadership? What makes a great military leader?

Why is it that men, indeed sometimes entire nations, follow a single leader, often to victory, but with equal dedication also to defeat?

Dozens of names come to mind…Napoleon, Lee, Charlemagne, Hannibal, Castro, Hussein. From a wide array, Keegan chooses four commanders who profoundly influenced the course of history: Alexander the Great, the Duke of Wellington, Ulysses S. Grant and Adolph Hitler. All powerful leaders, each cast in a different mold, each with diverse results.

“The best military historian of our generation.” –Tom Clancy

“A brilliant treatise on the essence of military leadership.” –The Philadelphia Inquirer

“Fascinating and enlightening… marked by great intellectual liveliness… Mr. Keegan knows how to bring fighting alive on the page.” –The New York Times

The Mask of Command is a book for preppers, leaders, instructors, and managers.  If you deal with people – especially if you deal with people in crisis, then you will benefit from the lessons in this book.

I enjoyed this book and have used its lessons in training officers to work in dangerous environments.