How to Increase Gun Accuracy

How to Increase Gun Accuracy Fast and Cheaply

Buy at Amazon

The optics industry is working hard at creating well-performing products that will help both beginners and advanced shooters in improving their accuracy. However, the best scopes will dig a pretty big hole in your pocket, and with the cheap ones, it’s difficult to find a diamond in the rough.

With this in mind, I decided to work on my accuracy and try to find those minor adjustments that will make my guns better. I am both a passionate airsoft player and a gun owner, so it’s important that I learn how to control my accuracy in both cases.

My goal is to avoid spending too much money on expensive equipment and find those little tweaks that are usually ignored. Below you can see the methods I tried and I hope they will be of help for other fellow shooters.

Improve accuracy when shooting a Handgun

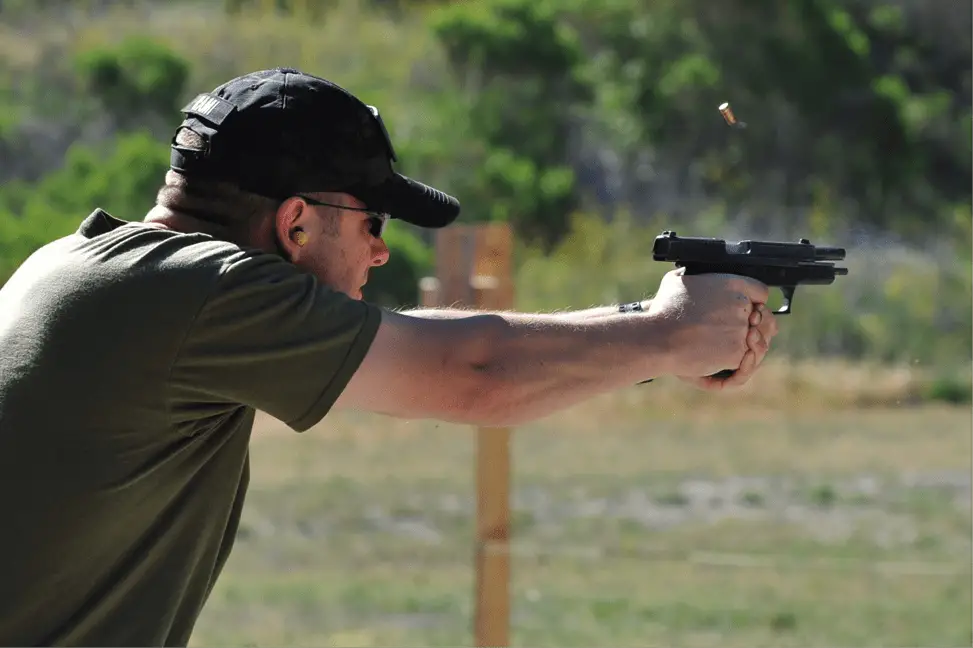
Honestly, I consider the handgun one of the most difficult to master when it comes to accuracy. The short sight radius, looking for the right trigger pressure, and getting the correct stance can be tricky to pull together from the first try.

The Grip

If you’ve ever shot with a pistol, you know how important it is to get a good grip. The gun must fit perfectly in your hands so, if you find your gun stock is slippery or too small, you should think about a back strap.

This is a cheap accessory (around $10) and is easy to find in any gun store or online. The back strap will slightly modify the shape of your stock to fit perfectly in your hand. For instance, if you have big hands, you’ll need a back strap that makes the stock bigger. On the other hand, if you need a more curvy shape for your stock, you should get the according back strap.

On my Glock Gen 4, I got the back straps when I got the gun, but this is not the case for every pistol. I recently started using the large back strap (big hands) and I can feel the difference in grip.

Trigger control

This is another aspect that’s difficult to control, even for advanced shooters. Finger placement on the trigger is highly important for your accuracy – too much or too little and the gun will wobble messing with your aim.

It took a few test shots to see where exactly my ideal finger placement is, but this is different for everyone. So, I recommend testing how your finger placement affects your accuracy (it’s free and it will be of great help in the long run). Here, you can find the in-depth description of finger placement techniques that was very helpful for me.

Use the Sights

Every gun comes with rear and front sights which are amazing when it comes to accuracy. If you use them correctly, your aim will improve considerably and fast!

I talked to Tom from googgun and here are a few expert tips I learned:

  • Don’t focus on the rear sights, focus on the front one (it must be between the two rear sights)
  • The front sight and the rear sight must be leveled – if the front sight is slightly up above, you will shoot high, if it’s down below, you’ll shoot low.
  • Align the front sight with the center of your target (once you checked the steps above)

If you follow these steps and you have the correct trigger pull, your shot should hit the middle of the target.

According to Tom, the sight alignment is one of the most common mistakes when it comes to accuracy so make sure to work on that. The good news is that it is free – once you master sight control, your accuracy will improve without spending one month’s salary on accessories.

Dry Fire

If you’re a beginner trying to better your accuracy, you can try dry fire to practice anywhere. Of course, practicing with live ammunition is better but ammunition is not always available and you can’t shoot a gun in any location.

So, to improve your accuracy and test your stance, practice your shooting skills without ammunition. Still, keep in mind that an empty gun won’t have recoil when you fire it. Dry fire is a great way to get a better feel of the gun without distractions, and you have the possibility to learn how to balance the gun and use the sights the right way.

I recommend getting a laser sight so you’ll know when your accuracy is just right. The laser gives you feedback and it’s easier to learn the right hands’ alignment.

Drills to Improve Accuracy

Once you’ve worked on all the things I mentioned above, it’s time to test your skills in various situations. Since you’re not always shooting at a fixed target, here are some drills that will help you assess your accuracy:

The Ragged Hole

From 6 yards, fire five rounds aiming at a single point on your target (you choose the point). Take your time while shooting and make sure you use the exact same point for each shot. If your accuracy is good, you’ll end up with a single, ragged hole on your target. Otherwise, the shots will be spread out, and you’ll know you need more practice.

Shrinking the target

For this, you’ll need a target with four circles on it, each smaller than the previous one. The goal is to fire five rounds into each circle, from 6 yards. As you master all the circles, your skills will improve. 

How to Wear a Boot Knife

How to Wear a Boot Knife


How to Wear a Boot Knife
Buy at Amazon

A boot knife is great for survival and defense.

Whether worn for protection or survival in the wilderness, boot knives or shoe knives prove themselves very useful in times of need. If you are thinking of carrying a knife in your boot, here is a simple tutorial on how to wear a boot knife.

What is a Boot Knife?

It is a blade that is made specifically to fit most calf-high boots. It is essentially a small fixed blade knife dagger with a sheath to protect the wearer from accidental cuts.  Often this type of knife has a double edge.

Generally, These knives serve the purpose of protection so that you can have a concealed and easy-to-reach weapon to defend yourself with in times of need.

Moreover, boot knives can be used as an additional weapon or tool to bring during camping or hunting. Since they are easy to carry around, these knives can be useful when cutting rope or splitting bark without having to rummage in your hunting backpack.

If you are reading this article, then you probably have interest in carrying a boot knife yourself. Don’t worry, wearing a knife on your bootis very easy. But to be sure that you do it right, here’s how to wear one.

How to Wear a Boot Knife

Boot knives are convenient tools or weapons just like tactical pens. They can be concealed and are easy to carry. If you want to wear a boot knife for yourself, follow these general tips that we have put together for you:

Step One: Select a particular pair of boots

Some hunting boots are equipped with a special straps or built-in compartments for boot knives.  If you already have a pair of boots that do have this special compartment, then you are ready to go.

You can try purchasing a new pair of hunting boots with this function.  If you do not have boots that have built-in straps for your knives, you can still use regular boots.

However, the ease of use of boot knives will depend on your boots.  Generally, boot knives fit well in boots that come up to the low to mid-calf.  These types of boots are said to be more comfortable to use with boot knives.

Step Two: Pick out your boot knife

Choose the boot knife that most appeals to you.

Knives come in all shapes and sizes. However, not all knives can be used as boot knives.

Most boot knives are generally made to fit into a shoe and provide easy access.  They also often come with a sheath to keep your feet safe. So, if you don’t already have one, you can try finding the best boot knife available on the market.

The best knives are easy to conceal, generally easy to carry, and provide you with good protection against hostile people or animals.

When you carry a boot knife with you whether you are only out in public our going hunting in the woods, they can provide you with more peace of mind and definitely more security than going without it.

What to Do if You Don’t Have Special Boots

If you don’t have boots that have built-in straps or compartments for boot knives, you can still easily wear a boot knife. How to wear a boot knife with regular boots just requires a string added to the equation.

Generally, a shoelace or thin rope will do. Simply insert your boot knife into the ring of your boots and use the string to secure the handle against your calf. This will prevent it from falling out of your shoe or getting moved around a lot.

On the other hand, if you are feeling a bit more creative, you can try sewing in a sheath for yourself into the boots. To do this, simply take a sheath and sew it into the interior of your boots, obviously where you want your boot knife to be.

Tips on How to Wear a Boot Knife

Tips on how to wear a boot knife

  1. Check local laws and regulations

Before you go on and wear a boot knife out in public, read up on your locality’s laws about wearing concealed weapons like boot knives.

  1. Wear your boot knife on your dominant side

In times when you need to use your boot knife, you can easily access and use it if you place it on your dominant side. For example, if you are right-handed, place your boot knife in your right boot, facing outwards. This will make it much easier for you to access your boot knife.

  1. Make sure the sheath is always secure

The sheath in your boot or the sheath that comes with the boot knife functions to keep your calf safe from any accidental cuts or stabs. Make sure that you always keep the sheath secure.  That way you won’t end up with an unnecessary trip to the emergency room.

  1. Choose high-quality equipment

The best tactical pens are considered the best for a reason; and that is because they perform their function well based on pre-set standards. Just like with boot knives and the boots you will be wearing, you need to pick out quality products that would meet your needs. Otherwise, the boots or boot knife may be worn down quicker than you want them to.

  1. A boot knife doesn’t always have to be in your shoe

Boot knives are versatile weapons. Since they are small, they can fit into your glove box, purse, waist, backpack, and basically almost anywhere.

Conclusion

Boot knives are great for serving as self-defense weapons as well as tools in hunting/camping or in emergency situations. Needless to say, they can help you perform tasks easier and defend yourself better due to their ease of access and concealed nature. We hope this article on how to wear a boot knife enlightened you on the necessary steps you need to take before buying your own boot knife.

Got any friends interested in concealed weapons? Share this article with them and let us know what you think in the comments below. Thanks for reading!


How to Make a Month of Freezer Meals in One Day

52 Unique Techniques for Stocking Food for Prepper
Buy at Amazon

Cooking in any sort of way has been my passion since the age of 9. My mother used to cook dinner on Fridays and Saturdays. Most of the time she complained how stressful it was for her to cook day-after-day after a hard day at work.

A very-good neighbor shared to her the idea of cooking a month of meals in one day. She gave it a thought and had consider the idea. Since often there’s always “what’s for dinner and who’s making it” debate at home, mom had it as her weekly strategy.

The idea of cooking a month of freezer meals all in one day makes it stress-free, saves money and time and make great deal for busy families just like us.

Since I am amazed and overwhelmed with the benefits I got from this easy and delectable freezer meal strategy, I am going to share few tips accumulated from my meal plans that might be a big help if you are a beginner.

First, Choose the type of food for freezer meal that will best benefit you.

It’s a matter of personal taste in your family and it all depends what your children love to eat. They like meals that are homemade and nutritious; eating healthy meals is unlikely for busy families like us but we want to get rid with meals typically with high calories.

Here’s a glimpse of what I did:

Breakfast – My kids are usually hungry when they wake up so I usually prepare what is practical and ready-to-go meals like muffins or pancakes, baked oatmeal or waffles and cheese biscuits

Lunch – They love my Homemade Granola Bars and Hot Pockets, you might want to try Chicken Taquitos, your way.

Dinner – Homemade Lasagna (my kids’ favorite), Hamburger Patties with whole wheat bread, Tuna Casserole, and, Creamy Cheesy Broccoli Soup, you choose.

Second, Stock up with the right supplies for freezer meal cooking.

You have to consider first right supplies or ingredients for freezer meal cooking. You have to know the kinds of vegetables or ingredient does not freeze well.

Example, bean sprout, lettuce, cucumbers and raw potatoes will turn soppy when thawed. Also, hard boiled eggs will go elastic so refrain freezing those as well. There are a lor more products, such as sour cream, yogurt, cheese sour cream and will sometimes go watery when melted.

The same thing with the containers and storage of your meal like foil baking pans, plastic containers, gallon sized freezer safe bags, casserole dishes and many more.

You may utilize a gallon or quart sized plastic or reusable freezer safe bags in storing your freezer meal. You just have to make sure to get out as much air as possible by crushing the food around and flattening the bag.

Next, you seal it as tight as possible to avoid from any spills or freezer burn as well. You can actually save much cost if you will use a reusable gallon-sized bag.

You can use aluminum foil pan when you do baking dishes and look for store that has cheaper cost where you can much save money. In the case of my family, since we are 8 in all, larger size is preferable. Well, it all depends on your preference.

Another one good for storing freezer meals are plastic Tupperware or commonly called as plastic containers. These are commonly used for meals with soup., however, this kind of container would take up bigger space in your fridge, but it can store large amount of food.

Third, Clean out the freezer before storing your freezer meals.

It is important to keep your fridge clean and organized before storing anything inside it. You have to make sure that the room in the freezer is spacious as well to be able to maximize its area. Regardless of its size or space what matter is its sanitation and capacity to store in.

The freezer at home is cleaned in regular basis whether it is full. We maintain its cleanliness since we are taking here the food that we eat.

Fourth, Begin making your freezer meal in a slow pace, no rush.

Since you are a beginner in making your own freezer meals, you must be that exhilarating. To prevent being completely overwhelmed, start slow.

In choosing the freezer meal you will prepare, make sure your kids, your whole family will like and anticipate to try the freezer meals as soon as it is done. A nice way to do this is when you are cooking for dinner. You just have to cook twice as much and one for freeze meal.

Make sure that only those meals recommended for freezing are ones that you will prepare. Keep in mind to avoid ingredients which are not good for freezing. If you are not certain about the ingredient you have whether good for freezing or not, you search it in Google and see whether others have had success with freezing that type of recipe.

Fifth, Prepare all the ingredients to avoid hassle.

Chopping, peeling, trimming, shredding and whatever else you need to prepare to the ingredients must be done beforehand cooking. This is to be more convenient and avoid hassle. Ingredients like vegetables that needed to be peeled and sliced can be done while boiling or simmering. Maximize the time you allotted to cook your recipe.

If you are establishing a kind of routine, then you will move swiftly every time you prepare a freezer meal. Set the time the moment you start prepare the dish to see variation next time you cook. have 2-3 different meals cooking at the same time.

Sixth, Freeze the ingredients individually.

Freezing is a quick and convenient way to preserve fruits and vegetables at home. It is a popular method of home food preservation throughout ages.

Whenever you have extra recipe or ingredient that you won’t be using yet before it expires, the good thing is, you can freeze it! Yes, that’s right. That’s how convenient it is, easy and quickly. Goodbye using of unused food and excess solution, just a pull away, there your freezer with lots of extra products. Then you won’t have to purchase another set of ingredient the next time you prepare a freezer meal.

For instance, if you were to brown ground beef and freeze, it can then be quickly and easily added to many recipes including tacos, pizza, soups/stews, spaghetti sauce and more. Another is, by browning a few pounds of ground beef all at once, you can freeze the meat in individual portions and then quickly add it to recipes to save a step.

Freezing ingredients also saves you money. To avoid your bananas getting brown, slice it flash size and it can be stored until you use it from smoothies to banana bread.

Below is one of my favorite beginner freezer cooking recipes

Here is the best method to freezing blueberries.

Many ways in freezing blueberries, some would say to no wash it. Others would say just lay out on cookies sheets, freeze it, then later add to bags.

They said the best way is to gently wash the berries, pat dry, add some sugar or syrup, then freeze. So that method was tested and it worked! It worked well. The sugar helps to keep them all from sticking together.  If you don’t like the idea of adding sugar, don’t worry.

Before using, give a quick rinse off with water then you will have some perfect preserved blueberries.

Step 1:  Gently wash the blueberries, getting any stems or leaves out.

Step 2: Gently pat dry the blueberries.

Step 3: Add some sugar to the blueberries for every 2 cups of blueberries use 1/3 cup of sugar.

Step 4: Mix them all up gently.

Step 5: Add your blueberries to quart sized freezer bags and freeze them.

These blueberries should last up to 6 months in your freezer, and even longer. Freezing blueberries every gives me feeling of a little bit of my sweet summer love even in the cold wet season.

Jennifer Moran

Jennifer MoranJennifer Moran is the author and the social media manager at TheBerkey.com and PreparedBee.com. She has been working and passionate with writing for over four years. When she isn’t glued to a laptop screen, she spends time playing tennis, practicing yoga, and trying very hard not to sleep in the meditation. You can reach her at jennifer (at) preparedbee (dot) com. PreparedBee.

Top 20 Survival Skills a Kid Should Know

Top 20 Survival Skills a Kid Should Know


Buy at Amazon

By nature, a child likes to play around, do things on their own, sometimes lousy and even think they are old enough. Because all children are different, they exhibit different types of capabilities and skills. Remember, children have great individual variations of temperament, development and behavior.Every prepper plans and strategize for disasters but an often neglected aspect of prepping is training for children.

Help your growing child understand what is expected of him or her as they grow, with a little help from you as dear parents.

Since knowledge takes time to develop, so we need to start teaching them as soon as possible, and that is now.

Check out this article on the Top 20 Survival Skills a Kid Should Know to see what skills you should be teaching your kiddos.

Know how to make a fire.

Top 20 Survival Skills a Kid Should KnowYour child needs to know how to make a fire. You must be care to locate fire in a place where the wind wouldn’t blow directly on it, also, it works well in a large boulder. You need to have matches during camping and make sure your kid knows how to keep it safely under your control.

Know how to cook on a fire.

This survival skill is great to teach while you are on a camping trip. Help your kids how to cook on a fire and determine when food is ready to eat. You will need tinder, kindling, and logs.

Know to eat healthy and stay fit.

Your kids should know what foods are healthy to eat and how to stay in good shape. Explain the importance of having a healthy system and what it brings to you. If you are not in good shape, you will have a hard time surviving in a difficult situation.

Know how to handle and use a knife.

Every child should be shown how to hold and carry a knife for their own safety in everyday tasks around the house.

If an emergency occurs, a knife could be the only tool they will have available to help them survive until help arrives. Your child could learn using knife in cutting branches for shelter but also for hunting, if necessary, and to catch fish as well.

Know to find water and see if it’s safe to drink.

Help your child learn to locate water sources, and how to purify and clean the water, that is by using filters and boiling. Your child must know how to find water that is safe to drink.

In case your home has a deep well, you may continue to drink water from it and should be taught how to draw water from that well in case the electric is out. If your home does not have a well, then they need to search for bottled water.

Know basic first aid.

Every child should learn basic first aid and should know to treat wound or injury then tie a sling. Your child needs to be shown where your first aid supplies are stored and how to treat minor wound or injury. They also need to learn how to differentiate minor injuries from ones that require the attention of a doctor.

In case your child is alone, being able to cover and mend a cut or wound could save their life.

Know basic sewing.

Basic sewing should be taught to kids so they can patch clothing or any kind of garments when necessary. Mending clothes or any fabric and even make things like bags or scrap quilts are good advantage you can get when you know basic sewing.

Know basic self-defense.

Self-defense is another vital survival skill everyone should know, and that includes the kiddos. This is a skill your child needs to know to stay safe.

You can teach your child how to get away if someone grabs them. Instead of pulling away, tell your child to push towards the other person. Because of this, it could actually cause a person to lose its balance, then, will let go of your child as they would fall.

You don’t need to teach them any fancy skills – they need to know basic skills. Teach them to always follow their gut instincts. This could save your child’s life in a survival situation.

Know how to find or build shelter.

Your child needs to know how to find shelter away from home. Let them know the importance of a shelter in a survival situation and how to find a shelter when needed. under their clothes or use as a blanket.

Know how to read a map and compass.

Top 20 Survival Skills a Kid Should KnowA lost child is a scared child, and usually their first instinct is to begin searching for their family.

Teaching the kids reading a map is like making a lesson into a treasure hunt.

You may draw up a map marking the location of the treasure and then help them understand the directions.

Know where your family and friends live.

Your child needs to know where family and friends are to find a safe place especially if your child is in trouble. They need to know how to get to those safe homes.

Know what to do when they get lost.

A child if lost will sure feel uneasy and terrified. Wherever your child is lost; in a grocery store, on a hiking trip or along the street, the instruction is the same. In case your child realizes they lose their way, condition their mind to stop, sit as soon they are in this situation. No matter how scared they might be, assure them that you are searching for them.

Know how to grow garden.

Every child must need to understand how to plant a seed and harvest it. Teaching kids to grow their own food gives them knowledge and power. Encourage your child to learn and appreciate how to grow food.

Know what to do in bad weather.

Your child needs to know what to do when a bad weather is coming regardless he or she is both at home and away.  Does your child know what to do if he or she is home alone and a bad storm is coming?

Always plan on them being alone so that they can be independently safe, with this, they will not be dependent, they could count on themselves. Remind them to go to a basement and to stay away from windows.

Know how to swim.

Unfortunately, drowning is the third most common form of accidental death in children, so learning to swim really is an essential life skill. Swimming is one of the few skills that once learned is rarely forgotten. And, this is fun too for kiddos.

Know to raise and care for animals.

Teaching your kids, the responsibility of having a pet is very important and it is another great lesson to them. If you do not have room for livestock, consider keeping a few chickens or rabbits for your kids to care for.

Know basic woodworking.

If your kids could learn basic carpentry that will be a bonus.  If they can work well with woods or logs, then they can learn building almost everything. And, if possible, you can teach your kids to safely use tools like axe or hatchet in doing basic woodwork.

Know to Fish.

Fishing is easy to learn, easy to teach and doesn’t have to involve lots of expensive equipment. This can be a good bonding with the whole family especially on a vacation.

Know how to answer the door when they are home alone.

The best way is either not to answer or open the door. When the door is opened and closed with kids in and out, it leaves those in the home vulnerable to someone who is watching the home. Train your kid to be keen in keeping the windows locked, your blinds and curtains always closed.

Know how to climb a tree.

Top 20 Survival Skills a Kid Should KnowThis is part of the dangerous things you should let your kids do, as long as they are under your control.

Teach them how to climb safely which is really important, tell them when to stop climbing and when it is dangerous.

This skill can be useful because it eliminates a potential accident risk.

Final Say

One of the most important of parental goals is to make them independent and autonomous while they’re still young as soon as possible. As crises or emergencies arise, their survival training and real determination will decide if you get to ever tuck them in bed again.

When crisis strikes, knowing as many survival skills as possible may it’s a life and death situation for your children. You don’t have to be aggressive or scary about it, but you should teach your kids how to take care of themselves as they grow.

The sooner the children become self-sufficient, the greater their chance of surviving in any type of collapse. Make a game out of teaching survival skills and have fun with your child. You never know when your child may need to take care of himself/herself for a few days.

It’s your call.

Bullpups vs. Conventional Rifles: The Ultimate Debate

Bullpups vs. Conventional Rifles: The Ultimate Debate
Buy at Amazon

It’s an age-old question: are bullpups better than conventional rifles? Or is it visa versa?

I have previously talked to a lot of friends about this, and many asked if I was more for bullpups or conventional rifles.

To help readers determine the answer, I have included information on both and what my opinion is about the ultimate debate: Which one is better?

An important thing to keep in mind is that both have different pros and cons and have contrasting factors that make it hard to pinpoint which one is the best.

What one person could be looking for may line up completely with how a bullpup functions whereas their good friend may prefer the conventional rifle.

This debate has gone on for a long time with opinions greatly divided. Some consider the bullpup to be an innovative design that should be accepted by the military while others—especially those who are used to using it-consider the standard rifle to function much better.

Who is right? Who is wrong?

In my opinion and experience, both work well according to their design, but to offer a glimpse of what they each have and how they could be beneficial for different people, I have compiled the following.

Bullpup rifles aren’t the preferred gun of choice for the U.S. military, but that doesn’t mean that they aren’t a viable option for those who are looking for a rifle that may be easier to handle than a conventional rifle.

They look more modern-and even somewhat futuristic-and because of the shorter handle, they are easier to carry and for some, to shoot from. I like the size and length and how compact they are, as well as the idea behind the bullpup–a shorter and more portable weapon.

I like what the original bullpup designers (such as James Baird Thorneycroft) intended to do and the ingenuity they used to come up with an alternative that they thought would work better than the heavier and longer conventional rifle, but I’m not sure that the bullpup has yet reached its potential.

Why I Like Conventional Rifles

Conventional rifles, such as the popular AR-15 and its many off-the-shelf variations, have been around for a long time, which means that any problems that they may have had at the beginning of time have been perfected and they are now some of the most reliable guns around, even if they are somewhat large and difficult to maneuver for beginners.

I like conventional rifles because although they may be somewhat challenging to hold due to the awkward trigger placement, they offer a dual ejection port which means that lefthanded or righthanded shooters won’t need to fear for their faces after shooting.

This is one of the major factors to why many prefer using a conventional rifle and makes a big difference for me. Not only do I prefer it for personal use, but I also think it shows that the conventional rifle was designed more effectively than the bullpup.

I also appreciate the proximity of the trigger to the action as this helps the conventional rifle to function properly (with proper cleaning and maintenance) with very few problems. Because of the placement of the trigger, the conventional rifle actually provides a better trigger pull.

Why I Like Bullpups

Although they may be somewhat challenging to hold due to the awkward trigger placement, they offer a dual ejection port which means that lefthanded or righthanded shooters won’t need to fear for their faces after shooting.

This is one of the major factors to why many prefer using a conventional rifle and makes a big difference for me. Not only do I prefer it for personal use, but I also think it shows that the conventional rifle was designed more effectively than the bullpup.

I also appreciate the proximity of the trigger to the action as this helps the conventional rifle to function properly (with proper cleaning and maintenance) with very few problems. Because of the placement of the trigger, the conventional rifle actually provides a better trigger pull.

The Final Verdict

While the answer to which one is better is mostly subjective for most people, for me, I would have to say that I prefer the conventional rifle.

As someone who has primarily used a conventional rifle, it is difficult to get used to using the bullpup, as it is completely different than the conventional rifle in both trigger placement, as well as its build.

Another thing is that as a left hander, I have a difficult time with the ejection port, and prefer shooting from a conventional rifle as I personally don’t like the trigger placement to be so close to my shoulder.

Another thing that I don’t like about some of the bullpup models is that the ejection ports eject the cartridge directly onto the shooter’s body which is not only annoying, but could potentially be dangerous.

While some of the bullpup models have remedied this with ejection ports facing forwards, this is just one way that bullpups still fall behind.

Bullpups are still a bit behind in their design and I think that they do need some updates and innovative ideas on the manufacturer’s part, as they have the potential to be great rifles for the military and definitely a space-saving option, but the current bullpups aren’t quite up to par with it is expected for those who are used to firing on more reliable and intelligently designed rifles.

With that being said, some people like how small the bullpup is and the trigger placement.

A lot of people appreciate the more modern and compact design that makes it easier to carry and also for those who haven’t handled many conventional rifles, they may appreciate that it is relatively easier to shoot from.

Newer models like the Desert Tech MDR are switching many lifelong conventional fans over to the Bullpup camp.

In Conclusion

The bullpup rifle and conventional rifle both have pros to their build and functionality.

While many people have different preferences and some do prefer the compact build of the bullpup and the trigger placement, the majority of users prefer the conventional rifle.

While this could simply be a matter of habit and what they are used to, I tend to trust a conventional rifle over a bullpup. Both for the ejection ports on both sides and how reliable it is.

That said, newer Bullup models like the MDR are truly changing the game for left-handed shooters. I look forward to testing the rifle myself, and seeing how it compares to conventional rifles.

For the most part, the military in the U.S. has yet to make a big emphasis on the use of the bullpup. Whether this is because it isn’t as good as the standard conventional rifle or because the conventional one is actually better, has yet to be proven. The fact that the bullpup is still in use goes to show that there are some benefits to using it.

What do you think? Do you prefer a standard rifle and find it easier to maneuver and aim with or does the shorter bullpup feel more comfortable for your use?