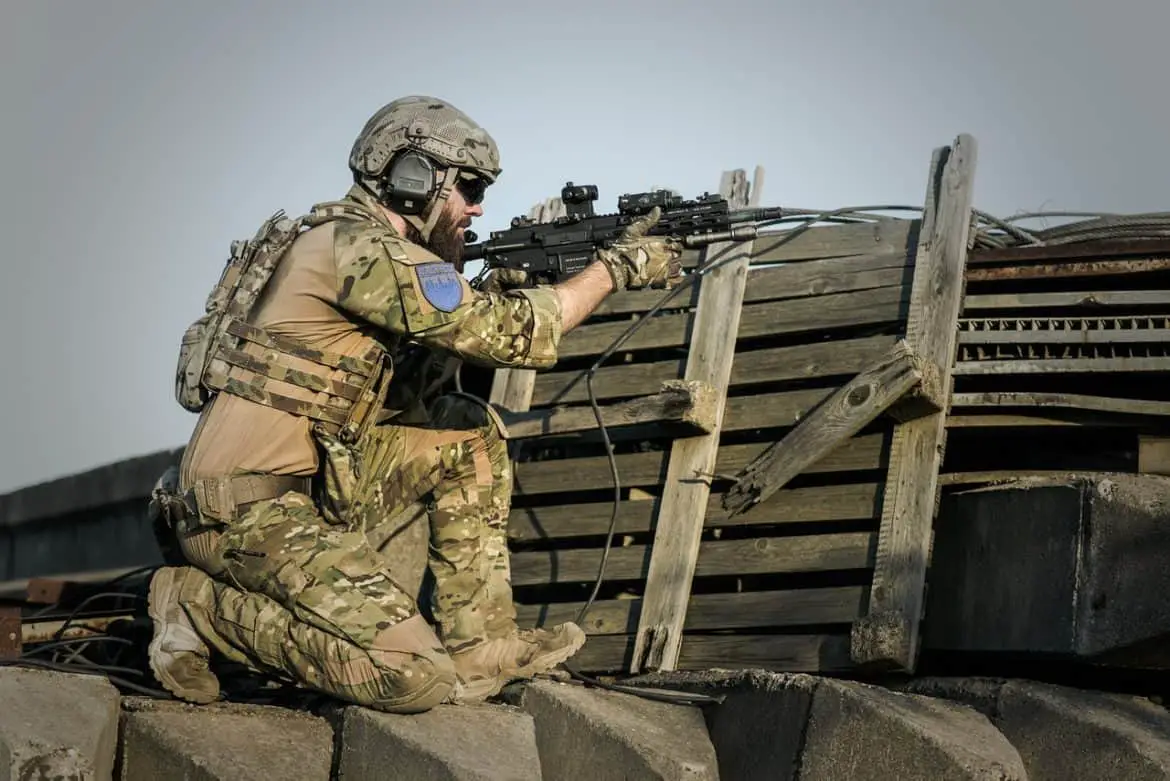
Shooting: Firing from Behind a Barricade

Shooting: Firing from Behind a Barricade
Buy at Amazon

Firing from behind a barricade is an essential part of combat marksmanship. It is a relatively straightforward skill and easily acquired. As all shooting techniques, however, mastery only comes from extensive practice. Contrary to what is seen on movies, most shooting incidents do not happen at high noon on Main Street.

Common sense dictates that when being shot at, the reasonable person will try to find cover from incoming rounds. If withdrawal from the scene is not practical and returning fire is justified, then knowledge of barricade position firing is essential. The most important part of the barricaded position is being behind the barricade. While this seems a simpleminded thing to say, it is amazing how many times while coaching this technique, one sees shooters positioned beside the cover they should be behind. As this is a combat skill, it is important to become as small a target as possible.

A good strategy is to adopt a kneeling position behind the item of cover. Kneeling is a good position because it allows quick adoption from standing and is quick to get up from. As a general rule, the closer your center of balance is to the ground, the more inherently accurate a position is. Therefore the kneeling position is a two-fold better position than standing for return fire, not only for making yourself a smaller target but also for making your shots more likely to hit your aggressor.

The adaptations from a normal two handed shooting position are simple. The shooter does not use the off hand to give support to the weapon by muscle tension as he would in a traditional manner. Instead the off hand is pressed against the covering object. A much-used method to accomplish this is to make a fist with the thumb extended, in a “thumbs up” sign. Press the pad of the thumb and the last knuckle of the support hand into the barricade. Cradle the firing hand and weapon in the support hand. Make sure that no part of the firearm is touching anything other than your flesh. Contact by the weapon with solid objects causes the weapon to bounce and the round to go off target.

The only portions of your body that should be exposed beyond the barricade are your firing hand, and only the amount of your face that is needed to obtain a clear view of the sights, target, and situation. Your arm should be raised enough so that the weapon is brought up to your face, not your face lowered to your sights. It takes practice to enable you to be able to quickly judge the distance needed between your body and cover to allow you to quickly assume the This article is based on the strategies for using a pistol behind a barricade, but long guns can also use this tactic with superficial modifications. Instead of using the knuckles of the support hand against the wall the hand should be extended as if making a “stop” sign. Extend the thumb away from the hand. Press your hand against the cover with your index finger flush against the barricade edge. Your thumb should extend past the cover like a shelf. Rest the forearm of the firearm on this shelf. All other aspects are similar.

It cannot be stressed how important this technique is in a lethal force situation. It is equally important that this technique is practiced so as to allow a seamless transition into this position.

The Myriad Uses of Concrete in Homesteading

The Myriad Uses of Concrete in Homesteading
Buy at Amazon

Homesteading puts us in a constant state of learning new skills, especially in the early years. One thing you’ll want to become comfortable with as soon as possible is working with concrete, because there plenty of ways we can use concrete in homesteading.

Concrete Is the Ultimate Building Material

Composed of Portland cement, crushed rock and water, concrete is both simple and highly functional. If you want a home that will:

  • Stand the test of time
  • Be easy to heat in winter and cool in the summer
  • Resist strong winds, even those from tornadoes or hurricanes
  • Be unappealing to insects, rodents and other pests
  • Offer a quiet retreat from noise
  • Be fireproof
  • Be recyclable in the future and can be made from recycled materials today
  • Allow you to have full artistic reign

… then concrete is the material for you. Concrete homes, otherwise known as ICF or insulated concrete form homes, offer all of the advantages above and more.

And the last bullet point is one we simply can’t gloss over. If you think of a concrete home and imagine a dull grey monolith to call “home,” you couldn’t be more wrong. Concrete can be colored and stamped to appear like other building materials altogether, giving the appearance of, for example, a brick or stone home. You can also embed materials like tiles and glass to give your home an eclectic look.

Aside from building your home out of this material, there are plenty of other ways to use concrete around the homestead.

Keep Burrowing Critters on the Right Side of Your Fences

Does any of this sound familiar?

  • A fenced garden that burrowing pests still feast on
  • A chicken coop that is raided by digging varmints
  • A dog who digs his way out of the kennel on a routine basis

We build fences for a variety of reasons, and animals, domestic or otherwise, always test those barriers. Fortunately, there is a simple and permanent solution to prevent digging.

Dig a trench about 1 foot deep and just a couple inches wide as close to your current fence line as possible. Fill it with concrete, and while the mixture is still wet, place simple metal stakes in it every few feet to help you tie the fence to it, preventing any gaps between the concrete and the fence that might invite a digger to still weasel in or out.

Take Advantage of Concrete’s Fireproof Properties

Virtually all homesteaders use fire to cook, heat their homes or burn debris. It’s essential to have a safe place to control a fire so that it does not get out of hand and destroy your property. Concrete is fire resistant, and thanks to its malleability, also completely customizable.

You can build:

  • An outdoor “pizza” oven
  • A firepit, either raised, flat or sunken
  • A rocket mass heater
  • A fireplace and chimney
  • Safe storage for flammable materials

Every Building Needs a Concrete Slab

If you need just one good reason to become a concrete pro, it’s the simple fact that virtually every building needs a durable foundation. Barns, sheds, garages … you name it, it needs a concrete slab foundation to provide a solid basis of support.

And best of all, concrete prices remain affordable, even more so if you use recycled concrete, which uses chopped concrete as the aggregate for new concrete rather than gravel. It’s easy to use, strong and cheap … the trifecta of a perfect building material.

The More You Know the Less You Carry


The More You Know the Less You Carry
Buy at Amazon

I got my start with bushcraft as a child living on a state park.  The man in the video above is Mors Kochanski who is a internationally known bushcrafter.

He popularized the idea of the more you know the less you carry.  I am sharing this video to explain a very important concept for preppers.

My conversations with new preppers that talk about their bug out plans and how much ammo they plan on carrying.  It is not uncommon for people to tell me that they keep a pistol, a backup pistol, a shotgun and an AR (or SKS or AK) and 200 rounds each in their car in case they have to get out of dodge.

Now that’s not terribly unrealistic in a car, but next they tell me that they plan on EMP and trying to hike home or to their bug out location 15 or twenty miles away.

I doubt those guys have every tried to walk a distance with 800 rounds, but I carry that much around on the range all the time to issue ammo – I don’t like carrying that 10 feet, much less 10 miles.

Let us be realistic in our plans, let’s think about all aspects of preparedness and not just stop at what we think is cool.

How to Make a Cheap Frame Loom


DIY Frame Loom
Buy at Amazon

Now that I have some homemade yarn I need to do something with it.  I cannot knit.  However, I have made a loom before, but it was small and not very useful.

Today’s post is a much larger DIY frame loom.  I enjoy using a drop spindle.  Spinning is something I do that relaxes me, but unlike the loom, it does require me to pay attention.

Making a loom does not have to be expensive.  A few years ago I reviewed a PVC loom how to manual that I thought was brilliant, but I never quite got around to making one.

This is a simple loom that can be made for under $20 and is a great way to see if you enjoy textile arts.

I used a simple set of canvas stretcher bars that I made into a frame, then marked and drilled small holes one centimeter apart in a line at the top and the bottom of the frame.

Next I tied string from the bottom nail to its partner at the top of the frame.

I should have probably tied each pair of nails together individually, but I took the easy route and ran a single strand up over and down going back and forth over each nail head.

Once the loom was strung, I simply took me yard and wove it between my strings, alternating up and down.

The video is pretty simple, and I am probably doing everything wrong, but in the end, I had a pretty cool start to a wool “rug”.