diy fishing gear

How to Make Portable PVC Fishing Gear

How to Make Portable PVC Fishing Gear
Buy at Amazon

First of all, before I show you how to make portable PVC fishing gear I want to rant about prepper plans that are not as smart as many think.

Generally speaking, I think that for the VAST majority of preppers, having a “mountain man plan” of bugging out to the wilderness and living off the land is a dangerous fallacy.

In fact, there simply isn’t enough land to support everyone that has the skills to do so.  Additionally, many individuals even think they have the skill level but don’t.

Although this may be true, it does not mean I don’t think that a well-rounded prepper should not have wilderness survival skills and equipment.  Nor do I think that practicing outdoor skills is not fun and useful in its own right.

Consequently, I am looking forward to teaching Tell about outdoor living as he grows into manhood.

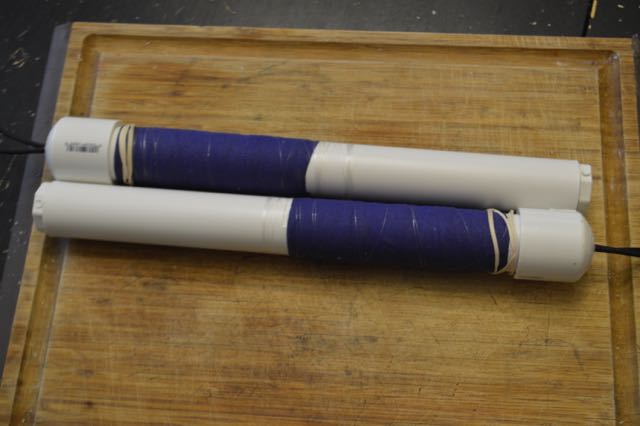
In the meantime, I want to share a outdoor living DIY tool.  It is a PVC fishing setup that takes up very little space in a pack, and is pretty versatile if you have the skill to use it.

Alternatively, if you really want a sturdy line, you can use braided fishing line.

How to Make PVC Fishing Gear

Parts

  • 3/4-inch MIP PVC plug
  • 1 inch diameter schedule 40 PVC pipe (12-inch piece)
  • 1 inch diameter PVC cap
  • 18 inches black parachute cord
  • 1 roll athletic tape
  • 80 feet 3- to 10-pound-test fishing line
  • 2 thick 1-inch-diameter rubber bands
  • 3 of your favorite fishing lures
  • 6 size-10 fishing hooks
  • 8 size-5 split-shot weights
  • Black spray paint (optional)
  • Hacksaw
  • Drill with 1/4-inch bit

Procedure

If you’d like to have a black fishing pole, paint all of the PVC parts now. Let them dry near a heat source for an hour, or overnight at room temperature.

  1. First, insert the ¾ inch MIP PVC plug into one end of the PVC pipe.
  2. Next, cut a ½-inch-long slit into one side of the cap. Make the slit twice as wide as the saw blade is thick.
  3. After that, drill a ¼-inch hole through the top of the cap.
  4. Tie the ends of the parachute cord in an overhand knot and thread the other end of the resulting loop through the hole in the cap.
  5. At the open end, cut a ½ inch long slit into the side of the pipe.
  6. Put the cap on the pipe. Starting ¼- inch from the base of the cap, wrap 4 inches of pipe with athletic tape.
  7. Cut a 1⁄16 inch deep groove across the pipe 4 inches from the plugged end. Do not cut through to the inside of the pipe.
  8. Tie a clinch knot into the end of the fishing line. Make sure the line rests in the slit, and pull the knot tight.
  9. Pull the fishing line toward the plugged end and wrap a 3-inch piece of tape around the pipe to cover the knot. This will not only hold the knot in place but also ensure that the line doesn’t snag on the knot when cast.
  10. Wrap about 80 feet of fishing line around this piece of tape. Don’t cut the line yet. Just cover the wraps with the rubber band to hold them in place.
  11. Using a clinch knot, tie your favorite lure to the end of the line.

Add Lures:

The inside of the tube is now your tackle box. Fill it with extra hooks, split shot, lures, and bobbers. You can even put a pocketknife in there.

Finally, put your newly tied lure into the pipe as well. Capture the fishing line in the gap formed by the slits in the cap and pipe. This gap will prevent the line from getting kinked and weakened.

Now you have a highly portable rod and tackle box.

To Use:

  1. First of all, take off the cap and pull out the tied lure. Replace the cap and remove the rubber band.
  2. Next, pull 3 feet of line off the spool and hold the rest of it on with your thumb. Swing the lure over your head in a counterclockwise motion. When you’ve got it swinging as fast as you can, whip the lure toward the water and take your thumb off the spool.
  3. Finally, slowly wrap the line around the pipe to reel it in. When you feel the fish bite, give the line a quick jerk to set the hook and reel it in.

I like having some portable fishing gear in my kit but its not as efficient as using normal fishing gear.  Plus I miss not having my electronic fish finder.

If you have pictures of you using such a piece of equipment send them to me, and I will post them here…

Collecting Yeast

Kitchen DIY: Collecting Yeast

Collecting Yeast
Collecting Yeast
52 Unique Techniques for Stocking Food for Prepper
Buy at Amazon

Yeast is one essential product for food preparation, you need it to make bread rise and to make alcohol.

Even if you do not drink, you need alcohol to make vinegar)

Yeast is generally store-bought, but if you run out you will need to be able to capture your own wild yeast.

Besides the resiliency aspects of being able to start collecting yeast, there are some culinary reasons for capturing your own.

Different yeasts flavor your food differently, and if you capture your own you can control these flavorings to some extent.

To collect yeast you will need some plastic wrap and a clean non-reactive bowl (glass works best, but plastic is okay)

Ingredients:

  • Flour
  • Water

Procedure: (this is a multi-day process)

  1. Mix flour with water.
  2. Mix with a wooden spoon and add enough water until the mix is a thick batter.
  3. Keep it covered with plastic wrap and let it sit at room temperature for 3 days.
  4. Three days later check your flour and water mixture for any activity.
  5. If there is a pool of water on the top of the flour mixture, dump or some out and mix the flour and water together. You should see small bubbles and smell a sour smell. If you don’t observe these things, let your mix sit for a day or two more.
  6. Within 5 days bubbles should be formed and the mix should be smelling sweeter, (like very ripe fruit). At this point, the starter is active.

If you have observed these things your fermented mixture contains yeasts and is ready to begin being “fed” regularly (daily)

To feed it:

  1. Discard a little more than half of the mix (or separate it to give away or use) and mix in equal proportion of water and flour.
  2. The starter should begin to bubble after feeding (it may take a couple hours), this means the yeast is active and feeding.
  3. Repeat this process everyday or every other day (don’t neglect this for a long period or your yeast will die – you can cheat a little and put it in the fridge which will slow the yeast down and make it last longer between feedings)

You can use this in baking just as you would use other types of store-bought yeast

Clearing Trash From Trailer: With RZ Mask Review


Clearing Trash with RZ Mask
Buy at Amazon

In tearing down this old burnt up mobile home I worry about mold and rat feces.  The thought of breathing in dust that is full of those things just is not appealing.

Luckily the guys over at RZ mask contacted me about doing a review of their product.  I didn’t think it was much more than a fancy N95 mask.  I was wrong.

An RZ mask is a neoprene outer face mask with an air intake port.  Inside the mask is a removable inner filter.

You can mix and match different inner filters with different face masks to suit your needs.

Personally, I like the simple fask masks, a solid black RZ mask works for me, I don’t need a skull face or a camouflage one.

However, I do like the different inner filters.  They have filters optimized for construction dust, or smells, or filtering the air.

While this mask is designed for things like construction and outdoor motor sports, it has other uses.  I think the RZ mask would be perfect in a sick room where contageous people were kept to keep them from infecting others.  That would be a perfect prepper use.

One thing to think about, having wore regular N-95 masks are that they have a short life span.  The moisture you exhale then to mess them up over time, they also don’t last long taking them off and on.  The design of the RZ-mask specifically addresses these problems.

I find that an RZ-mask can last for weeks of use – a month or so if it is light use.  That is incomparable to a typical N-95 mask.

Trick to Help Pull the Carpets


I used the carpet puller shown here to help pull the carpet up as a whole to slide trash and all out of the trailer and onto a large utility trailer.

I tied the handles to rope and the rope to my truck.  This went pretty fast.  It went faster when I used heavy equipment.

Tearing this thing down isn’t hard, but distance and time have contributed to this project taking a LONG time. I finally decided to just rip the thing down with the backhoe, and tear the remaining walls down with a truck, but I still have to clean up the debris and unbolt the sub-floor from the frame.

Now that I can see some progress and I have a system it is working much better.

How to Make Egg Sunshine


Recipe: Eggs Sunshine
Buy at Amazon

As you can guess, my wife thinks I experiment too much in the kitchen, she may appreciate THAT I cook, but she has a hard time appreciating WHAT I cook.

However, every once in a while I will hold my mouth right and make something she rules fit to make again.

Eggs Sunshine is one of those maker again recipes.

This recipe is a very basic breakfast meal that is easy enough to allow kids to cook (with supervision), and while it is not a “food storage meal” per se, it uses ingredients that are easily made from food storage ingredients (the bread), and/or easily produced or traded for (eggs).

In this recipe your simply pan toasting a slice of bread in a skillet. The bread has the center cut out to hold a raw egg.

As the bread toasts the egg fries and it is a novel way of making breakfast.

I used to butter the bread, and always made a mess buttering the second side. Now I normally use a small amount of oil to get the same effect.

I also use a shot glass to punch out the center (after letting it fry a second) – which is both prettier and easier than my old method of cutting out a square with a knife.

We would probably fight over the toasted centers of bread, except whenever I am home early enough to make breakfast, it is Genny’s day off so she is asleep and I don’t share….

How to Improvise a Winter Water Spigot Cover

Quick Tip: Improvised Water Faucet Winterization
Buy at Amazon

With all the ice and snow lately a friend of mine sent me this idea for an improvised method to winterize a water spigot. I tried it and it works.

Unfortunately due to the weather I was working a lot of overtime and I could not get this video out until now.

Basically a outdoor winter water spigot cover works by insulating the faucet from the cold outside temperatures.

Today’s video shows a way to do this without buying a cover. I think this is easier, but my wife would probably prefer a store bought solution.

Since trapped air can make an effective insulator, My friend wondered if multiple layers of plastic grocery bags could work.

Since I keep and reuse my grocery bags I simply grabbed a handful and loosely wrapped them in layers over the spigot and then held it in place with some duct tape.

I think this is a good idea to keep in the back of your head just in case.  Especially as a way to keep your mind open to work around solutions.

Thanks for the great idea Raging Main…

I know this improvised attempt at winterize a water spigot looks pretty rigged up,.  However, we had a really cold winter, including an ice storm that was big enough to rate a Presidential disaster declaration.  Through it all my pipes didn’t freeze.  Which is not a scientific measure, but it was free, easy, and seems to work so I am happy with it.