If your water heater is acting funny or if you’ve noticed anything different about it, you might need major water heater repair. These are signs that you should look for!
Sediment in Your Water
Sediment in your water can be cause for concern because it should be filtered out through the hot water heater. If there is any sediment in your water, parts of your water heater might not be working. Your hot water heater may also be malfunctioning causing the sediment to form in the first place. If you see sediment, it can be a huge signal that something is wrong with your hot water heater.
Water That’s Not Clear
If the water coming out of your hot water tap is not clear, you might need to contact plumbing services to get help. When your water isn’t clear, it can mean many different things, but it might be associated with your hot water heater. There are many things you’ll have to look at if your water isn’t clear so it’s best to call a professional to figure out what the actual problem with the water is.
An Odor that Comes from Your Heater
Your water shouldn’t smell bad! If the water has a rotten egg smell, it might have too much sulfur in it that the water heater isn’t properly filtering. If it has more of a metallic smell, that could be a problem with iron in your water. No matter what odor is coming from your water, it’s probably not a good thing. Make sure you talk with a plumbing professional to get help if you smell something wrong with your water.
Water that Isn’t Hot
If your water isn’t heating up, it could signal a big problem with your hot water heater. If your hot water heater suddenly stops working, it can make it difficult for you to live. You’ll need to adjust the temperature so that you can make sure it’s not something wrong with the thermostat. If that doesn’t work, you should always call a plumbing professional to learn whether you need major water heater repair.
Any of these could be signs of minor issues, too. Keep in mind that just because you have a sign of a major water heater problem doesn’t mean that you do have a major water heater problem. If you do have a problem, it’s important to get it fixed as quickly as possible.
If you’ve recently relocated to a new building you may be stuck for renovation ideas to bring the space to life. Your main considerations should be the practicality, comfort and aesthetics when it comes to designing your office. You could be working with a blank canvas or you might need to breathe some life into an old, tried room. Either way, there are plenty of ways you can create something amazing that works for your business. Read on for the best design ideas for your office:
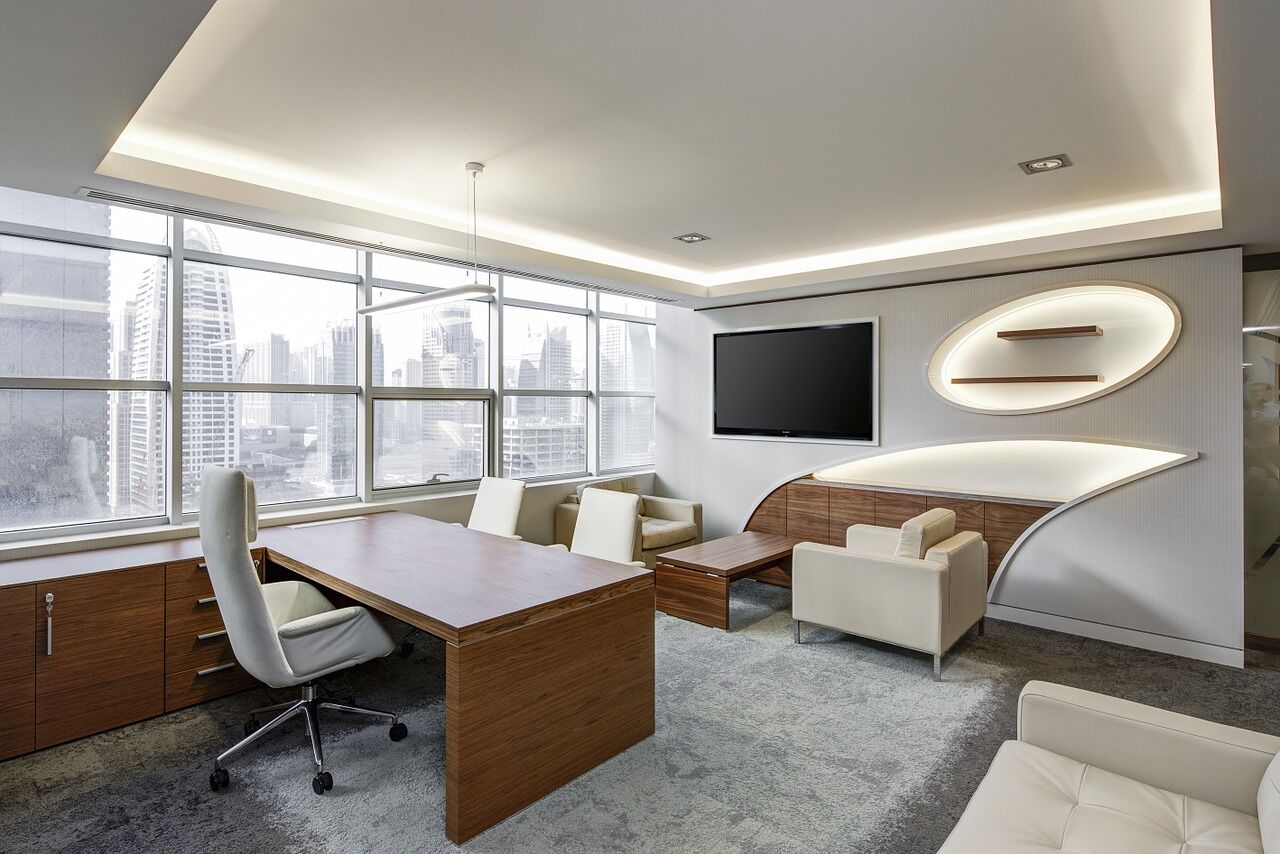
Open Plan
Gone are the days of stuffy restricted offices where you’re expected to work behind your divider wall with no communication with the outside world. Open plan offices have become increasingly popular, aiming to open up the space. It transforms the room into an environment with a friendly and welcoming atmosphere. This has also helps with collaboration between departments, consequently improving employee morale. It’s been found that employees work better and far more effectively with an open plan office. If you still need a place for meetings with clients, then you can always create a separate space specifically for this purpose.
Decoration for The Office
Keep the room light and bright by using light or neutral colours, with the only other dominant colour being that of your brand. Using light colours will also mean that your room has a timeless look and won’t ever be outdated. Furthermore, it’s a good idea to mix textures and patterns to add some depth and bring the room to life.
In addition, having artwork across the walls is not only visually pleasing, but it shows you have a happy and fun workplace. You can dot artwork around the office or even have a dedicated wall. Using artwork that’s relevant to your business is the perfect way to finish off your office design; this could be company statistics, achievements or employee work.
Let in Plenty of Light
If you’ve moved to a high-rise building in the city centre, then you may be lucky enough to have panoramic views across the office. Make the most of these by allowing as much light in as possible, taking a look at the best types of blinds that will allow you to filter light. This way you can have complete control over the natural light in the office. This will also allow for privacy when you need it.
If you’re working in an office with limited windows or in a home office, then try not to have any bulky furniture in the way that will block some of the light. You can even install some daylight lightbulbs in areas where they may be little light to make it brighter and more inviting.
Add Some Greenery
Office plants aren’t just for decoration, they are also beneficial to employee’s health. Plants are proven to remove harmful chemicals from the air, giving the room a cleaner, less compact feel. They’re also wonderful to look at – and they don’t even need to be hard work. There are plenty of low maintenance plants including succulents, spider plants, snake plant and even aloe vera that look wonderful in the office but require very little attention. You’ll find this means employees take less sickness days, are less stressed and boosts productivity.
How Will You Design Your Office?
The way you design your office can have a monumental impact on the business. Consider the best layout that will allow for optimum productivity, which may include switching to an open plan office. You could even compile a short survey for existing employees. If you’re moving consider asking what changes they’d like to see in the office plan.
Whether you are interested in just making your home attractive or you are planning to rake in a couple more bucks from the sale of your home by a couple of improvements here and there, home improvement is key for upping the value of your home.
In this article, we will take a look at a few home improvements tips that can fire up the value of your home.
They include:
Start with inspecting the home
You need to know that home improvement are not about improving aesthetic, improvements may also cut across repairs such as leaky roofs, blocked drainages and the rest. So a home inspection should be conducted prior to the improvement to pick out areas to be worked on.
Don’t underestimate the power of bright and well-articulated colors
A dormant room can be lit up with the right paints and patterns. Kitchen walls and cabinets, living room walls are great places to give detailed paint works. If you not sure the blend of paints to use, you may enlist the services of a painter.
It has been said that nothing brings out the beauty of a space than bright colors and smart details. Paints do not have to be totally worn out before they are changed. Get creative with the spaces around you. The kids’ rooms can even get extra illustrations on the wall for higher aesthetic value.
House Plants are real beauties, try them out
Apart from environmental purification and indoor air quality improvement, house plants have aesthetic value that you can use to improve your home and up its value. A wide range of indoor plants are available and these plants can be used creatively in different patterns and designs.
The succulents and air plants are top of the list of the plants that can be used in homes. Examples of some plants you can get from a florist and try are Sedum rubrotinctum, Lithops species, Haworthia cooperi, Agave victoriae-reginae and so on.
It is also important to note that plants do not just have to be potted and kept at a spot. Designs such as living wreaths, beautiful roofs and tapestries, fairy homes, terrariums or maybe even a vertical garden.
Get creative with empty spaces, utilize the space under the stairs
What if I told you that you could come up with really creative uses for those spaces you never gave much thought to like under the stairs. Such spaces are more effectively utilized when there is need for more space around the house. While it helps you create more space for storage, if nicely done, it can add to the beauty armory of your home.
Home improvementdoesn’t necessarily have to be exorbitant as many people think. A couple low-budget creativity here and there can do the magic.
Pay attention to maintenance and mechanicals
Nothing devalues a home more than faulty essentials such as broken pipes, blocked drainages, faulty electrical system. The faults gives the impression that the home is in bad shape when its just a matter of few basic repairs. This is why you should ensure that you update the essentials of your home from time to time to retain the values. While at it, ensure you allow the professionals attend to each repair around your home for expert solutions.
If you are not sure of the things that might require maintenance, procure the services of a home inspector. Additionally you need to be sure to keep a regular maintenance scheme.
Pay attention to aesthetics
A couple of things can drastically improve the aesthetic appeal of any home thereby increasing the worth. These things are:
A freshly smelling interior: an appealing smell in any home no matter how humble a home it is, is very good for such a home. you should pay attention to the smell that emanates from your house. Don’t just cover offensive odors with fragrances rather fish out the cause of such offensive smell and eliminate it.
A catchy exterior paint and more neutral and calm tones on the inside:
Ensure your home is well lit at any hour of the day.
Keep your kitchen, bathroom and other areas of your home sparkling clean. Dirt devalue a home.
Upgrades: Keep your home up to date
A couple of upgrades although economical, but they can grant your home competitive edge. Especially if you intend to sell your home. Finally, let’s talk about cost-effective upgrades that might give your home a competitive edge.
Some of the common upgrades you can try includes:
Go green
With all the fuss surrounding environmental degradation and the need for alternative energy, zero-carbon energy sources solar or wind or high efficiency devices are sure to drive up the value of your home. These eco-friendly energy sources make the inhabitants or prospective buyer excited about your home. They want to explore these relatively unknown technologies and this is the value we are talking about.
The kitchen and bathroom could also get a couple cost-effective upgrades that will culminate to higher value. For the kitchen, a couple changes like changing that stained ink or outdated appliance for a shiny new piece of appliance can surge up the value of your home. For the bathroom, replacing an outdated vanity, light fixtures or old plumbing will guarantee a couple more dollar for your home.
Consult a design expert.
Inasmuch as a couple DIY improvements cannot help your home, a design expert in Edmonton can sit with you and you both can strategize on improvement steps that are more important for your home. Different homes require a different set of improvements that will matter most depending on site, size and home structure.
Beautification of home, general repairs or just upgrading of property worth for a possible sale, whatever your reason for home improvementmight be, the tips discussed above can help you upgrade the value of your home from what it is now to something you didn’t think possible.
Every home needs a well-equipped and functional kitchen, but the size of it sometimes can seem as a great obstacle to your plans. Just because you don’t have as big space as you wanted, it doesn’t mean you can’t decorate a lovely kitchen in which you can keep all your pots and pans, and prepare delicious food for your entire family. With only a few easy tricks, you can design a cute little kitchen, so feel free to look for inspiration in the following tips.
Lucite and light hues
When you have a small space, you should always decorate it with bright, light hues to make it visually larger. That’s why white walls along with white floors will not only offer you a spacious, but a clean look as well. Furthermore, for an airy appeal, think about having white rafters, countertops, backsplash and white cabinetry. To add a bit of contrast, consider pendant lights and a few wooden items. Aside from white paint, it would be a good idea to find a way to let as much natural light inside the room as possible to extend the visual horizon, which will instantly make the room look spacious. Furthermore, to eliminate visual clutter, think about Lucite barstools, trays, drawer pulls and paper towel holders.
Put cookware on display
You can never have enough space in a small kitchen, which is why you shouldn’t fill your cabinets with pots and pans, but find a more suitable storage for them. Think about using Command Hooks to hang them on an unused wall. Alternatively, you can use the sides of the cabinets to do the same, and go from the biggest item on top, to the smallest on the bottom, to create a nice little hierarchy. Also, think about doing the same with cutting boards. A chunky vintage cutting board can double as an artwork, so you have a win-win situation with not cramping your cupboards and creating a lovely decor for your kitchen.
Use metallic details
If you’ve opted for white to dominate the kitchen decor, a nice way to break the monotony would be to introduce a few metallic details to the room. From gold lampshade, to bronze bar stools, you can create a perfect modern decor with various metallic items. Chrome or stainless steel appliances such as bosch double wall oven can be a great addition to your kitchen, offering you both functionality and modern look. With brass fixtures, drawer pulls and doorknobs your kitchen will look amazing.
Go minimalistic
The trick to make a small kitchen look bigger is to keep it decluttered. Not only should the room be neat and tidy, but without too much furniture as well. While cabinetry and a few basic appliances are necessary, you don’t have to cramp the kitchen up with various decorative items. Instead, go for minimalistic approach. Uncomplicated fixtures, light colors and clean lines will make your kitchen look spacious and tidy. Go for plain cabinets and bare floors to highlight the chic minimalist theme.
Open floor plan
A lack of visual borders immediately creates a bigger space. That’s why open floor plans are so popular nowadays. With no walls to create a visual or spatial barrier, your kitchen will appear much bigger than it actually is. It will open up cramped spaces, allowing you to determine where the border between the kitchen and dining room is. This way, you can expand or reduce the size of your kitchen just by reorganizing your furniture.
Open shelving
Small kitchens are all about saving space, so adding storage without creating a bulky kitchen is a goal to strive for. The best way to achieve that goal is to use open shelving. It won’t take up a lot of space, literally or visually, and it’s a good opportunity for you to express your taste in glassware and details. For kitchens that are especially compact, shelving above and below the upper cabinets can be a good storage solution. You can store cake pans, extra towels and other stuff you don’t use as often above, and keep seasoning, oils and items you use on a daily basis below.
Multi-purpose implements
Small kitchens can sometimes limit you to using only several appliances, leaving you without the room for a very much needed dishwasher. Lucky for you, a new innovative sink will be the greatest invention for you and your tiny kitchen. A sink that doubles as a built-in dishwasher is the best solution for small kitchens, as you won’t have to think about where to put a bulky machine.
Decorating a small kitchen can often be challenging, but rewarding at the same time. Thinking about various options and coming up with the best solution will help you think outside the box and create a unique kitchen area. If you ever feel a lack of inspiration, feel free to use some of the aforementioned tips, and your kitchen will look perfect.
There are numerous signs it is time to replace the windows in your home. Although broken glass is a clear-cut sign you need to replace the structure, you should also pay attention if your home has recently undergone a makeover. Additionally, you need a professional to come by your abode if a storm has just rolled through your town. However, you can save time and money if your windows just need repairs. Here are some points to keep in mind as you debate whether it is better to repair or replace windows.
Windows Are Painted Shut
During the winter, you may decide to paint the windows shut, so they keep the cold air outside. Perhaps you recently painted your windows and did not realize they could become shut as a result. During the summer, you may want your windows open, so you can get nice breezes coming in. In most cases, this simply requires hiring someone to come out with a sash saw. The expert will put the saw where the paint has sealed until it is open. Allow a professional to do this work because handling a saw can be dangerous.
Jammed Sashes and Rot
Rot can begin to form within windows if they are exposed to water penetration. A professional may be able to repair it if he or she can get to it soon enough. The windows will need to be removed and repaired off-site. The expert will also look at the layers of insulated glass to see if any condensation has formed between the layers. That is a serious problem, but in many cases, it can be repaired. Your warranty often covers this type of damage.
Greater Energy Efficient
In the event you pay more than you think you should on electricity every month, then you should look for ways to reduce that number. One way is to make your windows more energy efficient. Prompt window glass repair and weather stripping the structures can help limit drafts. Ideally, you will get this work done when it is cold outside and when humidity is low. While some homeowners will need to replace their windows, it is possible you will just need to install screen and storm windows instead.
Windows in Historic Homes
If you own a historic building, then you need to be extremely careful about replacing windows. You may not have a choice, but you need to select windows that maintain the historical significance of the property. It is still possible to acquire more energy efficient windows or new windows in case the damage is too extensive. A professional will be able to tell you what to do when dealing with homes featuring leaded or stained glass.
Repairs naturally cost less than a total replacement. However, if you always have to repair something related to your windows, then it may be more cost-effective in the long run to get a replacement sooner rather than later. With new windows, you at least have the peace of mind they should remain viable for between 20 and 40 years depending on how well you maintain them.