How to Use Mason Jars with a Blender

How to Use Mason Jars with a Blender


How to Use Mason Jars with a Blender
Buy at Amazon

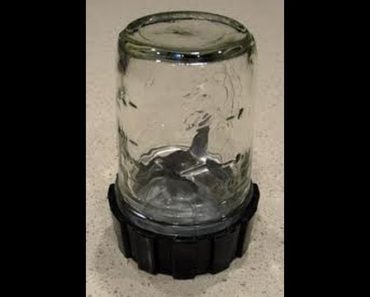
This Mason Jar Blender Tip is a simple trick that can make your kitchen life easier. It seems like many/most blender manufacturers designed the threads of their blender jars to match the threads of canning jars.

This means that in many cases (especially with older blenders) you can make a Mason Jar Blender.

Simply can screw the blade into your mason jar and blend your items in the jar. This makes it easy to measure things since many mason jars have cup markings molded into the glass.

If is also great to blend small amounts of things without having to clean the large blender jar.

Personally, I use it to make rubs and spice mixes.  Just take your dehydrated vegetables/spices/herbs and blend together to make all sorts of seasoned salt mixes.

It is also a easy way to make single serve smoothies if your into that sort of thing.  I use this all the time to make butter and creams.  It works great.  It also is much easier to clean than a full size blender.

This is one of my favorite tips so far.  I how this mason jar blender tip is as useful to you as it is to me.

Replace a Jerry Can Cap with a Drum Bung

Replace a Jerry Can Cap with a Drum Bung


5 Gallon Jerry Can Tip
Buy at Amazon

The CARB compliant gas can law means all gas cans and gas can lids sold in this country have to have a vapor lock on them. The extra spillage associated with the new caps causes a lot more hazardous material to be released than the vapor it was trying to prevent.  Which by the way is still released when you open the darn thing.  That matters because you cannot buy caps for the military 5 gallon jerry cans anymore.

I have seen several functional 5 Gallon Jerry Can gas containers in surplus stores around Tennessee, but I never bought them because they did not have lids.

Jerry Can Comes from the GI Term for Germans

Imagine my surprise when I realized that when we stole the idea from the Germans in North Africa during WWII.  Then, we redesigned the cans to use standard bungs from steel drums.

I did not want to take this at face value.  To investigate, I went to Nashville Drum and Barrel to get a bung as well as a steel drum for a homemade charcoal post I am working on.

I do not get any compensation from them; they just have always treated me right.  Therefore I wanted to pass their information to those interested. They are located in Fairview TN and their phone number is 615-799-9449.

The reason I like these guys is not just that they are the only game in town for small purchases, but because when I tell them what I am doing, they try to get me a used drum that best fits the intended purpose.

They will not sell you a used barrel for projects involving potable water.  However, they will tell you what was in the drum you are buying.  That is nice when you are making a rain barrel or a barrelponic setup.

Sometimes when I go to other stores and explain what I need and what I need it to do the clerks get funny looks and tell me they don’t have the parts.   When I went to the drum store and tell them what I want they help me the best they can.  When I told them about the bung fitting the jerry can, I was pleasantly surprised when they gave me a drum bung just because they thought it was interesting.

Jerry Cans are Great for Preppers

So to get back on topic, the bung fit the jerry can perfectly.  Now, I have a spare for my gas can.  From now on every time I find a jerry can on sale without a lid I buy it.

They are perfect for preppers, 5 gallons is a fine balance of weight for one man to carry, and capacity. They are strong, easy to store and stack, and because of the three grips on the top, one man can carry it by grasping the center handle, and two can carry one by grabbing the grips on each side.

Jerry cans are a wonderfully engineered product, let’s just hope modern government stops stealing bad ideas that collide with good ideas our past governments won by conquest…

DIY Chlorine Battery

DIY Chlorine Battery
Buy at Amazon

I will tell you right now, a homemade chlorine battery is not going to be as cost effective as commercial batteries.  In the nanny state it is almost impossible to get pure enough chemicals to really experiment. However, I think it is important for the sustainable power types to understand what is going on within their system. This allows them to make informed decisions when they buy their batteries.

In a true grid down collapse, i.e. Mad Max scenario, the ability to make batteries from scrounged materials may come in handy. Now before you get too excited, if you get one volt per battery cell you are doing extremely well.

It will take many of these cells to get any usable energy.   This is not a cost effective way to power your home.

In the video we make a battery using a mason jar, copper, aluminum, and chlorine bleach.

Basically, any two different kinds of metal can be placed in a conducting solution and you get a battery. In some schools they still teach an experiment that involves inserting copper and zinc strips into a lemon or a potato to make a battery.

Once you get the basic chemistry down, feel free to experiment.  I have seen instructions for making large cells from aluminum soda cans riveted together and inserted into long PVC pipes. Right now I am experimenting with PVC pipe, grounding rod, and aluminum pipe.

If you want to see the procedure to make a chlorine battery, please watch the video.

As promised in the video, this article will discuss the theory of batteries in a little more detail.

This is just a quick down and dirty – if you want more information, you can do an internet search for the following battery types:

  • Edison Battery (Nickel Iron)
  • Acid, Copper, Zinc
  • Salt, Copper, Zinc
  • Air, Copper, Zinc
  • Acid, Copper, aluminum
  • Salt, Copper, aluminum
  • Air, Copper, aluminum

The Chemistry in a Nutshell.

Metal atoms are held together by electrical attractions between the nuclei and the electrons around the atoms.

When you place a strip of metal in a glass of water, the water molecules interact with the metal atoms on the surface of the strip. Water molecules are polar, meaning the one side is slightly positive, and the other side is slightly negative. This is because the two hydrogen atoms are not on opposite sides of the oxygen atom, but are instead about 105° apart. The hydrogen side is positive, and the oxygen side is negative.

At the location where the water and metal meet, some of the metal atoms are attracted to the negative side of the water molecules. This attraction allows the metal atom to leave one or more of its electrons behind in the metal strip, and others to move into the water.

Because of this movement of electrons a metal atom is left with a very small negative electric charge. This tiny charge does not pull very much on the metal ion that has left the strip. But since there are huge numbers of atoms at the surface of the metal strip, and an enormous number of metal ions are in the water at any given time the metal strip ends up with a slight negative charge.

Some metals hold on to their atoms more tightly than others.

This means that some metal strips will become more negative when placed in water than others do.

If one metal strip has more extra electrons than another strip of a dissimilar metal, the extra electrons will flow from the first strip to the second, until they both have the same charge and equal each other out. However, before the electrons can flow from one strip to the other, they need a conductive path.

We give them that path when we connect two strips of different metals with a wire. The electrons then flow through that wire, creating an electric current.

Acid Batteries (we will use copper and zinc as an example)

In the case of the copper and zinc strips, the copper holds onto its atoms more strongly than the zinc does. That means the zinc strip is more negative than the copper strip. The electrons will flow from the zinc to the copper.

When the forces are eventually balanced, the copper strip ends up with more electrons than the zinc strip. The zinc strip now has fewer electrons, and it cannot attract the zinc ions back to the strip.

If our battery just had water in it that would be the end of the battery. This battery has water plus an acid. An acid has an easily detached hydrogen ion. (in the video I mention about ionic solutions). Hydrogen ions are positive, and the remaining part of the acid becomes negative when it loses the hydrogen ion. In a battery made with soda (phosphoric acid) you would end up with phosphate ions – in a vinegar battery (acetic acid) you would have acetate ions left.

When all of those positively charged zinc ions bump into those negatively charged phosphate/acetate or other acid ions the phosphate ion is more strongly attracted to the zinc ion than to the hydrogen ion.

The positively charged hydrogen ion is attracted to the copper strip

The positively charged hydrogen ion is attracted to the copper strip, because the copper strip has the extra electrons, and is thus negative (opposite charges attract).

The hydrogen ions attract the electrons from the copper, and become neutral hydrogen atoms. These join up in pairs to become hydrogen molecules, and form bubbles on the copper strip. Eventually the bubbles become big enough to float up to the surface and leave the system entirely. (which is why you vent batteries to keep the explosive hydrogen from collecting)

Now the copper strip no longer has the extra electrons. It attracts more from the zinc strip through the connecting wire, as it did when the wire was first connected.

The copper ions next to the copper strip are not as attracted to the strip as they were before. The hydrogen ions keep taking the electrons that attracted the copper ions. So those ions are free to move through the liquid.

At the zinc strip, zinc ions are being removed, leaving extra electrons. Some of those electrons travel through the wire to the copper strip. But some of them encounter the copper ions that happen to bump into the zinc strip. Those ions grab the electrons, and become copper atoms. We can see those atoms build up on the zinc strip. They look like a black film, because the oxygen in the water combines with the copper to form black copper oxide. (Electroplating anyone….)

Eventually, all of the zinc is eaten up, and the copper and copper oxide falls into a pile beneath where the zinc strip used to be. The battery is now dead, and no more electrons flow through the wire. If there was not a lot of acid in the water, the acid may have been used up first – leaving the metal. (int the video we mention this by saying the stronger the bleach solution the stronger the battery but the shorter time it will last)

Salt Batteries (Air Batteries)

When you use a salt solution instead of acid in the water you have a different chemistry.

Salt breaks up in water to make positive sodium ions and negative chloride ions. These ions reduce the energy needed for water to split into hydroxide ions (OH-) and hydrogen ions H+ (the hydrogen ions quickly find another water molecule and create hydronium ions, H3O+).

At the zinc strip, the zinc ion combines with four hydroxide ions to form one ion of zincate (Zn(OH)42-), leaving two electrons behind on the zinc strip. The chlorine ions from the salt then combine with the hydronium ions leftover when the hydroxide ions were taken away by the zinc, and form hydrochloric acid.

Over on the copper strip, four electrons combine with oxygen dissolved in the water and two molecules of water to form four hydroxide ions. The sodium ions from the salt combine with these hydroxide ions to make sodium hydroxide. (This is the chemistry behind the 12 volt chlorine generator from an earlier video)

The hydrochloric acid and the sodium hydroxide combine back into salt. So the salt is merely in the picture as a way to move charges through the water. It is not used up.

We can summarize what happens at the zinc strip (called the anode)

Zn + 4OH- Zn(OH)42- + 2e-

4Cl- + 4H2O 4HCl + 4OH-

Zn(OH)42- ZnO + H2O + 2OH-

At the copper strip (called the cathode) we have:

O2 + 2H2O + 4e- 4OH-

4Na+ + 4OH-4NaOH

A zinc-air battery gets its name from this reaction

The oxygen from the air is combining with the zinc.

The copper electrode is just there to conduct the electrons, and does not participate in the chemistry. It can be replaced with a carbon rod.

You may notice that after a short while, the oxygen in the battery is used up, and the current (and thus the brightness of the LED) begins to drop. Stirring the salt water helps to put more oxygen in the water, and the LED gets bright again.

Source:

Science Toys

They had the best explanation of what is happening and I took a lot of their information to write this as their way of explaining was a lot easier to understand when I contrasted the two. (I guess that means they understand the process much better than I do). If you have kids with an interest in science I recommend visiting their site.

How to Make Beeswax Votive Candles


How to Make Beeswax Votive Candles
Buy at Amazon

When I got into beekeeping I wanted the wax as much as I wanted the honey. Beeswax can be used for hundreds if not thousands of things. It is great bullet lube, helps hold bow strings together, has medical and cosmetic uses, and makes a great additive to woodworking varnish. But one of the biggest uses is candle making. Beeswax candles have some great advantages to paraffin based candles.

They are renewable and natural – bees make more wax each year. They burn cleaner and longer than paraffin, unlike paraffin candles they won’t deposit soot in your home. Beeswax burns brighter than paraffin, and is more similar to sunlight. Beeswax candles don’t drip wax.

I guess the only downside of beeswax is the cost. Because paraffin wax is a by-product of oil refining, there is a lot more of it so costs are lower.

However, even cost can be mitigated if you keep your own bees and make your own candles.

Be Safe While Making Candles

Before we get into How to Make Beeswax Votive Candles, I want to give you two safety caveats.
Beeswax gets HOT. I have melted several plastic measuring cups and molds working with it. It is also very flammable. If you are not careful and use a stove without a double boiler you will most likely have a fire. Never leave heating beeswax unmonitored.

It’s not really hard to do; all you need to start is just get a mold, some wicks, and some beeswax.

Melt Wax

To melt my wax, I used wax that I had previously strained. Raw wax will have bee bits and other unattractive items. If you don’t have any hives, or a friend with hives to barter with, you can buy beeswax from a craft store or order it online.

To melt it, you either need a double boiler (in a pinch you can use two pots – just make sure they are Pyrex or stainless steel. Anything else will probably stain your wax.) I used a Pyrex measuring cup and a couple minutes in the microwave.

The microwave method can get the wax super heated, so I run it long enough to get some wax melted, and then use what litte patience I have to let the melted wax melt whatever is left. If you run your microwave until all the max is melted it will be VERY hot, and can melt plastic….

Mold Candles

For a mold I bought a multiple votive mold from a bee supply store, but you can use just about anything. I have heard paper Dixie cups work outstanding, but I heard that after I dropped money on the metal mold.  For wicks I bought a bag of pre-tabbed wicks that were cut to length and have a little metal mounting tab attached. You can buy a roll of wick if you want, but its more trouble to make it stick in the bottom of your mold. If you were using paper cups, generally you would need to punch a hole in the center and run the wick up through the cup and tie the end of the wick to a stick to hold it in place.

Add Wick

With a pre-tabbed wick, all I did was put a little dab of melted wax in the mold and stick the tab to it. Once that hardened, I poured a little more wax to cover the tab and let that harden. I then slowly poured the rest of the wax to fill the mold. You will need to pour it in slowly, as you don’t want any air bubbles.

Beeswax needs to cool slowly or it will crack. The larger the candle the longer it will take to cool. As it dries the top will shrink and may leave a little depression around the wick. The wick hole might also enlarge. Either can be fixed by pouring a little hot wax to fill it in.

Once the candle completely hardens, I turn the mold over and gently tap the bottom to knock out the candles. Just like with my interpersonal communication, gently doesn’t always work, in that case, I grab my stick and beat the fire out of the bottom of the mold until the stubborn candles drop free. If I was cheaper and used paper cups I would just peel the paper off.

If there are imperfections in the candles, and I am giving them away, I just use a little heat from my hands, a heat gun, or a quick dip in hot water to soften the wax and run the imperfection away.

After that, I just store them is a cool spot until my wife gives them away to her friends…