I just discovered this idea on pinterest late last week and I hat to share this tip on how you can use this car seat emergency sticker to keep your child safe.
I bumped my schedule around to post this because I think it is exactly what risk management is. Getting the most safety from the least effort.
If something happens to my wife and I and we would not be able to speak, this Car Seat Emergency Sticker will give responders the information they need.
This allows faster emergency care for W.T.
This was especially useful when he was a baby. As back then his verbal communication skills were limited to saying “mow mow” when asked what the kitty says…
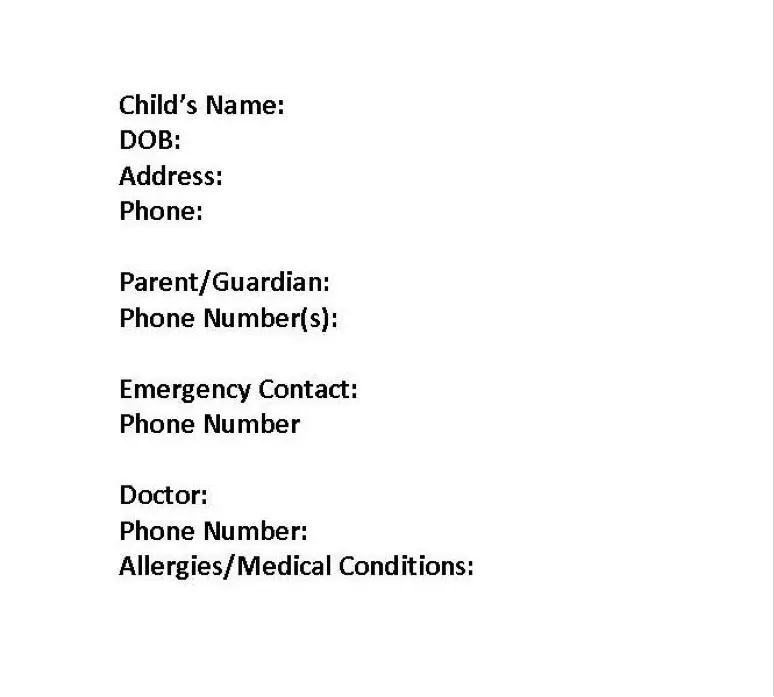
So what we are going to do is put emergency contact information on a car seat. We are printing out important information to stick on the car seat just in case.
I just made a page that contained vital information that someone might need to know in the event that we ever had a wreck and I was unable to communicate with responders.
I then printed them on regular paper, covered them with clear packing tape and taped one to the side of every car seat we have.
When I garden or work with my hands I tend to end up with dry hands – I have all sorts of beeswax based salves, but preventing is better than treating, at least in my opinion. So I wanted to show you how to use beeswax for dirty hands to keep them clean.
I have found that if I have some warm beeswax (body temperature) and rub it on my hands I get just enough wax rubbed in to protect my hands, but not so much that I get it caked on (as when I am working with melted wax.)
Because I am using wax and not a salve or cream, the coating is dry and relatively durable, and still comes off with soap and water when I am done working.
I hope this tip on using Beeswax for Dirty Hands helps – if it doesn’t (or your hands are cracked and dry from other things) try my beeswax balm recipe.
This tip does take some work to rub it on, as you have to knead the wax and rub it into between your hands to heat it up. You can’t just swipe the wax across you palm. However, from personal experience, this is worth it when you are going to be working in the dirt for a while.
Garlic is a powerful antioxidant with antimicrobial, antiviral and antibiotic properties.
I have also found that as a Garlic Cold Remedy, it provides decongestant and expectorant effects when I have a cold.
I am not a doctor, obviously. Additionally, Science has not isolated the components of garlic responsible for medicinal effects. However, I have had good experience that garlic does a great job at preventing and remedying colds.
I would have to say, that even if it is only psychosomatic, the vitamin C, enzymes, and minerals such as sulfur and selenium, definitely help my body.
Allicin is the Active Ingredient
Allicin is the powerful antibacterial agent found in garlic. Since Allicin is only present shortly after garlic is crushed and before it is heated. Eating fresh garlic is best for treating a cold or flu.
As I mention in the video some experts even recommend eating a clove or two every couple of hours until the bug is entirely gone.
However, this may play havoc on your social schedule. Later in the video I share a tip to help that. However, the main purpose is to show how to make a cough syrup that makes the garlic a little easier to swallow.
Basically all I did was to blend garlic with apple cider vinegar, strain, and bottle. In the video I also added some other ingredients for taste and to add to the tincture’s effectiveness.
This is something that works well for me. I believe garlic belongs in every prepper’s garden as it is a powerful anti-bacteria, as well as a much needed seasoning agent.
This following is a guest post from Nadia Jones about colloidal silver. As with all medical posts, please use your own judgement and consult a doctor. I have no firsthand experience with colloidal silver taken internally myself, so I have no opinion on either side of the debate.
One of the most important aspects of being prepared is addressing medical concerns — having a first aid response kit and solutions to medical problems of any sort as they arise. If our society were to collapse, we would no longer be able to rely on hospitals and doctors, so we would have to cure our ailments ourselves.
This post deals with the question: Should You Trust Colloidal Silver?
Over the years, various propponents of preparedness have offered solutions to medicine after a collapse of society, but the one that stands out as probably the most controversial is a literal solution. It’s called colloidal silver.
Colloidal silver is a suspension of silver particles in water that purportedly has a kind of miraculous healing power. Given that silver ions are bioactive, can kill bacteria in vitro as well as in external living tissue wounds, are disinfectants, antiseptics, and are regularly found woven into wound dressings, the hypothesis that silver can act as a universal antibiotic isn’t all that surprising.
And if you had to fend for yourself medically, the wide availability of silver and the relative ease of making a colloidal silver suspense would make it an excellent and obvious candidate for medical treatment.
In fact, before antibiotics were introduced into the medical system in the 1940’s, silver was widely used in the medical field, treating everything from infections to epilepsy and gonorrhea.
With all these reported usages and alleged benefits of colloidal silver, you may begin to wonder why silver isn’t used more extensively in the medical field now, especially since silver is so abundant, and relatively inexpensive.
There is no shortage of theories explaining this phenomenon, most of them conspiratorial. (Doctors, hospitals, and governments wouldn’t make any money if they used silver.) The theory that shouldn’t be ignored, however, is the one that is based on scientific tests and trials.
While colloidal silver hasn’t been proven to have any adverse health risks — except for argyria, which is a silver coloration of the skin due to high silver levels in the body, which is only cosmetic, as it were — doctors and scientists have yet to find definitive and consistent evidence that colloidal silver has any curative properties whatsoever.
Silver by itself is not ionized, and it is only ionized silver that has been proven to cure and treat ailments. The silver delivered to the body by colloidal silver suspensions is inactive, and therefore should not have the same properties as silver ions.
The FDA has prohibited manufacturers of colloidal silver to market it based on any medical claims — in fact, it is illegal to do so — and practicing doctors will never prescribe or even recommend colloidal silver to patients. Claims made about the effectiveness of colloidal silver are largely unsupported, and where they are supported, the evidence is spurious.
It is possible that colloidal silver is a kind of placebo, in that if someone who truly believes that colloidal silver will cure their ailments administers a dose to herself, it might actually work. But whether you want to base the success or failure of your post-collapse society on colloidal silver is, in the end, up to you.
Author Bio:
This is a guest post by Nadia Jones who blogs at online college about education, college, student, teacher, money saving, movie related topics. You can reach her at nadia.jones5 @ gmail.com.
This post shows how to make Dakin’s Solution, which is a great homemade antiseptic.
Dakin’s solution is an antiseptic solution containing sodium hypochlorite (Common Household Bleach) and water. It was first developed during World War I to treat infected wounds.
Dakin’s solution is not the only antiseptic that can be made at home. As there are several stronger germicidal solutions available, however many of these contain either carbolic acid (phenol) or iodine to prevent infection. Which unfortunately means they either damage living cells or lose their potency in the presence of blood serum.
Dakin’s solution does not damage living cells; its solvent action on dead cells hastens the separation of dead from living tissue.
Dakin’s solution is easy to make, and is prepared by passing chlorine into a solution of sodium hydroxide or sodium carbonate.
Unfortunately, the solution is unstable and cannot be stored more than a few days.
It is used by periodical flooding of an entire wound surface with the solution.
As always, I am not a doctor, and you should research anything you find on line so you are assured of its use and the accuracy of the material presented.
Precautions:
• Keep out of the reach of children.
• Do not swallow it if used as a mouth wash,
• Do not use longer than one week.
• Obviously you should not use this solution if you are allergic to any of the ingredients.
• Stop use of the solution if your condition worsens, or a rash or any other reaction develops.
Call Your Doctor If You Have:
• Pain or burning sensation
• Rash or itching
• Redness of skin
• Swelling, hives or blisters
• Signs or symptoms of wound infection
Storage:
• Keep the solution stored at room temperature.
• Cover jar with aluminum foil to protect it from light.
• Be sure the jar lid is tight for storing.
Cleanliness is very important to this procedure, sterilize everything, and keep your hands clean. Remember the maxim: you cannot sterilize what is not clean
Ingredients:
Sodium hypochlorite solution 5.25% (Clorox® or similar household bleach). Be sure to purchase unscented bleach. Do not use ultra bleach products it is more concentrated and thicker.
Sodium bicarbonate (baking soda)
Tap Water
Equipment:
Clean pan with lid
Sterile measuring cup and spoons
Sterile jar with sterile lid (see above)
Procedures:
Measure out 32 ounces (4 cups) of tap water. Pour into the clean pan.
Boil water for 15 minutes with the lid on the pan. Remove from heat.
Using a sterile measuring spoon, add ½ teaspoonful of baking soda to the boiled water.
Add Bleach per chart below to achieve differing strengths of solution.
Place the solution in a sterile jar. Close it tightly with the sterile lid.
Label the jar with the date and time you made the solution
Throw away any unused portion 48 hours after opening. Unopened jars can be stored for one month after you have prepared them
Strength of Solution is dependent on how much Bleach to water.