What will happen when you are near a water body and would like to catch some fish without having packed any gear? Well, there are many ways to catch fish without having any gear with you. This article will chow how to catch a fish with your hand
If you have no gear and are not in a position to fashion an improvised fishing rod, hook, line or even a trap, then you can resort to hand fishing.
Hand fishing or otherwise referred to as noodling has been in practice for a long time now. It is not recommended, but if push comes to shove, you may have to resort to it.
You can choose to wade in the water, but you will be susceptible to catching hypothermia. More so, if you opt to practice this craft at night, you will be at risk. During the day the water temperatures are warmer than at night.
If you do not want to get wet, then, you can find a spot where the water is flowing slower than the whole stream and place yourself there. Position yourself at the banks and lie in wait for the fish. Look for areas with a lot of stones lined along the coastline.
Step 2: Patience Pays
In hand fishing, you have to master patience as you lay in wait for the fish to come to you. Your hand will be radiating more heat than the surrounding of the fish. It will spook the fish as it will be a foreign object to it.
Wait for about 10 to 15 minutes for your hand to cool down and be at the same temperature as the surrounding. Once it cools down, the fish will have troubles differentiating your hand from other objects in its habitat.
Step 3: Tricking the Fish
When you resort to hand fishing, you are likely not to have any bait with you. You can either look for worms form below rocks or even use dead insects as bait. If not you can use your hand as bait.
Yes, you got that right. To use your hand as bait, you have to wiggle it like a worm and draw the fish that is likely to be hidden towards you. The motion of your finger will look like that of a worm that is struggling. The fish will move forward and take a bite on your hand.
Once the fish is within reach, act fast by holding it by the gills or the mouth. By putting your hands under its gills, you get an easier grip from the hard cartilage that makes up the gills of the fish. Otherwise, position your hands under the fish and quickly throw it on the bank.
If you used your hand as bait and the fish has gripped at it. Your first reaction may be to pull out your finger, but you have let your hand stay put in the mouth of the fish and pull it towards you.
Tips on How to Ensure Your Success in Hand fishing
Just like any other fishing technique, hand fishing requires precision and making calculated moves. How do you go about this?
➔ Approach the fish from behind. In this manner, your strike will be unexpected to it.
➔ As you place your hand in the water, be slow but steady so as not to startle the fish
➔ Look for holes and rocks along the shoreline. The fish are probably hidden here
Conclusion
Hand fishing is recommended for survival only. However, it is a sporting activity in some other parts of the world. You may step on something sharp as you wade in the water or cut you hand by sticking it almost everywhere.
It is advisable to put on shoes, have long pants on and even put on gloves as a precautionary measure. When catching fish with your bare hands, you are at risk of losing your hand or fingers if you get an infection.
If you have to resort to noodling, then let it be your last best option. You can build traps, improvised fishing rods, etc. These methods may not be as exhilarating, but they sure are safer. Personally I like using a rod and reel, but even then you have to perform reel maintenance so their are drawbacks to that also.
Don’t risk getting hypothermia or frostbite but it will come in handy in survival mode. Have you ever practiced hand fishing? Let us know what your experience was like in the comments section below….
You might not have the ability to drive to the local market to get the things you want.
This is when the survival hacks come into play. Yes, the things which you have with you can be utilized effectively.
We are creating the list of amazing survival hacks to let you know.
Here are 5 Outdoor Survival Hacks Using Everyday Items
Crayons To Candles
What You Will Need To Make
If you have old, broken crayons, then making candles using it can be a good option for you. Since there are some differences between crayon wax and candle wax; you would have to use usual wax in the mixture.
This will make the candles burn brightly as well as for a long time. Hence, the things you need to make candles are:
Old, broken crayons
Candle wax
Wicks.
Step-by-Step Instructions:
Step 1
After selecting the crayons, you would have to remove the wraps of crayons. For this, you would need a bowl having water and ice in it. After that, the crayons have to be put in the cold water and leave it for five minutes. Likewise, the wrapper can be removed.
Step 2
After taking off the wrappers from the crayons, it is the time to start the melting process. The desired colored crayons would have to be kept in a container and then leave it in the microwave for 2 minutes till it becomes smooth.
Step 3
It is the time to mold the melted crayon for preparing your candles. You can pour this mixture into a metal cutter of cookie, a mini cup of baking or any container according to your wish and leave it for 5 minutes.
However, it is important to note that you would need to spray non-sticky spray on the bottle prior to pouring.
Step 4
Selecting the size of wick forms a significant part in candle making. There is probably no particular formula for it, but there are guidelines. The size of the wick must match with the size of the candle.
It might otherwise create particular problems like shorter wicks will leave unburned wax while longer wicks will produce much smoke and make the wax to overflow from the container.
Wick size might be a difficult part of the process, but by applying general knowledge, things can become easier.
Step 5
After you complete selecting the ideal wick, you would now have to insert it in the candle. A toothpick or pointed end of a crayon can be a good option if you want to make a hole in the half made candle.
You would now have to put the wick inside and compress the wax with fingers. After inserting the required amount, the extra wick that remains would have to be cut off. And your candle finally gets ready after it is taken out from the mold.
Turn a Can into a Lamp
What You Will Need To Make
Soda can eventually turn into a valuable thing after it has been used. If you want to make a lamp quickly and easily, soda cans could be a good option for it. There might be many soda cans in your house that are empty.
Hence, you just need to utilize them instead of throwing away. It’s just a matter of skill and creativity that would help you to make out everything. However, for turning a can into a lamp, you would need
A knife
A soda can to shape it out.
Step-by-Step Instructions:
Step 1
The first thing that you would have to do is hold the can and cut a small ‘window’ on it with the help of the knife. However, you should be very careful while using the knife as lack of attention might result in injury.
Step 2
After cutting the window in the can, you would have to open up the section and clean inside. Now, you just have to put the tea candle inside the can through the window. And this makes your can ready as the lighted lamp.
Make Fish Hooks Out of Can Tabs
What Will You Need To Make
Soda can will be a good material if you want to make fish hooks in the simplest ways. It could be a good way to reuse the cans rather than throwing them away. Things that you would probably need to make fish hooks are
A soda can tab
Pocket blade
Scissors
Paracord
Multipurpose tool
Lighter
Diagonal cut pliers.
Step-by-Step Instructions:
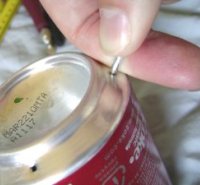
Step 1
The first thing you would do is cutting the tab of the soda can. To start with, cut an aperture in the tab’s bottom hole. You need to make sure that you are cutting in a slanted way and after that begin to cut away the metal around the hook as much as possible. Now you need to turn the hook into a keen point by filing it.
Step 2
The next step in making fish hook is filing the hook. If you have to file the keen edges of the hook, the multipurpose tool would be a good option to use. A multipurpose tool can be said as a versatile utensil that can be used for various purposes.
It can be kept anywhere in the house like in kitchen drawers, shelves and can also be carried in a purse, pocket or tool box.
Step 3
It is the time to make an aperture for fishing lines. To make this small hole, the pocket blade could be a good one to employ.
Using the pocket blade, you would have to enlarge the small aperture at the hook’s top. This would be the place where you will be tying the line of fishing.
Step 4
After making the hole for tying fishing line, you would now have to cut the paracord.
You would have to take a paracord that is 4 to 6 inches approximately in length and then cut a piece out of it.
Step 5
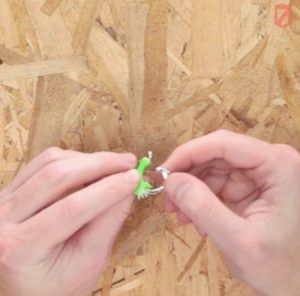
Now you have to insert the hook in the paracord piece.
The end of the hook has to be sufficiently sharp to make the insertion easy.
If any extra part of the cord remains after insertion, you would have to cut it off.
Step 6
Your fish hook is almost ready now.
You would just have to light the paracord’s top end while leaving the bottom part unraveled.
You are now ready to keep the hook in your tackle box and go out for a lovely fishing day.
Make A Mini Stove Out of Soda Cans
What Will You Need To Make
The things which you need to make a mini stove are already there in your house.
Two soda cans minimum
Measuring tape
Scratch awl or any sharp thing
Knife
Scissors
Sharpie
High-temperature tape-like metal tape, foil tape, aluminum tape or those which will not burn.
Step-by-Step Instructions:
Step 1
The first step involves creating of burner holes.
Using a scratch awl, you would have to make holes on a can’s bottom edge. It is said that small holes are fuel coherent while big holes can burn fast and hot. You can do whichever you like.
However, numbers of the hole aren’t so important. You can make holes in the can as much as it is possible.
Step 2
Now it is the time to make the main opening. For making it, you would have to cut the bottom from where the holes were made in the can. You would need a strong instrument to cut it as the can is thicker here.
An x-acto knife with a sturdy blade might be a good option if you want to do this. If in case the edges turned to be a jagged bit, you would have to file it then.
Step 3
The third phase involves cutting down the top of the stove. By measuring 20mm from the can’s bottom, you would have to cut it to make the top part of the stove. Keeping a regular Sharpie on the table, you have to turn around the can against it.
If you want to get a clear cut, you would have to do a rough cut at first to separate the end and then a final cut through the mark directly.
Step 4
To make tabs, you would have to cut the stove top’s edges for many times. The resulted small tabs will ensure that the top will fit in the bottom of the stove correctly. You can make the number of spaced cut around evenly according to your wish or requirement.
Step 5
Now, you would have to take another can to cut its bottom. By measuring 25mm from the can’s bottom, you have to cut it. You can make the stove tall or short by adjusting the given measurement.
However, it would be better to make 25 mm standard for the first stove.
Step 6
It is the time to make the inner walls. The leftover remains of the earlier cans would be utilized for making it. However, if these remains are not in the usable state, then you might require a third can.
For making the inner wall, you would have to cut a strip of 35 mm wide. This measurement will vary according to your stove height.
Step 7
To fix the inner wall in the bottom of the stove, you would have to cut a halfway along the strip on both the ends to make them fasten together. The strip ends would have to be inside while locking.
Now you have to crop the inner wall by cutting small notches three in a number, of equal distance on the strip’s one side. It will make the fuel flow from inner wall to outer.
Step 8
All the three parts now have to be put together. You can begin with setting the inner wall with the down notched ends, then fitting the stove top and inserting the preceding cut tabs at the bottom. All these things will eventually get fixed as a puzzle.
Make A Paracord Survival Bracelet
What Will You Need To Make
For making a paracord survival bracelet, you would need:
Paracord of about 10 feet,
Lighter
Measuring tape or ruler,
Scissors
Side release buckle.
Step-by-Step Instructions:
Step 1
You would have first to measure your wrist by wrapping a nice rope or string around it. Using a marker, create a line of the string. Next, you would have to cut and melt the ends. With the help of a lighter, you have to burn the cord evenly.
Step 2
You would have to now fold the paracord of 10ft to work together on both ends. The cord threads have to be inserted through the lower opening of the side release buckle. Now you have to pull the cord’s loose ends along the loop that has been formed on the other side till it forms a tight knot.
Step 3
In this step, you would have to take the left cord to thread it beneath the cord of the bracelet and then take the right one to thread under the left one.
Then it comes to the turn of the right cord to thread under the bracelet cord, and this will continue along the loop formed with the left cord. The second braid will also continue to be built in the just the same way starting with the right one.
Step 4
The above process will continue till it reaches the bottom of the buckle. Now, the male buckle has to be pulled towards the female buckle for more limp.
After that, taking the loose cords, you would have to insert them in the male buckle’s slit. Likewise, when the final diagonal buckle is reached, you would have to pull the loose cords from the loop that was formed after loosening the braid.
Step 5
After tightening up the end, the cords’ ends have to be melted to prevent from wearing away. You need to squeeze the melted ends to make them flat. And with this, your paracord survival bracelet will finally form.
Conclusion
Survival hacks can help you to deal every instance of your life comfortably and happily. It’s all about how much creative you can be while utilizing the household or discarded materials in an innovative way. I hope these survival hacks will help you a lot in managing your life more easily and quickly.
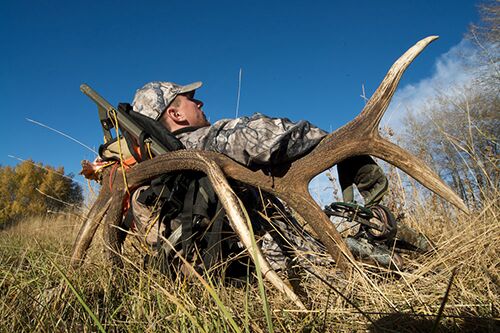
The deer hunting season is always so brief yet so intense that it calls for any deer hunter to be thoroughly prepared for it so as to take advantage of each situation that will present itself.
The aim is to become a deer hunter that has all the tricks and skills that are necessary to trick a deer into a range that a nice shot can be taken.
What better way is there to develop skills than to get some deer hunting tips that can be easily understood and implemented by anyone regardless of their hunting expertise.
There are quite some useful tips that have been determined by experienced deer hunters which can land you your priced game come next hunting season.
Additionally the folks over at WildernessToday have an infographic on the best places to shoot a deer.
The notable tips that will nullify the need to ask how fast can a deer run?
including the ones listed below:
Cover Scent
Via Outdoorlife.com
lt is important to fully cover up your scent when you go for deer hunting. This is because deer are capable of detecting human smell for up to a mile away.
Deer can also detect any smell left on the ground and in the air.lt is, therefore, advisable that hunters use scent eliminators to prevent deer from detecting them.
lt can simply be sprayed on the bottom of hunting boots and hunting stands located in the woods.
Hunters can also invest in scent-free soaps before embarking on deer hunting trips. Bathing with scent-free soaps is the only way of ensuring that the hunter’s scent is not left in the air.
Dupe Deer
Via OutdoorLife.com
lt is vital to trick deer using calls or decoys if you desire to be successful in deer hunting. This mainly serves to bring deer into the hunter’s range where a clean shot can be taken.
Modern decoys are just exemplary as they are designed with lifelike features. Attention should be directed to the setup of the decoy as it is the main determinant of success.
Alternatively, deer hunters can use calls. Calls can be produced by bleat cans and grunt tube. Hunters can even attempt rattling antlers as a way of luring deer to take a perfect shot.
Calls can also be made with the mouth after some practice. This is even better as it frees up the hunter’s hands for accurate shooting and safer gun handling.
lt is very important to learn the techniques of using the and when they are appropriate so as to increase your chances of success.
Deer Attractants
Via hubpages.com
This is yet another successful strategy that has repeatedly been used by deer hunting veterans.
There are several types of deer attracts in the market today; they range from deer feeders, deer urine and even deer feed.
These attractants are a good way of attracting deer to your hunting stand from which a close range short that is more relative accurate can be taken from.
Using A Bow
The use of a compound bow in deer hunting has turned out to be a pretty good idea. The bow should fit both your strength and your size to guarantee comfort during use.
Hunting deer using a bow and arrow requires adequate training for one to fully hone the archery skills required.
This can be achieved by practicing shooting at different positions and elevations using locally available targets.
The recommended Arrowhead is razor-sharp broadheads as they are quite efficient about hunting game and also leave behind a good trail of blood.
Deer have an exemplary sense of hearing. ln fact, deer can detect movements that are up to 0.25 miles away on non-windy days.
Unfortunately, deer can take a period of up to two whole hours to return if they detect suspicious movements. It is, therefore, advisable to set up hunting stands two days in advance to avoid making unnecessary noise through movements.
Hunters can also try walking carefully through the woods so as not to scare off deer.
Hunting stores also have boot covers or hunting boots that are specially designed to be sound eliminating; they can greatly reduce sound produced while walking.
When To Hunt
Deer activity is highest in the early morning and near dusk, these are the best times to hunt.
Stands meant for evening hunts ought to be set up next to deer feeding areas while the morning hunts ought to target their routes to bedding.
Where to hunt
It is vital for hunters to scout for deer hunting grounds before the onset of the hunting season. The ideal hunting location that needs to be discovered is where they mate, drink, defecate and feed.
However, it should be noted that different seasons of the year put deer in different home ranges but which can be easily identified through indicators such as droppings and tracks.
Dressing
Via http://www.deeranddeerhunting.com
Comfort is important for successful deer hunting and that is why is necessary for hunters to always dress warmly while in the woods. Hunters should invest in heated socks, hunting jacket, good quality boots and warm gloves. This is because cold can ruin a good hunting day.
Small Area
Deer hunting should be carried out in a small acreage, preferably a ridge or a trail. Concentrate on heavy used areas or corridors to increase chances of success rather than to roam over a wide country.
Weather
Deer activity is very high before a storm; they will carelessly move to feeding areas at this time even if it is during the day.
The period just right after a storm is also ideal for hunting as they like feeding at this time as well. Deer hunters should be highly vigilant on their feeding areas during such weather, farm fields and oak woodlots are good feeding grounds.
Conclusion
The above insightful information about deer hunting tips outlines the top skills, tricks, and tips that are required to be incorporated into successful deer hunting. They are both easy to understand as well as to implement and are meant to develop both newbie deer hunters as well as experienced ones
Raccoons are common all over the United States. Although they have an adorable face and are fun to watch at times, they will cause havoc in your shed or attic and knock your garbage can on its side. They’ll even steal your bird seed and dog food, and because of rabies can pose a safety risk to your family and pets. If thieving trash pandas are giving you a hard time, you’ll be glad to know one of the best ways to get rid of them is through trapping. Here are some tips to help you through it.
Choose the Right Trap
Many people get upset when they fail at raccoon trapping, but don’t realize the problem is that the cage they choose was too small or not designed to catch the little bandits. To give yourself a fighting chance, you need a sturdy, metal cage that is big enough to hold a raccoon. The most common metal cage used for trapping is at least 32” long and 12” x 10” wide and tall.
Place Trap Strategically
Raccoon Trapping Tips
If you want to catch a raccoon in a trap, you have to place the cage in a strategic location. The crafty nocturnal creatures are very clever, which means you have to be too, if you want to trap them.
To do this, you’ll need to put a trap in an area that you know raccoons are visiting. However, you can’t just drop a cage and think you’re going to get a mammal in it. Instead, you have to place the trap in an area without making it look suspicious. For best results, place the cage in a frequently populated area, but place it a few feet away from where you’ve actually seen the raccoons. Usually just a few feet off the beaten path should do the trick.
It’s worth mentioning you shouldn’t put the cage near anything you don’t want a raccoon to destroy. You also need to make sure the cage is in a shaded area, so it won’t be roasting in the sun.
Prepare the Area Around the Cage
After you’ve decided where you’re going to put the raccoon trap, it’s time to prepare the area around the cage. Remember earlier when we said you can’t just drop a trap in the woods and hope for the best. Well this has to do with the intelligence of raccoons. So after you’ve chosen the right location, you have to spend a few minutes preparing the area so it looks as it should and nothing sticks out.
When everything looks good move the cage to the side and dig a hole for the trap’s pan. Add a lure to the hole if you want to increase your chances of snagging a ‘coon. If you’re going to use a lure, there aren’t enough good things to be said about skunk essence. It works like a charm. If you don’t use a skunk lure think about adding white bread, sardines, or marshmallows. Raccoons love marshmallows.
After you’ve dug the hole and used a lure if you want, it’s time to set the cage back in place. Don’t cover the hole completely with dirt, or you’ll risk decreasing the effects of the lure. But do make sure to toss dirt all around the cage and use any brush nearby to cover the cage. Usually, it’s necessary to cover the back, top, and both sides of the cage with brush
Make sure you’re happy with the way the cage looks before you leave. Make any adjustments needed and then mark the area, so you don’t have to remember exactly where you left the cage. One good way to mark a trap is to tie tape around a tree or branch about 3’ feet away from the cage. Make sure to tie the tape off about 6’ high, so it’s at eye level when you’re walking towards it.
Conclusion
While raccoon trapping can be difficult, it is a great alternative to using weapons to kill the animals if they are being a nuisance or pose a health risk. But, if you do choose to trap raccoons, you must be aware of trapping laws in your state. Make sure you have a furtaker’s license, if needed, and check the traps every 24 hours.
Because trapping raccoons and other small animals takes patience and persistence, you might need to adjust your techniques to catch the mammal. Good Luck and Be Safe.
Wilderness survival can be one of the most challenging adventures of a lifetime. Being in the wild and with nature can be a profound experience.
However, things in the wilderness may not be just about sightseeing, exploration and fun. If one desires to venture the wild and to keep alive staying there, he should know wilderness survival skills.
Get Trained:
To learn the basic wilderness survival skills, one should enroll in a survival skill program offered by a survival school. Participating in survival training seminar could also be an option. Various schools and institutions may have their own survival programs. Nevertheless, the programs offered may integrate the basic survival skills.
Survival schools may give instructions on aboriginal survival skills. One can check out survival schools or survival programs in local community or schools. It is also possible to learn the wilderness survival skills by reading survival articles on some websites and practicing them in local wilderness areas.
One should know the how to, where to, and what to in when it comes to wilderness survival skills. When staying in the wild, it is all about survival. Tending for the personal needs is of the utmost concern. Self-defense may also have to be learned as the dangers in the wild will likely be numerous and unexpected. Optimism is the best attitude that can be employed in addition to courage, faith and hope. There are various things that should be considered when having a trek or staying in the wilderness.
Skill is Important
The importance of wilderness survival training is that individuals will have a greater chance to stay alive in harsh conditions thanks to first-hand experience with the necessary techniques. By participating in a wilderness survival course, individuals may realize the importance of life in a more traditional way while learning first hand from an expert. Individuals may also have a better insight on what to do in the event a survival situation may come unexpectedly.
Learning the necessary skills that can be applied in the wilderness is perhaps one of the great academic achievements in life. Although most people tend to avoid dangers as much as possible by living in an environment where they think they are safe, people should also comprehend those things in life, particularly those that are extremely challenging, demand physical and mental competence. Involving oneself in wilderness survival program can help him overcome the various challenges in life.
Practice Skills
One can develop or nurture his abilities physically and mentally when his focus is all about survival.
Before you begin your trip into the wilderness, there are some basic skills you must learn. There are four basic needs that must be met to survive. Warmth, water, sleep and food must be provided for wilderness survival.
It can be very challenging to maintain body warmth at night in some areas.
The human body has a very narrow temperature range. You must maintain your temperature in that range for survival.
Water makes up the majority of the human body. Although you can survive for a day or two without water, you should not wait until you are out of water before you start looking.
A lack of sleep can greatly affect your cognitive ability. You may experience hallucinations and be unable to make a rational decision as to your wilderness survival.
Humans can go without food for a couple of weeks. Food may not be your first priority, but considering that you are using many calories on your trek, you will need an adequate amount of emergency food supply to maintain your stability.
Summary
Wilderness survival requires a great deal of preparedness. You need to prepare for the worst case scenario and hope it doesn’t happen. Be sure you have the right gear with you. Learn what would be the proper equipment for your trip. Your requirements for a week long backpacking trip will vary greatly from a day trip on the trails. Never go out on a trip without letting someone know where you are going. They need to know your route, your destination and the expected return time. There are services that will call family and/or friends if you do not return on schedule or within a reasonable time frame.
Dave’s Note: To me I think adaptability and mindset are high on the list – right after air. To illustrate that point, I have a link to an interesting article on the multiple uses of tampons (don’t worry plugging gunshot wounds is not on the list – that has been discredited)


 What You Will Need To Make
 After selecting the crayons, you would have to remove the wraps of crayons. For this, you would need a bowl having water and ice in it. After that, the crayons have to be put in the cold water and leave it for five minutes. Likewise, the wrapper can be removed.
 It is the time to mold the melted crayon for preparing your candles. You can pour this mixture into a metal cutter of cookie, a mini cup of baking or any container according to your wish and leave it for 5 minutes.
 After you complete selecting the ideal wick, you would now have to insert it in the candle. A toothpick or pointed end of a crayon can be a good option if you want to make a hole in the half made candle.
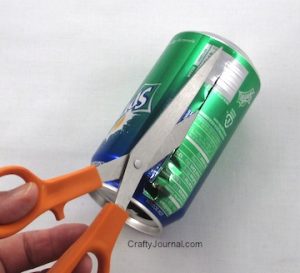 The first thing that you would have to do is hold the can and cut a small ‘window’ on it with the help of the knife. However, you should be very careful while using the knife as lack of attention might result in injury.
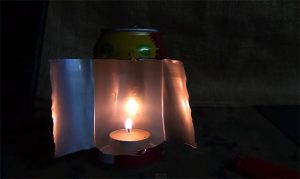 After cutting the window in the can, you would have to open up the section and clean inside. Now, you just have to put the tea candle inside the can through the window. And this makes your can ready as the lighted lamp.
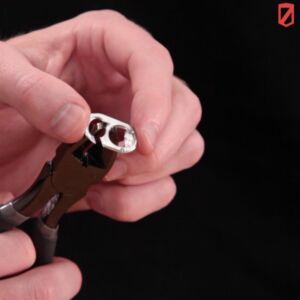 The first thing you would do is cutting the tab of the soda can. To start with, cut an aperture in the tab’s bottom hole. You need to make sure that you are cutting in a slanted way and after that begin to cut away the metal around the hook as much as possible. Now you need to turn the hook into a keen point by filing it.
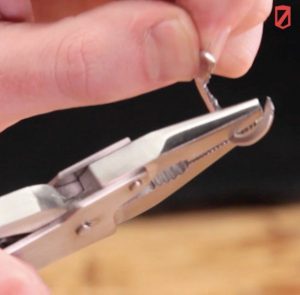 The next step in making fish hook is filing the hook. If you have to file the keen edges of the hook, the multipurpose tool would be a good option to use. A multipurpose tool can be said as a versatile utensil that can be used for various purposes.
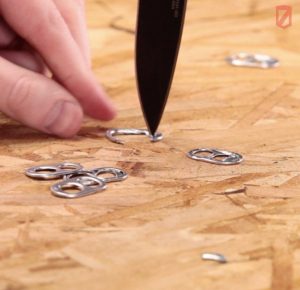 It is the time to make an aperture for fishing lines. To make this small hole, the pocket blade could be a good one to employ.
 Now you have to insert the hook in the paracord piece.
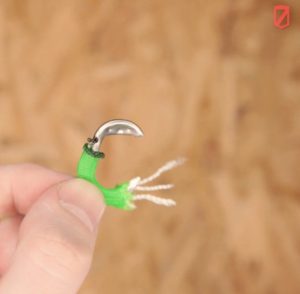
 Using a scratch awl, you would have to make holes on a can’s bottom edge. It is said that small holes are fuel coherent while big holes can burn fast and hot. You can do whichever you like.
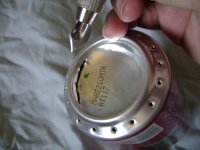 Now it is the time to make the main opening. For making it, you would have to cut the bottom from where the holes were made in the can. You would need a strong instrument to cut it as the can is thicker here.
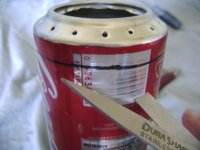 The third phase involves cutting down the top of the stove. By measuring 20mm from the can’s bottom, you would have to cut it to make the top part of the stove. Keeping a regular Sharpie on the table, you have to turn around the can against it.
 To make tabs, you would have to cut the stove top’s edges for many times. The resulted small tabs will ensure that the top will fit in the bottom of the stove correctly. You can make the number of spaced cut around evenly according to your wish or requirement.
 Now, you would have to take another can to cut its bottom. By measuring 25mm from the can’s bottom, you have to cut it. You can make the stove tall or short by adjusting the given measurement.
 It is the time to make the inner walls. The leftover remains of the earlier cans would be utilized for making it. However, if these remains are not in the usable state, then you might require a third can.
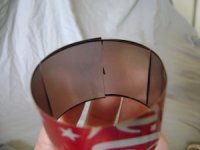 To fix the inner wall in the bottom of the stove, you would have to cut a halfway along the strip on both the ends to make them fasten together. The strip ends would have to be inside while locking.
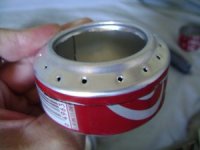 All the three parts now have to be put together. You can begin with setting the inner wall with the down notched ends, then fitting the stove top and inserting the preceding cut tabs at the bottom. All these things will eventually get fixed as a puzzle.
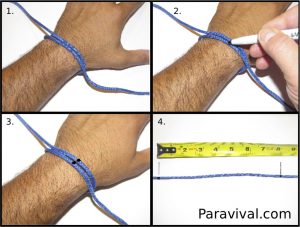 You would have first to measure your wrist by wrapping a nice rope or string around it. Using a marker, create a line of the string. Next, you would have to cut and melt the ends. With the help of a lighter, you have to burn the cord evenly.
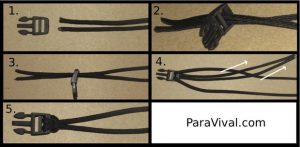 You would have to now fold the paracord of 10ft to work together on both ends. The cord threads have to be inserted through the lower opening of the side release buckle. Now you have to pull the cord’s loose ends along the loop that has been formed on the other side till it forms a tight knot.
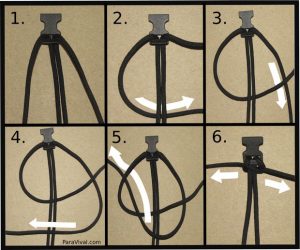 In this step, you would have to take the left cord to thread it beneath the cord of the bracelet and then take the right one to thread under the left one.
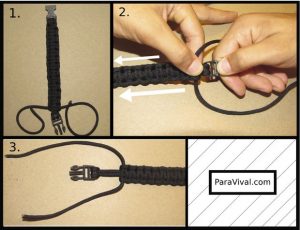 The above process will continue till it reaches the bottom of the buckle. Now, the male buckle has to be pulled towards the female buckle for more limp.
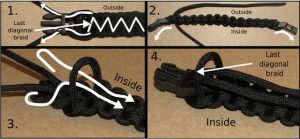 After tightening up the end, the cords’ ends have to be melted to prevent from wearing away. You need to squeeze the melted ends to make them flat. And with this, your paracord survival bracelet will finally form.