W. Ben Hunt’s classic has earned a reputation as the” authentic handbook since it was first published in 1939. Updated in 1974, it remains the only step-by-step guide to building log cabins and log furniture — pioneer style.”
I have read this book several times in my search to learn how to build and furnish a log cabin.
While I am still working on getting mine built, I do believe that this one book alone is enough to get a decent pioneer book built. As long as you a willing to do the work with the tools and techniques listed.
Books like this are invaluable to a new homesteader or prepsteader, it not only shows how to build a log cabin, but how to make the furniture for it also.
You may not have a log cabin, but it you live in rural America you probably have the materials to make log furniture. I bet that no matter the type of home construction you use, you will need basic furniture in your homestead.
Personally I like rustic furniture, and when I left TEMA, I took the money I received and bought several tools for creating that type of pegged rustic furniture found in this book.
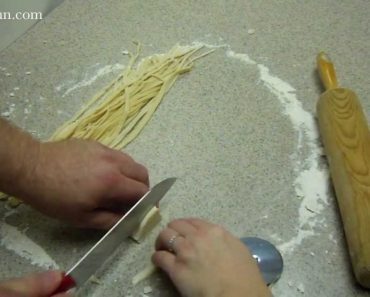
When making homemade pasta you have several options in forming your noodles, but while there are many ways of doing it, I want you to know the easy way to cut pasta.
Run it through a dedicated pasta machineCut individual noodles
or as this article demonstrates an Easy Way to Cut Pasta, you can roll the dough and cut noodles very efficiently and quickly.Once you get your dough as thin as you desire, simply roll it into a tube, and using a sharp knife, slice it as thin as you want.
After cutting the dough spirals, simply unroll each spiral into a long noodle, and either dry or cook immediately.
This is a very simple way of cutting pasta noodles, and I hope it makes your life easier.
This used to be something I thought was the realm of the super skilled Italian mother – but after trying it I found that homemade pasta is extremely simple to make, as well as being pretty inexpensive.
Once I found an easy way to cut pasta I was all set to make it all of the time – but then I discovered gnocchi and then all my pasta making stopped.
I needed a semi-permanent shelter out on the land as James and I went about clearing the trash from the land. I did not want to spend any money. Additionally, I did not want to take a lot of time messing around as time on the property is limited. Since Tarps are cheap and plentiful we decided on a tarp setup.
All we did was string a taut center-line between two trees,. Next, we spread the tarp over the line. Then we created cord tie-outs from the corners out to other trees to finish the tarp setup.
I set up the tarp so that the 4 corners are pretty high when it is in use. However, when I leave to go back to work, I can take two corners and drop them much lower so that rain does not collect.
This setup works pretty well, and we have had a couple of good thunderstorms over the past month and I am very pleased.
In conclusion, I would say a trap and a length of rope are bush craft essentials and you can build a shelter anywhere. A tarp setup is extremely adjustable you can adjust to almost any situation. One tree, two trees, no trees, it can all work with a little thought and some rope.
There is not a lot to say about cooking sticky rice in a crock pot other than saying how easy this is, and how cheap rice is. Preppers already know that rice is a great preparedness food because it is cheap, filling, and lasts a long time if stored properly.
How to Cook Sticky Rice in a Crock Pot
There is not a lot of difference between cooking rice in boiling water on the stove and cooking rice in a crock pot. The ratios of water to rice (2 cups water to 1 cup rice). The only real difference is the time required. Since crock pots are fix and forget cooking utensils – they take longer than stove methods because they don’t get as hot. Depending on you settings it takes about 2 hours to cook rice in a crock pot, but time is not as important as getting the water absorbed.
The way you go about cooking rice in a crock pot is exactly opposite of cooking rice in a pressure cooker. A crock pot takes much longer, but you don’t have to watch it – which is quite useful for us busy folks.
Cooking Rice in a Crock Pot works well, but it does come out a little stickier than normal methods. Especially in the video because I did not wash the grains to get rid extra starch. I like sticky rice.
This turned out more like rice pudding than individual grains. Some would sayI cooked it too long. However, I like it this way.
I put in a lot of creamy chicken soup and shredded chicken and eat on it for a week.
If you like it less mushy then cook is a shorter time.
It never occurred to me that not everyone likes to make sticky rice. I like mine with some stick to the ribs gooey factor. I normally throw in some shredded chicken and some cream of chicken soup.
If you want the rice to be less sticky, rinse the grains first and cook for a shorter time at a higher temp.
This can turn into a crazy passion. When researching this I saw many websites where people started making tire planters, and now own websites that sell tire art. I saw people making tire swings, recliners, rope horses, dragons, alligators, flowers, “Mexican clay pots” and even houses… After I built my first 4 planters I went back and got every tire the garage had and made about 9 more…
The basics are pretty simple.
Find a used tire (I have found the larger the tire store the less likely they are to let you have any).
Cut out the sidewalls
Flip it inside out
Paint it if desired
Cutting is pretty simple. I used a large hunting knife. Online I have read about using jigsaws. I have been told that a wood blade with 10 or 11 teeth per inch is best. Also, I have also been told that you should grind the teeth like you are making a knife. This makes the cutting end is very thin. Additionally, when cutting with a jigsaw you should lubricate the tire with water as you cut it. Supposedly this make it like cutting warm butter.
A Jigsaw Did Not Work
Either I was doing it wrong or that guy’s butter was actually steel, because the jig saw did NOT work for me. A large sharp knife did the job pretty easy. This is one area that it did not pay to get complicated to make it easier…
You don’t have to flip the tire inside out, but it makes it look less like a tire and takes a lot less paint (due to the tread). It’s pretty simple – some tires flipped inside out so easy that I thought I was an expert – others took several minutes and more than one 4 letter word. The video of show’s me doing it, but I did not really explain how. Press down on one side and lift up on the other and try to flip the side of the tire that is away from you over and side near you and then down.
Basically this is one of those things you have to do to understand.
I then found the nice sunny areas I wanted planters and lined everything up because you’re not moving it once you fill it. I found it took one wheelbarrow of dirt to fill each tire – but that depends on size of tire and how compacted it is.
Tires Absorb Heat
A couple nice things about tire planters are that because of the black rubber they absorb heat well so you can start your plants early. You get al the benefits of raised beds. They are easy to mow around as the mower bounces off of the tire. You are up-cycling by taking something that takes a lot of room in landfills and turning it into something better. I have seen people selling tire planters for up to $30.00. If you are willing to pay $30 for a used tire slapped with paint call me. I will make you as many as you want.
Some people are concerned with toxins leaching into the dirt. I did a little research and found that the main thing that leeches off of WASHED tires is zinc. Zinc is bad for some plants, but at reasonable levels is something humans need. Additionally, I also learned that the zinc is released as the tire breaks down. This happens over about 30 years. So FOR ME I am not concerned. If YOU are, then don’t plant edibles in your tires.
Tires disposal is a first world problem – we generate tons of used tires annually. One way many ecologically minded folks deal with reducing the amount of tires that end up in landfills is to build rammed earth tire houses. I am all for that, but ramming a couple hundred pounds of dirt into a steel belted tire is hard work – and I am lazy….
I was overjoyed to find that if you remove one sidewall of a tire you can still build with it (its not as strong, but still stronger than traditional 2×4 construction).
Since I planned on building tire buildings on Dual Homestead, I set about finding an easy way to remove the sidewalls from tires.
Best Method to Cut Tires is With a Hook Knife
Buy at Amazon
It did not take much research to find this easy tire sidewall removal tip. Simply use a hook bladed utility knife.
Hook blades are pretty cheap, and they install in a utility knife the same was as a normal blade.
I find that once you get the hook into the sidewall it zips along easily cutting the tire. Since the hook blade keeps the blade in the tire, I feel it is safer and I tend to pull a little harder than I would with a straight utility blade.
I will give you a tip to keep tire sidewall removal easy – stay out of the steel belts – don’t cut too close to the treads. Remember that this is a technique that can be used for more than just building buildings with tires – I remove the tire sidewall for building planters, tree protectors, tire sandals, and tire swings.