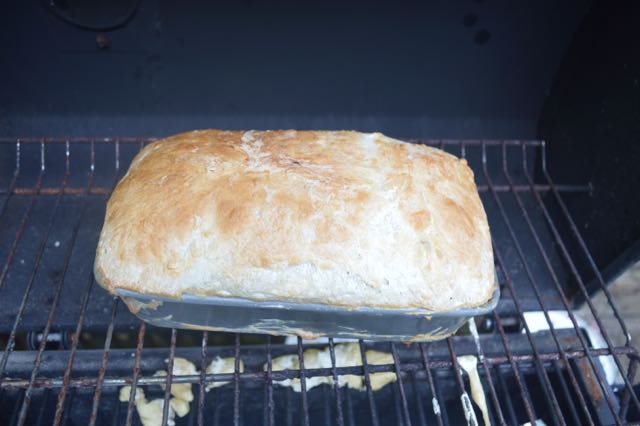
Cooking Bread in a Grill

Kitchen DIY: Cooking Bread in a Grill

Cooking Bread in a Grill
Buy at Amazon

One of the main reasons I write books like this is to help promote the notion that anyone can solve their problems with a little out of the box thinking. This article on cooking bread in a grill is just one example.

Most people think you have to have an oven to bake bread – not true – all you need is a source of steady and controllable heat. Bread can be baked anywhere you can get controlled heat

Once you learn how to separate requirements from results you will be surprised at how many ways you can see to get the job done. The big thing to remember with baking on a grill is that it is hottest near the flames, so elevate the bread (even if you need to improvise.

Cooking Bread in a Grill

A grill thermometer is adequate for a good bread Another important thing to note is that to bake perfect bread you need to be able to control both time and temperature. Since most grill have a thermometer on them, you should have it under control, but you may need to add a thermometer, or experiment until you learn just the right sized fire for your recipe.

Depending on your grill you may need to bake on the top rack Rolls and buns will probably bake in 15 to 20 minutes and loaves will take 20 to 30 minutes depending on their size and the grill’s temperature. If you are making an entire meal – either to show off during a barbeque, or in some grid down emergency, timing is important.

Cook the bread before the meat. This allows the bread to cool, and grease from cooking meat makes the temperature unstable, and the smoke and soot from burning grease can stain your bread. Grills don’t circulate air as well as ovens do, which can lead to uneven heating. You may need to rotate your bread halfway through baking to have even cooking.

Grilled bread tastes wonderful There is also a tendency for flames to burn the bottom of the bread, so keep the flames low and the bread elevated on a rack.

Grill Master Gloves Review

Gear Review: Grill Master Gloves
Buy at Amazon

I have had a good time lately reviewing products, I get to play with stuff I normally would not buy and I get to share my opinions with you.  These grill master gloves are no exception.

I probably would not have bought these gloves on my own, but after cooking with them, I realized how much I was missing.

These gloves are thick and sturdy.  They are a little tight on my large hands, but they are surprisingly comfortable.  They make cooking with my cast iron skillet much easier.

Grill master gloves do not compare to regular oven mitts – you have the dexterity to work without taking them off, and the gripping ridges give a good hold on heavy cast iron pans or grills.

Since they are rated to above 900 degrees Fahrenheit, you could even use them in casting lead (however if you are going to do that buy another pair as food and lead should only meet at during hunting season.

I did get these Grill Master Gloves at reduced cost in exchange for an honest review, but based on the quality and how useful they are, when I wear these out, I will buy myself another set.

How to Make a Tin Can Grill


Hoe to Make a Tin Can Grill
Buy at Amazon

Here is an idea for a tin can grill that I got from pinterest.  Basically, it is a small homemade grill made from a can, some foil, and a round charcoal grate.

I think this is optimized for a #10 can, but like most of my projects, once you have the concept you can feel free to experiment based upon your needs and materials at hand.

If you need a charcoal starter – I have one made from a second #10 can

Construction is simple:

  • Mark the top of the can into 10 equally wide segments.
  • Using tin snips cut along these marks until you have 10 strips that are 2/3 as long as the depth of the can (this leaves the bottom 1/3 in one piece to keep the round shape.
  • Bend these strips out so they radiate outwards. Do not press them all the way down, they should form a dish.
  • Place aluminum foil over the can, so that it forms a bowl supported by the 10 strips.
  • Insert charcoal into bowl, and light – take care not to use so much that the mound of fuel rises above the top of the bowl.
  • Place grate on grill, so that it is supported by the metal strips.
  • Grill food and enjoy.

Gear Review: Survival Still Grill

Gear Review: Survival Still Grill
Buy at Amazon

One of the things I love about the survival still is how versatile it is. In today’s video we use it on a charcoal grill and tried to test how much we could get, unfortunately it began raining and messed up our semi-almost scientific test.

I know a lot of people complain about the Survival Still – some don’t like the inventor, others say that the design is too simple to justify the cost, and some just don’t want to spend close to $300 for a water still.

I have no opinion of the inventor’s personality as I only met him once and he seemed okay to me but I do agree that it is a lot of money, and that the design is simple.

I do not think that those two things make it a rip-off – first I look at the value – what the device provides – which is a virtually inexhaustible method of making pure drinking water from almost any type of contaminated water.

That can be priceless as no other system has the potential to clean up radiological, chemical and biologically polluted waters.  It costs less than a Glock which I also use to protect my family, so to me what it does is worth the money.

Second – a simple design is to be valued rather than diminished.  It takes time, effort, and understanding to design something so simple.  I am not saying I could not have designed the survival still, but I didn’t and I am not envious of the man that did.  To my mind, he deserves to charge what he wants to for the things he creates.