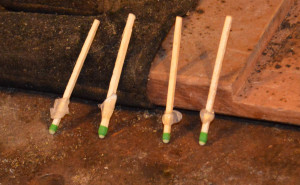
Hot Glue Matches Cooling on WorkbenchBuy at Amazon
Have you ever needed to fix something but did not have a hot glue gun handy?
Today’s hot glue matches project shows how to combine strike anywhere matches with hot glue so you always have the ability to use hot glue no matter where you are.
It is not hard, and all you really need is some matches and a hot glue gun.
I store mine in an old pill bottle and keep them in the glove box of my truck.
Mine are not as pretty as the video from Facebook where I got the idea, but then again I made several of these in just a few minutes.
The big thing I learned was to cool them standing upright do the glue flowed where I wanted it rather than away from the match head.
I think that if I took more time and continued to swirl the match in my hands as the hot glue match cooled, then the resulting bead would be much more even. However, even if this was not a pretty project it works and is simple enough to add in a small repair kit for emergency repairs on the go.
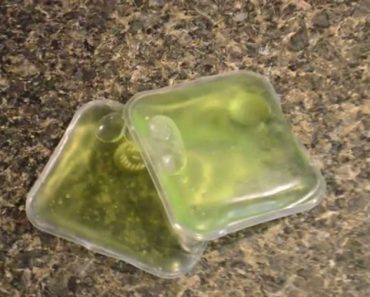
Hot hands are a reusable heat pack that can be used multiple times.
There is a metal disk inside the pack than when clicked activates an exothermic chemical reaction as the solution inside the package crystallizes and released heat.
After the crystals cool down they can be reactivated by hot water.
Most manufacturers recommend a crock pot, but I have also used a pot of boiling water. I have had success with, but cannot recommend, dropping the hot hand into a cup of water and after completely immersing it, putting it in the microwave.
I like this type of product much more than the iron oxide cloth heat packs that are commonly used. Those style are a single use only and the heat released is intense enough to burn you.
The reusable hot hands get hot, but it is not as intense, so it is much safer.
Besides, you can keep them around and use many times. I have had mine for over 3 years and have not had a single problem.
Now, the pack I got did not have detailed instructions so it took me a while to get the hand of the process.
The main thing to remember is heat it completely to melt not allowing ANY crystals to remain, and to let it cool completely before you try to activate.
When I was younger I could not tolerate hot food, but as I age, I find myself enjoying spicy food.
Couple that with my DIY gene, I really enjoy making my own hot sauce; it is not hard and makes a quality sauce for little expense.
This recipe works with any hot pepper, and I usually use a blend of jalapeno and habanero.
Making a pepper mash is different than making hot sauce – you make the sauce from the mash.
The pepper mash is fermented to mellow the flavor of the peppers and really ads to the quality. Tabasco sauce, for instance, is fermented for three years, but I find after 6 months you really don’t get that much more quality.
Since we are letting the peppers ferment, we are going to be adding salt to suppress bad bacteria and mold.
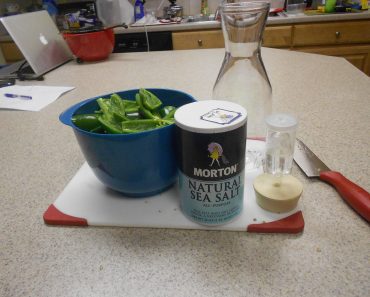
What You Need
The first thing you are going to need is a glass jar or pottery crock, size matters as you only can fill it about ¾ full so it won’t overflow as it ferments. You want a straight sided container so you can use a weighted plate to keep the peppers under the liquid (this prevents mold).
Since I am only making sauce for myself, I actually us a glass juice carafe and a large rubber bung and airlock instead.
As you size your jug, realize that 1 pound of peppers will produce a little less than a pint of pepper mash.
As you pick your peppers, get the largest, plumpest fully ripe peppers from the garden or market. Fully ripe peppers have a more sugar content, so that will help with fermentation.
I remove the seeds from my peppers, but that is a personal choice. Contrary to popular opinion, the seeds don’t add much heat. The real heat comes from the connecting veins that attach the seeds to the pepper walls.
If you are dislike getting burned by peppers, I have a great tip to help wash off the oleo-resin capsicum inside the hot pepper.
How to Make the Pepper Mash
Wash the peppers and dry them with a towel or paper towel before processing them.
Remove and discard the stems.
Add 1 Tablespoon of salt per pint of mash
Process the peppers in a blender.
Pour one Tablespoon sea salt per pound of peppers in a blender and process them on high speed till they become puree (mash), no more than a minute at the absolute most, typically only 15 to 30 seconds
You may add other vegetables, herbs, and spices into the blender and puree it along with the peppers mash, so long as you maintain the salt ratio to weight of vegetable matter. Anything you add will dramatically affect the taste of the finished product, (I add sweet peppers)
Pour the mash into the fermentation jar or crock. You need to keep air away from the mash, but if you seal it airtight it will explode. If you are using a straight sided crock, set an upside down plate inside the crock so that it can move up and down the crock, weigh it down with a ziplock bag full of water. Since I use a large juice carafe, I simply stick in a large rubber bung fitted with a airlock for making wine.
In one week, the pepper mash will start bubbling vigorously as a result of fermentation in which the bacteria will produce acetic acid and any sugars will produce alcohol and carbon dioxide gas. The gas bubbles will cause the pulp in the mash to rise, leaving the liquid and some solids on the bottom.
In another week or two, the fermentation should stop producing bubbles.
You may use the mash as soon as fermentation has finished. I let it age in a dark closet for about 6 months though.
You can use this mash directly on food. However it’s a simple process to turn it into a sauce. I will save that for another post….