My Complete27 Prepper Precepts

PRN Episode #41 27 Prepper Precepts

52 Unique Techniques for Stocking Food for Prepper
Buy at Amazon

One of the things I hold most dear is my moral compass, my morals may not line up perfectly with “traditional” morals – and I know they don’t line up with modern “morals” – but as Heinlein said “I am free because I know that I alone am morally responsible for everything I do. I am free, no matter what rules surround me. If I find them tolerable, I tolerate them; if I find them too obnoxious, I break them. I am free because I know that I alone am morally responsible for everything I do.”

This isn’t a political show – nor a talk show that deals in morality – it’s a prepper show – so how in the world does this apply to disaster preparedness?

My moral code, precepts, are guides for action that make me who I am, and since the underlying foundation of who I am determines how I act.  It is the reason I work so hard to be self-reliant, self-determining, to take responsibility for myself.  This explains why I choose to do things to protect my family instead of going the easy route.

My 27 precepts guide me in deciding how best to do those things.

My rules are why I spend so much time DIYing.  It shows why I choose to bug in rather than bug out, why I have guns, and why I don’t have a LOT of guns.

Frankly, my precepts are what make me, ME. While that has it’s faults, I am sharing my 27 precepts with you because I feel that some of them may help you prepare for disaster.

I am interested to know if your principles are similar to mine, or how they differ – I am not looking to change my core beliefs, but I am interested in how and why people think as they do – as it helps me learn and grow as a prepper and a person. Please feel free to email me and share your thoughts on today’s podcast.

The show is scheduled for Monday at 10pm central time at this link.

If you cannot listen on Monday, you can always download the podcast for listening at your own leisure.

Sterilizing Water in a Pressure Cooker

52 Unique Techniques for Stocking Food for Prepper
Buy at Amazon

This method Sterilizing Water in a Pressure Cooker is much like pressure canning. Except instead of sterilizing food, we will be sterilizing drinking water in glass canning jars. Unlike filtering or distillation, this will not do anything for contaminate – just organisms.

To truly sterilize something, it must be free of all microbes AND spores.

Boiling does NOT kill all bacteria. Some bacteria are actually resistant to the temperature of boiling water at 212° F. (100 ° C.). Many bacteria formed spores can withstand boiling.

To kill all the bacteria, you need to raise the temperature to about 250° F. (121° C.). Sterilizing with steam heat is the most common method to obtain this level of sterility.

It is also the most effective, since spores can resist dry heat, but 30 minutes of exposure to steam at 250° F. 121°C will kill almost anything.

As a matter of fact, pressure canners kill so effectively, you can use them to sterilize medical equipment.

Procedure

  • Add approximately 2 inches of water into the pot.
  • Place the supporting rack inside.
  • Fill the canning jars with water, leaving 1 inch head space before closing the lid, and only tightening the bands just finger tight.
  • Add the water filled jars to the pot.

For Canners or Cookers with A Weighted Pressure Regulator

  • Lock the lid in place, but do NOT place the weight on the vent pipe.
  • Turn the heat to high
  • As soon the water at the bottom of the pot begins boiling the steam will displace the air inside the unit.
  • Let the steam escape from the cooker or canner in order to expel the air.
  • Wait until a good jet of steam is venting from the vent pipe before replacing the pressure regulator weight on the vent pipe.
  • Once the pressure setting reaches 15psi, turn down the heat and start a 30 minute timer.
  • Make sure the pressure setting remains constant, if pressure drops, get back up to 15 psi and restart timer.
  • After 30 minutes, turn off the heat and allow the pot to cool naturally until the pressure slowly drops.
  • The jars of sterile water should now be removed immediately.

As long as the sterilized liquid remains sealed the jars should be free of microbes until it is opened again.

It occurs to me that if you are having to sterilize water in a pressure cooker, the chances are good you kitchen stove isn’t working so I have included below instructions in using a pressure cooker on a wood fire.

If your pressure cooker is stainless steel and does not have any sort applied coating or non-stick finish, it can be heated outside over a wood or charcoal fire.

  • Start by digging a shallow depression in the dirt and build a fire in it.
  • Build up a large enough fire to produce a deep bed of coals.
  • Position the canner in the heart of the coals.
  • Cooking on a fire is harder than on a stove because it will be necessary to reposition it in order to maintain proper pressure
    Moving it in or out of the hottest part of the coals as needed.

How to Make Cold Smoked Cheese


52 Unique Techniques for Stocking Food for Prepper
Buy at Amazon

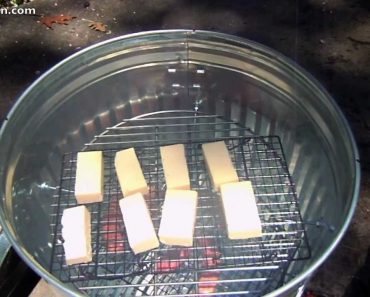
After enjoying the sausage, I had to try some Smoked Cheese – when smoking hard cheese you need to ensure the smoke is less than 175 degrees unless you want to pick melted cheese from the bottom of your smoker.

It does not take very much to smoke cheese – a little goes a long way – I like mine at 45 minutes – but the wife likes hers at about an hour.
It is no different functionally than smoking meat – other than the cooler the better, and it does not take very long.

I also find after doing this a couple times I like my smoked cheese to be of a mild sharpness – which is interesting, because if just eating cheese plain I like it to be extra sharp. I think the smoke adds the extra “bite”.

Smoked cheese makes a great gift – it is something that is unique, and that people generally do not buy for themselves.  I love it when I get it as a Christmas present from those that I know.

And for those that love to make comments about the galvanized metal – the food is not on the gavanized sides, and the heat never reaches high enough to burn off the zinc.  That happens at 200 degrees and above- the cheese melts and drips down off the greats at 175 – so I find it okay – if you don’t that’s great go buy a smoker.

PRN Episode #40 Introduction to Prepper Kits

PRN Episode #40 Introduction to Prepper Kits

52 Unique Techniques for Stocking Food for Prepper
Buy at Amazon

In my plan, Bugging Out is not my first choice.  It makes great survival fiction.  However, I would much rather stay with the majority of my preps and keep my survival systems in place.  That is better than trying to live an unknown amount of time with only the supplies I can carry or scrounge.

However, what I WANT to do, may not be one of the choices on the “Can You Survive” multiple choice test. Therefore, I feel it is important to be able to bug out if needed.

A quick internet search will show you how popular this concept is.  It seems that every internet prepper has coined their own term for the gear associated with being “on the road”.

Prepper alphabet kits such as: BOBs, GOODs, INCHs, IFAKs, EDC, and line gear.  It is enough to make your head spin.

In today’s episode, we cover the common acronyms.  How they are and are not alike – and once the terms are explained, I share with you several EDC tips I picked up over the years.

If you like this podcast – the subject will also be covered in my newest books 52 Prepper Projects – which is available on Amazon.

The show is scheduled for Monday at 10pm central time at this link.

If you cannot listen on Monday, you can always download the podcast for listening at your own leisure.

Opening 7.62x54R Spam Can

Opening 7.62x54R Spam Can
Buy at Amazon

There are a couple different spam cans for surplus ammo – and each has a little different method of opening. Today I am going to open a 300 round can of 7.62x54R on clips.

The 7.62x54R Spam Can is hot dipped galvanized with a soldered on lid.

There is a metal tip on one end.

Grasp that with your pliers (needle nose) and turn the pliers to roll the seam up around the pliers.

Then use the pliers on the side seals, grabbing and peeling away until you can start to roll the lid off.

Its not as hard as it looks on the video – once I got it rolling it came off easy.

The ammo is covered in some cardboard sheet – lift them out to get to the packed rounds.

There are several smaller cardboard coated sections of ammo – each tied with a small string and holding 2 stripper clips of 5 rounds.

Remember – This is the rifle that one man gets “One man gets the rifle, the next man gets some bullets. The second man follows the man with the rifle, and when he is shot, picks up the rifle and carries on fighting!”

All in all this was not that hard to get open, but it sure did protect the contents well.  I need to buy a couple more of these tins of ammo so that when my boy is old enough to clean the cosomoline off of the Mosins I put back for him he has plenty of ammo to learn to shoot with.

When I got my C&R license, it was specifically to buy mosins and other WWII bolt guns.  I figure at $100 for the rifle, and $100 for a 300 round can of ammo, I could afford (over time) to collect enough firearms to outfit all the folks who say that they are coming to my house in a disaster (or repel them – if needed)