Using a Kid’s Microscope


I wanted to get my son more than just toys for Christmas, I wanted to get him stuff that he will both use, and will nurture a curious mind.  To that end, I bought him the book Greg’s Microscope and gave it to him a couple of months ago and we had many talks about all the cool things Greg discovered in his microscope (with William’s microscope already hidden in the present closet.)

It did not take long before WT started asking for a microscope (and a chemistry set) and the die was cast.

I also bought a scope adaptor so I could take pictures of his microscope adventures on my phone.  Unfortunately it was too big and I needed to adapt it.  Later I plan on using this on a .22 rifle scope.

So this is just a toy microscope, for under $50 you get plastic lens and a small frame.  That’s okay though if he likes it I will get him a better one – I just didn’t want to spend good money on a good scope for a 5 year old.

In using his kid’s microscope he will learn techniques that will still work on a “real” one.  Start at a lower power and move up as necessary, how to prepare slides, how to adjust focus, how to adjust the light.

One thing I liked about this particular kid’s microscope is that it has both a mirror and a battery powered light.  This makes it much easier to use.

We have started small by recreating many of the things he read about in his Greg’s microscope book, and he has been busy finding other things to look at.

This was a good investment, not in the toy microscope, but in my boy.

My dad always gave me the option to either grow up smart OR strong – I want my son to be both.

Using the Sureshot HD Video Game Review

Buy at Amazon

This Sureshot HD game is so easy to hook up, and it pushed the wife over the edge so I could buy a new TV – of course our old one is from the 90s so it was time.

To hook this up, plug it into the wall and take the hdmi cable from the device and plug it into the tv.  There are also some velcro tape in the package to help stick it to your tv – but that may not be necessary for you.

All that is left is to turn the SureShot HD shooting game on and follow the instructions on the screen to set up your guns.

I would suggest you set up the guns from where you are going to be standing.  My son likes trying to get up close to the tv so he can cheat – but he can’t figure out why he misses.  The game setup tells the game where the gun is located, move too far from that spot and your gun will be misaligned to the tv.

The game comes with two bluetooth guns and two games (two hard games) – but if you sign up for a profile you can get a credit for a third game – we got a single player shoot’em up “army” game.

My son and I both like the single player shoot’em game the best, but the two gun hunting games are more fun with groups.

This wasn’t a Christmas present, I got these games around Thanksgiving to do a review on, but it has gotten the most use of all my son’s presents.  He loves this game, and did not want to stop playing it to talk about it on camera.

I try to use this to teach some gun handling rules, but let him have fun and haven’t started to work on his cross dominant eye issue yet – but this game helped me notice his issue, so for me its not all fun and games, but this is a fun game and I am happy I got the chance to use it.  I really like this game and think its a great deal.

Toothpaste Tube Squeezer Review


I hate waste, I don’t like buying new when there is life left in the old.  This makes the the condition of the toothpaste tube something that brings my teeth on edge.  Which is why when I got the chance to review this toothpaste tube squeezer I jumped on it.

My wife, bless her soul, is much more free spirited. She loves to push toothpaste out from the middle of the tube – THE MIDDLE!  She also loves opening new tubes when there is still paste in the old ones!  The insanity…..

Now to be fair she does help the boy with his brushing, and that is a chore so some of this can be overlooked in the spirit of understanding, but as I still hate waste, I must be the one to use the last bits of paste from the tube.

I got the opportunity to review this toothpaste tube squeezer at no cost to me as felt it was a no-brainer.

It did not come with instructions

However, if you can’t figure it out, I wonder how you can figure out how to open the toothpaste tube.

Insert the end of the tube between the rollers and clamp down on the handles.  Turn the key and the geared rollers pull the tube inward and exert pressure to get that last bit of toothpaste out of the tube.

This toothpaste tube squeezer is available on amazon for less than $9.00 and comes in a couple of sizes.  This one is pretty large, I got it that way on purpose so I can squeeze bigger tubes if needed.

I like it, and while it does not have a lot of amazon reviews, I am going to keep this in my bathroom.

If your wasting your resources you can’t hope to be able to save.  Prepping is not just about acquiring stuff, it is also about using less, and using items better.

This helps with that.

I did get this item for free in exchange for an honest review.

*Update:

After having this in the house for almost a year, I can say the large size is a distraction.  I don’t use it as much as I planned because it is so bulky.

Survival Skills: 7 Ways to Find Water in the Wild

Buy at Amazon

Only a very few people can survive the wild these days without the modern convenience, such as electricity and electronic gadgets, mobile devices. Although some can still survive without this modern equipment, nobody can survive without water.

Needless to say, water is highly essential for survival. Yes, you can package some water along with you to the wild; they cannot sustain you if you plan to spend a considerable period of time. If you want to spend more time in the wild, then you need to devise some ways to find water in the wild.

Start With the Obvious: Streams, Rivers, and Lakes

Streams, rivers, and lakes are the most obvious source of water in the wild. These sources of water offer clean, clear flowing water which is the best option you can ever think of. Generally, flowing water does not allow bacteria to fester. Small streams are what you should first look for once you get to the wild. You can also consider rivers as a second choice after stream. Larger rivers often have a higher percentage of pollution. If this is this only option available, you should consider purifying the water consumption. Lakes and ponds are also okay but they are stagnant and hence, a high rate of bacteria.

So, how do you find these sources of water? First, you should conduct a research on the location of rivers and streams before you embark on the journey in cases where possible. In the wild, you need to use your senses. If you stand still and silent, you should be able to hear the sound of flowing water. More so, If you stand at a sloppy ground, you should know that there is a flowing river or stream at the extreme base.

Another way to locate rivers or streams is by tracing animal footpaths which can lead to water. Insect swarms, although annoying, is another sign of water proximity. Another way to locate rivers or streams is by following the birds swarm early in the morning or late in the evening.

Collect Rainwater

Rainwater is one of the safest ways to get drinkable water without the fear of bacterial infections. If you are lucky to find yourself in a wild in the tropical region during the rainy season, you wouldn’t have to worry about water all through your stay in the wild.

There are basically 2 ways of collecting rainwater. The first is to place as many containers as you have in the rain. In cases where you have little or no container, then you can try this second method. Tarp around trees a few millimeters off the ground or tie the corners of a poncho, place a small piece of stone at the center to create depression and watch the water collect in it.

Collect Heavy Morning Dew

Heavy morning dew is another source of water in the wild. You can get up to 1 liter of water per hour from morning dew. To do this, tie some absorbent clothes around your ankles take a workout early in the morning before sunrise. When your cloth gets saturated, wring out the water and repeat the process over and over again.

Fruits/Vegetation

You should not underestimate the amount of water you can derive from plants. Plant fruits, roots, vegetables, fleshy plants, and other plants have a lot of water embedded in it. Collect EDIBLE plants, place them into a container, and smash them with a piece of stone or rock. Although it may be a very tedious process, it can be very useful in desperate situations.  Try my Leaf Condensation trick.

Collect Plant Transpiration

You can also get some water by trapping the plant’s transpiration. Transpiration is a process whereby water is translocated from the root to the underside of the leaf before it is eventually released to the atmosphere. So, the trick here is to catch the water before it escapes to the sky.

First in the morning, tie a bag or anything that can be mold into a bed around the leafy green area of a shrub. Place a small piece of rock in the bag in order to create a depression and weigh it down a bit for easy water collection. Instead of the vapor to escape to the atmosphere, the water will be collected and retained in the bed. However, do not try this with a poisonous plant.

Tree Crotches/Rock Crevices

Tree crotches and rock crevices are another good sources of water, just like the fruit and vegetation. Although the process can be stressful and demanding, it is a good alternative, especially in difficult situations. To collect water from tree crotches or rock crevices, dip a cloth inside the hole, allow it to soak, and wring it out. Repeat this process as much as possible to get enough water.

Dig an Underground Still

This method is a relatively reliable source of water compared to other ways. It is a good option if you or your team is camping in the wild for a considerable long period of time. The process of digging well is very common which you are surely aware of. Although the process is tasking, the outcome always worth the energy invested. However, make sure you site your well or still close to a reputable water source or riverine area.

Conclusion

While you can survive without electricity or electronic gadgets in the wild, it is quite impossible to survive without water. Getting water in the wild may first sound difficult to you. However, we hope this guide on ways to find water will help you a lot.

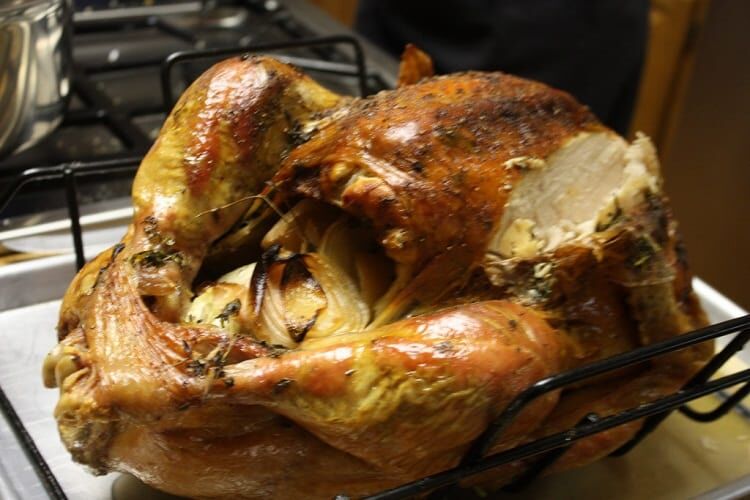
5 Tantalizing and Delicious Christmas Turkey recipes

It’s the festive season and we all get to spend precious time with our families and friends. We have all had a busy year. So this year let me share some of my family’s favorite turkey recipes.

It has always brought joy to our Christmas table. They are all simple and easy recipes so you can easily manage them.

This will also be your chance to use that best ceramic knives you just bought yourself as a holiday cooking tool treat.  We all owe ourselves a treat so why not have a stunning knife to ease your cutting this holiday season.

 Citrus Turkey

The turkey must to be room temperature and not frozen.

Preheat oven 180°C

Ingredients

  • 5 kg turkey
  • olive oil
  • sea salt
  • 2 chopped carrots
  • freshly ground black pepper
  • 1 orange cut in half
  • 2 onions, chopped
  • fresh rosemary
  • 2 chopped celery sticks

Stuffing

  • olive oil
  • 2 onions, finely chopped
  • sea salt
  • black pepper
  • ½ teaspoon nutmeg
  • sage
  • 300g mince
  • 250g breadcrumbs

Method

  • Drizzle olive oil and sprinkle salt and pepper all over it. Massage the entire turkey getting the mixture all over.
  • Add a bit of oil to a pan over medium heat and fry your onion until soft. Add in salt and pepper, along with nutmeg and chopped sage leaves. Fry for another 2 minutes.
  • Put the mixture in a bowl and allow cooling, then add in breadcrumbs and mince. Mix.
  • Take the turkey and pull the skin by the neck back so you see the hole and put half the stuffing inside.  When done pull the skin up and over the hole.
  • The rest of the stuffing along with the halves of orange, rosemary and fill the other hole.
  • Take your chopped veg and place it in the roasting pan and place the turkey on that.
  • Cover the turkey with foil and place into the oven.  Cook for 35 to 40 minutes per kilo. So 5kg bird will cook for 3½ hour
  • Check on it regularly and spoon some of the juice from cooking over it keeping it moist.
  • After 2½ hours, remove the foil and allow to crisp. After 3½ hour, remove from the oven and allow resting for an hour.

Mamma’s Lemon Breast-Down Turkey

Most turkeys are frozen when bought. Pop it in the microwave and defrost. Preheat oven 180°C. This size turkey should give you 10 servings. It’s a very simple and uncomplicated recipe and is for the health conscious that are watching calorie intakes but still celebrating the holiday season.

Ingredients

  • 1 turkey (5kg) – defrost in the microwave and let it get to room temperature
  • Lemon juice – if you can’t do freshly squeezed then bottled lemon juice will do
  • Salt and pepper
  • Olive oil
  • ½  a  finely chopped  onion
  • 2 finely chopped celery sticks
  • 2  finely chopped carrots
  • bunch of parsley finely chopped
  • Some fresh rosemary and thyme – finely chopped

Method

  • Sprinkle olive oil  and lemon juice all over the turkey
  • Liberally sprinkle with  salt and pepper all over
  • Using your fingers rub the turkey, massaging in the oil, lemon juice, and spices.
  • Take all the other ingredients onion, celery, carrots, parsley, rosemary and thyme and place inside the turkey.
  • Liberally squirt lemon juice inside the turkey.
  • Pull the legs together and tie with a cooking tie
  • Pull the skin over the neck cavity and tuck under to keep the moisture in
  • Wrap the turkey in foil
  • Place in roasting pan – if you don’t have a large one you can use a purchased foil roasting tray that can be disposed of afterward. Most stores sell them.
  • Place in oven with the turkey’s breast area  facing down
  • After 2½ open the foil up and allow to brown and crisp
  • Remove after 3½ hours and allow resting for an hour or so

Honey Roasted Turkey

The initial steps

  • Turkey to be defrosted and at room temperature
  • 45 min prep time
  • 2½ hours to cook and 3 ½ hours to ready
  • Preheat the oven to 200C

Ingredients

  • 1.5k Turkey
  • 1 lemon cut in half
  • Salt and pepper
  • 1 peeled apple
  • small peeled onion
  • 1 peeled potato
  • 3 tablespoons of butter
  • 6 tablespoons of honey
  • 1 cup of chicken stock

Directions

  • Rub the lemon all over the turkey
  • Season the turkey with salt and pepper (inside and outside)
  • Place the lemon halves, onion, apple, and potato into the turkey
  • Place turkey into a roasting pan
  • Using a small pan melt butter and honey together on a medium heat
  • Spoon the honey and butter mixture over the turkey coating the entire exterior.
  • Leave to stand for 30 minutes
  • Then reapply the mixture a few times
  • Place turkey in the oven at 200C for 30 minutes
  • As the honey mixture drips off baste the turkey a few times
  • Reduce the temperature to 175C and cook for 30 minutes
  • Baste frequently
  • If needed then use the cup of chicken stock to keep the juices from drying out
  • Now cover the turkey with foil and cook until no longer pink on the bone
  • You can check this by a small piercing into the turkey and see that the liquid runs clear
  • Leave in the oven for a further 1½ hours
  • Remove the foil and for about 15 to 30 minutes basting regularly
  • Then remove from the oven and cover with another layer of foil completely
  • Allow it to rest in the wrapper for about  15 minutes before opening and slicing

Roast Turkey with garlic & lemon

  • Prep time 30 minutes
  • Cooking time 3½ hours
  • Two days before cooking season
  • Crispy and delicious
  • Preheat oven to 180C

Ingredients

  • 1 x 5kg turkey
  • Half of an onion
  • 1 lemon half
  • Whole bulb of garlic

Salt Mix

  • 2tbsp  sea salt
  • 1tbsp thyme
  • 1tbsp peppercorns
  • Butter mix
  • 100g butter
  • 1tbsp vegetable bouillon powder
  • 1 lemon zested (grated skin from the lemon above)

Method

  • 2 days prior to cooking you will have rubbed your salt and pepper mix onto your turkey and left in the roasting pan uncovered in the fridge. The longer the salt stays on it the moister it will be.
  • Take the butter, vegetable stock, and lemon zest and mix together in a bowl. Cover and chill in the fridge
  • Take the turkey out the fridge and let it stand to get to room temperature
  • Take your butter mixture from the fridge
  • Using your hands spread the butter mixture under the skin and between the thighs and the main part of the turkey.
  • Place the onion, garlic and lemon halves into the inside of the turkey
  • Cover the roasting pan with foil
  • Cooking time is about 3 hrs. It’s about 40 minutes per kilo of turkey
  • About 30 minutes before cooking time is up, increase the oven temperature to 200C
  • Remove the foil
  • Baste the turkey and place back in the oven
  • When the turkey is beautifully brown remove from the oven
  • Leave it to rest for at least  15 minutes covering it with foil
  • The juice left in the roasting pan can now be used to make your gravy

Turkey Breast stuffed with walnut & cranberry

If you don’t want to roast a whole turkey perhaps try just turkey breasts

Ingredients

  • boneless turkey breasts with skin (about 2.7kg)
  • 5 cups chicken stock
  • 1/3 cup olive oil
  • 1/3 cup plain flour
  • 2  lemon thyme pieces

Stuffing

  • 60g butter
  • 2 onions, finely chopped
  • 4 cups fresh breadcrumbs
  • 1/2 cup dried cranberries
  • 1/2 cup finely chopped dried pears
  • 1/4 cup finely chopped walnuts
  • 1/4 cup finely chopped sage leaves
  • 1 lightly beaten egg

Method

  • Make the stuffing first. Melt the butter in a pan
  • Add in onions – cook until soft
  • Put into a bowl
  • Add the breadcrumbs, pear, walnut, cranberries, beaten egg and sage
  • Mix them all together
  • Season with pepper and salt
  • Preheat your oven to 190C
  • Place your turkey on a board with the fat piece towards you
  • From where the breasts join cut a slit into the breast at an angle
  • Cut the turkey breast horizontally through the meat but not all the way through
  • This will give you a flap
  • Flap the breast open
  • Place the stuffing in the middle of the breast
  • Fold the flaps back to encapsulate the stuffing
  • Using kitchen string tie them to secure the stuffing inside
  • Pour a cup of stock into the roasting pan
  • Add in your turkey breasts with the skin facing upward
  • Lightly brush with 1 tablespoon of oil
  • Season with salt and pepper
  • Roast in the oven for about 100 minutes
  • Baste regularly
  • Remove breasts from roasting pan
  • Cover with foil and let it rest for 15 minutes
  • The juice that remains in the pan is perfect to make a gravy with

The Christmas holidays are always a special time of the year. Be kind, Be gentle, and Be forgiving and share what you have with those that are dear to you. Take the time to say I love you and share a smile with a stranger.

If after Christmas day you have some turkey left over (if your family is like mine you won’t), then there are some lovely quick and easy recipes to use that leftover Turkey for.  From a simple Turkey salad to a Turkey sandwich or even a Turkey Pâté