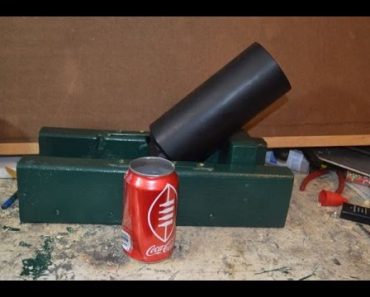
How to Build a Beer Can Mortar Bed


Soda Can Mortar Bed Build
Buy at Amazon

It did not take long to make a basic beer can mortar bed from some 2×4 lumber and screws.

This base is very basic.  I have some ideas for improvement.

However, I want to start from a known system.

This bed is built using the plans that came with my mortar tube from blackpowder-cannons.com.

The video is pretty self-explanatory.

How to Build a Mortar Bed

  • First, start by cutting 2 pieces of 2×4 15 inches long, a piece 13 inches long, and a support 3 inches long.
  • Next, mark the center of the 15 inch boards.  Mark that line 1/2 inch from the top.
  • Then, drill a pilot hole through the mark you made, and then follow up with a 1 inch hole saw.
  • Cut the top out of the cut on the board so the cannon trunions can slide down into the hole you cut.
  • Next center the 13 inch board at the base of the two longer boards and screw them to the shorter board forming a channel for the mortar to sit in.
  • Knock the 3 inch board into this channel and set the cannon into the trunion holes.
  • Move the 3 inch board forward and back until then cannon is resting at a 45 degree angle when sitting in the trunion mounts and resting on the top of the board.
  • Finally, screw the support board in and your bed is finished.

I went ahead and fabricated some strap to hold the cannon in place, and I painted mine, now to make some rounds and find some places to test fire it.

How to Measure Bolt Protrusion on M91/30 Mosin Nagant

Bolt Protrusion on M91/30 Mosin Nagant
Buy at Amazon

Be certain to check the firing pin protrusion using the screwdriver / protrusion tool found in the Mosin Nagant Cleaning kit.

IMHO, if you do not have this tool, buying the entire cleaning kit is well worth the money.  Some unscrupulous vendors have replica tools that are not to spec.

Consequently, they do not accurately measure protrusion.

I have never heard of a replica tool being sold as part of a surplus kit.

Why Bolt Protrusion is Important

If the firing pin does not protrude far enough out of the bolt the gun will not fire.  Alternatively, if it protrudes too far it can puncture the primer.  This will cause hot combustion gasses to leave the bolt and move into your face.

Either of these situations can be extremely dangerous and are not part of the enjoyable use of your moist nugget.

How to Check Protrusion

  • First, Verify that the bolt is in its “fired” position and that the firing pin is flush with the cocking piece.
    • The index marks must be aligned.
  • Second, the firing pin must (at least) touch the top of the milled out area below the number “75” on the protrusion gauge.
    • If it does not, firing pin protrusion is insufficient. Be certain that there is no gap between the bolt head and bolt body (hold them together) when performing this test.
  • Finally, the firing pin must not touch the top of the milled out area under the number “95”. If it does, firing pin protrusion is excessive.

Bolt Protrusion on M91/30 Mosin NagantIf you do not have the teardrop shaped too you should order one.  However, if you have a caliper, the firing pin must protrude at least .075 inches.  Additionally, it cannot exceed .095 inches.

Generally speaking, a matched bolt should not have a protrusion problem.  This is assuming the firing pin and the cocking piece are flush and the index marks are aligned.  I would be suspect of a private sale that had protrusion problems.  Personally, I would wonder if it was pieced together from various guns.

Finally, you can adjust firing pin protrusion by turning the firing pin in the cocking piece.

The bolt will have to be disassembled (or cocked) because there is a notch that normally prevents the firing pin to rotate and change protrusion.

Usually having the rear end of the firing pin flush with the back of the cocking piece gives you the correct adjustment.

Regal Range Construction Visit

regal range at night

When I found that someone was building a new training range that happened to be on my daily commute route I had to check it out.  Lickily Regal Rage was pretty receptive to letting me visit during their construction.

Its pretty cool that someone decided that an old movie theatre would make a great gun range, and actually did it.  I have long felt that golf courses and movie theateres were both misappropriated gun ranges.

Regal range was build for training, they decided early on that firearm instruction would be their main focus and everything else would support that.  Of course they sell guns and ammo, and they have a great gunsmith, but they have one of the best firearm instructors in the area as their lead trainer.

They have a simunitions room, a private training range, a great classroom, as well as an indoor archery range (with stands), and a huge tactical range that you can shoot up to and including .50 bmg.

As a matter of fact, they have a full auto M2 .50 caliber machine gun that you can rent and shoot on their range until the cordite addiction is fulfilled.

Talking with their general manager was a pleasure, and I am excited to see if their plans pan out because if they accomplish all they plan then this will be a great addition to the firearms training community in the Middle TN area.

How to Adjust Front Sight Windage on a CETME


CETME Front Sight Windage Adjustment
Buy at Amazon

I have done a lot of articles using my CETME rifle.  For the longest time I could not figure out how to adjust Windage.

Luckily I finally got smart enough to use the internet and quickly found out that the front sight covers both Windage AND Elevation.

That blew my mind….

After reading a little more, I looked closer and saw that the front sight is offset.  Therefore, as it turns it moves up and around.

You end up with about 4 minutes of angle of adjustment as it moves through one complete circle (4 MOA is 4 inches of adjustment at 100 yards)

There is a small screw at the front of the front sight at the muzzle end and parallel to the barrel.
You must unscrew this screw to be able to adjust the sights.  Failure to do this will damage the sight or break your tool.

The tool is just a tube with two wings that fit around the sight and allow you to turn it. I have seen them from $4 to $15 each. Simply do an Internet search for CETME Front Sight tool and you will find many of them.

Use the tool to adjust for elevation, and then turn the post one way or the other to adjust for Windage.

In Conclusion, it is not a precision operation, but it is minute of bad guy.  Therefore, it is good enough for a battle rifle.   As I said, this is not a precision rifle sighting system.  Understand that and it should meet your expectations as a main battle rifle capable of hitting man sized targets out to 500 yards.

How to Use Potassium Permanganate Fire Starter


How to Use Potassium Permanganate Fire Starter
Buy at Amazon

Using Potassium Permanganate Fire Starter is a common topic for prepper and survival website.  It is commonly found in lists of things you should always keep in your first aid kits.

Potassium Permanganate or KMnO4 is a strong oxidizer and when mixed with certain materials it will spontaneously ignite.  It will also kill bacteria and organisms in water.

Most commonly it is mixed with glycerine to burn.  I mostly use it to light my thermite.

I don’t think it is as effective as a prepper tool because the reaction is dependent on the ambient temperature.  If it is too cold it won’t work.  This video was in my cool basement and you saw the delayed reaction.

I also think that space taken up by a one time chemical would be better suited to a lighter, a pack of matches, flint and steel, a feocioum rod, or a fire piston.  Any of these take up less space and give more fires per size.

However, if you just think this is cool and you want to carry it for the mall ninja effect, I say go for it.  I am not hating on you, just carry a backup tool just in case.