This post is a little mall ninja, and coloring ar-15 reciever markings is not the most loved idea.
However, this is my AR, and I really like the white and red filled selector markings on HK firearms and wanted to replicate it on my firearm.
There are several ways of doing it, and I used a red lumber crayon on the AR in the video
Basically I just rubbed the crayon over the inscription and then wiped off the excess. Just like ivory scrimshaw, the colorant filled the deeper cuts and was able to be wiped clean of the body.
You can dab enamel paint or fingernail polish into the engraving for a more durable color, but it is harder to remove it from the side of the gun. If you use a rag with too much thinner it will drip in and mix with the paint you want to keep. Not enough and it can smear on the body of your gun.
If you use crayon, be aware heat can make it run
If you use nail polish and decide to remove it, a tooth brush and nail polish remover does a good job.
I like how this looks, but you need to be careful what you use, and ensure its what you really want. Some people like the look that comes from coloring AR-15 receiver markings, but many do not.
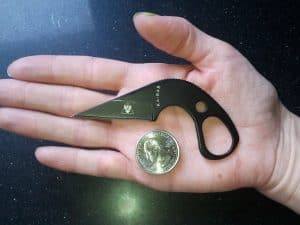
I wasn’t really sure I wanted to share this covert LDK belt carry method. Not because its not a good tip, but I think everyone needs a secret or two. However, I found a new method of carrying a BOGA knife (Back Off-Get Away). This method can be used as a last ditch defensive weapon.
I like the Ka-Bar LDK (last Ditch Knife). It is a small back up knife designed for just such a use. The small size and flat Kydex sheath make it perfect for mounting in tight spaces.
What I did was sew it near the buckle of my 5.11 rigger belt. I can reach under and draw the knife easily. I did end up tying a small piece of brown shoelace to the grip to make this easier. Being under my belt and very close to the metal buckle it is almost undiscoverable.
I like the small size because my state has a maximum legal length for fixed knives. This blade is very comfortably within legal limits.
I have carried this knife in this manner for a while (years). So I have refined my sewing technique. When I made this video I was still using thread and a normal needle.
Fishing Line Thread Holds it Best
I now use thin monofilament line and a larger needle to better force through the belt. This makes me able to sew no only the corners, but also the two middle holes. The additional thread makes a very secure and non-moving mount.
My only concern is that this knife is very hard for a big guy like me to re-sheath. I generally have to unbuckle my belt to get it back in.
This is not normally a problem, as this knife is not meant for daily use. You should not draw it unless it is an emergency.
There are a couple different spam cans for surplus ammo – and each has a little different method of opening. Today I am going to open a 300 round can of 7.62x54R on clips.
The 7.62x54R Spam Can is hot dipped galvanized with a soldered on lid.
There is a metal tip on one end.
Grasp that with your pliers (needle nose) and turn the pliers to roll the seam up around the pliers.
Then use the pliers on the side seals, grabbing and peeling away until you can start to roll the lid off.
Its not as hard as it looks on the video – once I got it rolling it came off easy.
The ammo is covered in some cardboard sheet – lift them out to get to the packed rounds.
There are several smaller cardboard coated sections of ammo – each tied with a small string and holding 2 stripper clips of 5 rounds.
Remember – This is the rifle that one man gets “One man gets the rifle, the next man gets some bullets. The second man follows the man with the rifle, and when he is shot, picks up the rifle and carries on fighting!”
All in all this was not that hard to get open, but it sure did protect the contents well. I need to buy a couple more of these tins of ammo so that when my boy is old enough to clean the cosomoline off of the Mosins I put back for him he has plenty of ammo to learn to shoot with.
When I got my C&R license, it was specifically to buy mosins and other WWII bolt guns. I figure at $100 for the rifle, and $100 for a 300 round can of ammo, I could afford (over time) to collect enough firearms to outfit all the folks who say that they are coming to my house in a disaster (or repel them – if needed)
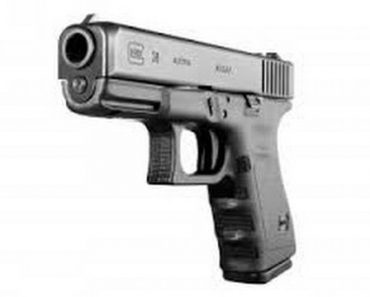
Have you wondered how Glocks are Numbered? I have. However, I constantly get asked what I think about the Glock 324B* or some other obscure number
I never bothered to memorize the Glock numbering scheme. I just ask for a specific size and caliber. Since, I prefer a compact 9mm. Therefore, I typically buy a Glock 19.
The reason I don’t keep up with the numbering system is that it does not make sense for the user. They are not numbered in order of caliber or size.
Glocks are numbered by the order Gaston Glock gets patent number. I would prefer them listed by caliber and size.
Why not put all the 9mm guns in a row, then number by size. Glock 1, 2, and 3 could be the standard, compact, subcompact. Then the 4,5, and 6 could be the .40 S&W guns. Next could come the .45 ACP in the 7, 8, and 9 models.
That would be much easier for me to remember. In contrast, the reason Glock pistols start at 17 is that Gaston Glock had 16 patents before guns. He originally made polymer kitchen utensils before he decided to go after an Austrian military contract for a new pistol.
(* I made that number up. There is not a Glock 324 but I expect some day Glock may make one)
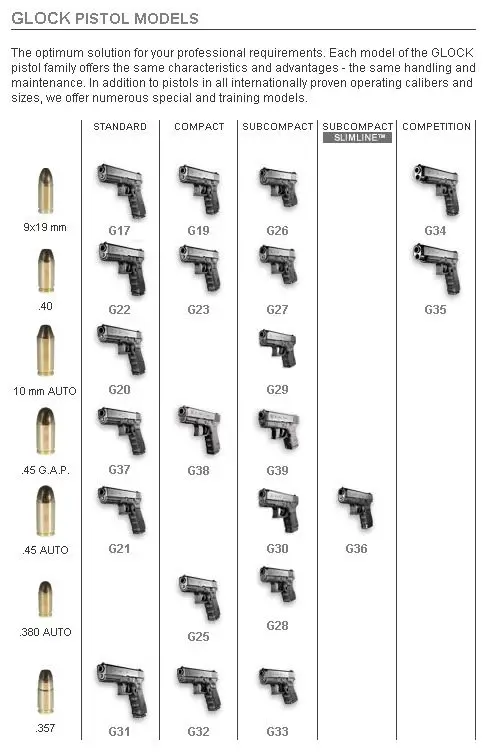
Here is a Basic Breakdown
Glock 17 is a 9mm full size
The 18 is the select fire version
Nest, the Glock 19 is the 9mm compact
20, 21, 22 are all full size, with the 20 chambered in 10mm, the 21 in .45 acp, and the 22 in .40 S&W
22, 23, and 24 are all .40 with the difference being size. The 23 is compact, the 24 is sized for competition.
Glock 25 is a compact .380
26-30 are all sub compacts. In order of caliber, they are: 9mm, .40, .380, 10mm. Lastly the 30 is a .45acp
31, 32, and 33 are all chambered in .357 sig. the 31 is fill sized, the 32 compact, and the 33 is subcompact. This is the series the TN Highway patrol carries.
34 and 35 are competition guns. the 34 is 9mm. the 35 is .40 S&W
The Glock 36 is a slimline .45 acp
Lastly, the 37, 38, and 39 are chambered in .45GAP. the 37 is the standard full size, the 38 compact, and the 39 the sub compact.
There are several ways and opinions about how to remove cosmoline, and many curses heaped on the head of this product over the years.
Cosmoline is not evil, if it was not for its preservative effects, we would not be able to enjoy shooting old military surplus guns as they would not have survived over the years.
You Need to Understand Cosmoline
Before learning how to remove Cosmoline, you first need to understand that it is chemically similar to Vaseline, and is applied by dipping guns into a vat of molten Cosmoline. This means that the preservative is not just gunked up on the gun, but is embedded in every nook and cranny in the gun. If you are going to remove cosmoline from a gun, you will have to disassemble and detail clean it.
Some like to use chemicals to clean out the petroleum based Cosmoline. I have read accounts of people using gasoline a 55 gallon drums. I think that this is overly dangerous and under-effective. Mineral oil and brake cleaner work just as well.
Hot Water Method
I personally use hot water for the metal, and sun and gently heat for the wood. Some do not like the idea of using water, but in my experience using heat alone runs the risk of cooking out the oil and leaving the dark tar-like crud. Water seems to both heat the oil and help float it away.
The way I do it is to strip off all the wood, and disassemble the gun to is smallest user level parts. I don’t do an armorer level disassemble, but just a detailed field strip. I then put all the small parts in a stainless pot that the wife won’t kill me for ruining (I actually have my own kitchen set by now), and boil them clean.
The Cosmoline will float to the top as it melts. When I take the hot metal out of the water, and quickly clean it with bore solvent, it dries rather quickly and I oil it well so it does not rust.
The longer parts like the barrel, takes more work.
I boil them in a large stock pot, and repeatedly pour hot water down the barrel to loosen up the Cosmoline. A rod will need to be pushed down the barrel as it will be plugged with the Cosmoline.
Attention to Detail Helps
Take special care on the action, as with guns such as the Mosin Nagant, In the video I show a Mosin, but this is not a how to remove cosmoline from Mosin Nagant article.
Cosmoline is notorious for being hard to remove. It may cycle fine, but after a shot or two, the Cosmoline will become tacky and the bolt will be hard to cycle. Additionally, If you fire the gun a lot with the Cosmoline on the action, it will bake on and make a small problem a huge nightmare.
I take care with the stock, and do not introduce boiling water as that will damage the old wood. What I do is to gently heat it up in the sun on a hot day (or VERY gently heat with a hairdryer) and wipe the Cosmoline off with a towel. With repeated heatings and wipe downs you can remove the Cosmoline without damaging the wood. If you go to fast or too aggressive you can strip out the moisture and mess up the stock. I also use murphy’s oil soap to help remove the oily Cosmoline from the wood.
I know this is not an easy process, its messy, and will most likely cause a little bit of marital stress, but look at it as a rite of passage, and a way to help preserve history. Heck, if you get a C&R license, you may even consider buying a curio gun and leave it in its Cosmoline wrapping to allow your kids and grand kids this pleasure.