


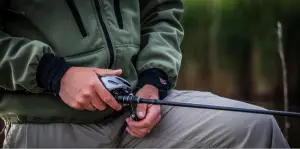
 Do you want to be able to maintain and repair your own fishing reels? Most anglers do, but the problem is that it’s not that simple. The best fishing reels these days are just as complicated as the most sophisticated automatic watches, and they come with tiny parts that work in mysterious ways.
But you can perform some preventive measures to keep your fishing reels working well, and you can clean them yourself provided that you take certain sensible precautions. Here are the steps you need to take.
I never was a good fisherman, but when I was a young Marine, I had a kayak and one of my favorite things was to take it out into the intercostal waterway and fish (and explore). If you want a good kayak to go with your fishing reel, I have great site to help pick out a good kayak.
Preventive Measures
Here are some preventive measures you can perform on your fishing reels so that you can protect your reels and also minimize the amount of cleaning you need to perform afterwards:
- Before you get on the water, use a petroleum distillate such as “Real Magic” from Blakemore. It doesn’t hurt marine electronics, and it protects the reels from the waves slapping the kayak or from paddle spray. It minimizes UV damage and corrosion, boosts casting distance, and reduces line memory.
- After a whole day of fishing, you can also use a reel cleaner on your reels. You just spray the cleaner on your reels, and then lightly wipe it down to keep the salt and moisture buildup from resulting in corrosion.
- You can also get home and use a simple garden hose with a light spray to rinse off any debris and salt from your reels.
The Cleaning Process
Of course, sooner or later even freshwater anglers will need to clean their reels properly. Saltwater anglers need to clean their reels after every fishing trip. While you can always opt to have the reel cleaned by your local reel expert, you can always do it yourself. Here are the basic steps you need to take, though you will need some additional specific steps for particular models:
- Have all your tools ready on the onset. Your reel may have come with a wrench, along with a list of parts, so have those ready. You should also have a standard slot head screwdriver as well as a Phillips. You’ll also need an old toothbrush with soft bristles, a toothpick, and a pair of tweezers. A pencil will also come in handy later, as well as a mat and some masking tape.
- Have your cleaning supplies ready as well. Here you need a cleaner that gets rid of contaminated oil and grease. This can be any reputable cleaning compound for reels, or even lighter fluid. Then you need a lubricant with contains reel oil and reel grease. You should your Blackmore Real Magic handy as well.
- Hold the reel with the same hand. This is crucial when you start to disassemble the reel. If you’re right-handed, hold it with your left hand and use your right hand to take it apart. This way, everything stays oriented the same way and you’ll find it easier when you put it back together again.
- Keep track of your reel parts. It can be scary when you start disassembling your reel, since there are a lot of parts to track. To do this properly, you need to have a mat ready for all these parts, and then you should have a line of masking tape under the parts so you can number them as you pull them out. This way, you can put them back in the right reverse order and you won’t have any parts left over afterwards.
- In general, reel parts are designed with metal parts attached to fiber parts. With a few exceptions such as metal gears, for the most part you don’t really see any metal parts that bear on another metal part.
- Use the tweezers for the wire clips and the springs. This can help you handle these small parts properly. If you’re not careful and you use your fingers, you can lose these parts very easily.
- Take care of the fishing line first before you take off the spool. You can secure the fishing line with masking tape or you can strip all the line off the spool. Either way, do this first before you remove the spool from the reel. If you don’t secure the line first, the line can get caught between the frame and the spool. That’ll make the removal much more difficult.
- Clean the various parts with the appropriate biodegradable cleaner. Gasoline isn’t a good cleaner for grease and dirt removal, since it can damage the plastic components. That’s why you should also use soft bristled-toothbrush, as hard (or brand-new) bristles can damage the plastic as well.
- Use the toothpick to apply the grease. You only need a light coating anyway. Also you need to apply the grease on the bottom of the teeth of the gears. Putting the grease on the top of the teeth can cause the gears to throw the grease everywhere.
- Use lighter fluid to clean the bearings. That should remove debris and dirt from the bearings. Afterwards, check that they can spin so you’ll know they’re really clean. Then use a drop of synthetic reel oil for each bearing.
- Reassemble the reel. Check that you put them back in proper reverse order, and that you have no parts left over. Then you can check it out to make sure that everything works the way they’re supposed to.
- Apply Real Magic to finish things off. Just back the drag off, and then you can apply a little Real Magic to the exterior. That will protect the finish and the line.
What you have to remember is that your fishing reel is your most important tool if you really want to catch fish. If you perform these simple maintenance measures, you can keep your reels working properly for many years.
Getting the best fishing reels won’t do you much good in the long run if you don’t take care of them properly. You save money from having to buy too many reels too frequently, and you also save yourself a lot of frustration when your worn-down reels let you down when you finally have a huge fish biting on your bait!


 What You Will Need To Make
 After selecting the crayons, you would have to remove the wraps of crayons. For this, you would need a bowl having water and ice in it. After that, the crayons have to be put in the cold water and leave it for five minutes. Likewise, the wrapper can be removed.
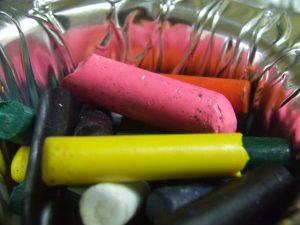
 It is the time to mold the melted crayon for preparing your candles. You can pour this mixture into a metal cutter of cookie, a mini cup of baking or any container according to your wish and leave it for 5 minutes.
 After you complete selecting the ideal wick, you would now have to insert it in the candle. A toothpick or pointed end of a crayon can be a good option if you want to make a hole in the half made candle.
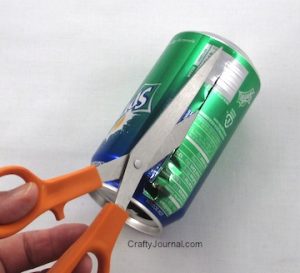 The first thing that you would have to do is hold the can and cut a small ‘window’ on it with the help of the knife. However, you should be very careful while using the knife as lack of attention might result in injury.
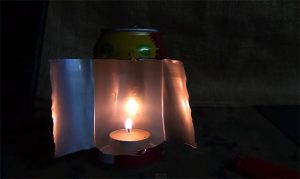 After cutting the window in the can, you would have to open up the section and clean inside. Now, you just have to put the tea candle inside the can through the window. And this makes your can ready as the lighted lamp.
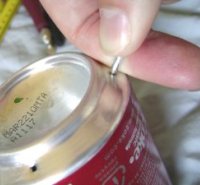
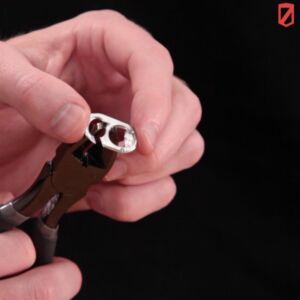 The first thing you would do is cutting the tab of the soda can. To start with, cut an aperture in the tab’s bottom hole. You need to make sure that you are cutting in a slanted way and after that begin to cut away the metal around the hook as much as possible. Now you need to turn the hook into a keen point by filing it.
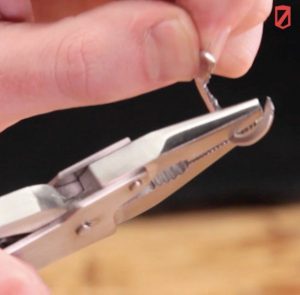 The next step in making fish hook is filing the hook. If you have to file the keen edges of the hook, the multipurpose tool would be a good option to use. A multipurpose tool can be said as a versatile utensil that can be used for various purposes.
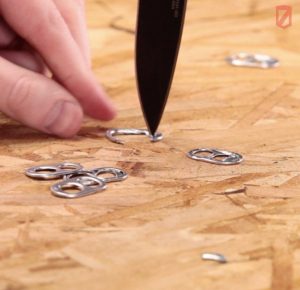 It is the time to make an aperture for fishing lines. To make this small hole, the pocket blade could be a good one to employ.
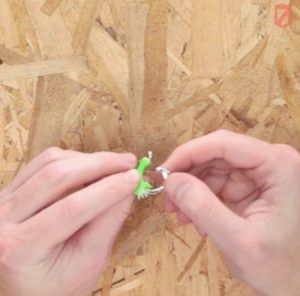 Now you have to insert the hook in the paracord piece.
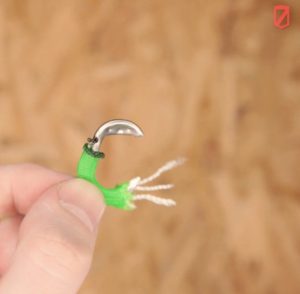
 Using a scratch awl, you would have to make holes on a can’s bottom edge. It is said that small holes are fuel coherent while big holes can burn fast and hot. You can do whichever you like.
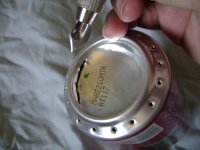 Now it is the time to make the main opening. For making it, you would have to cut the bottom from where the holes were made in the can. You would need a strong instrument to cut it as the can is thicker here.
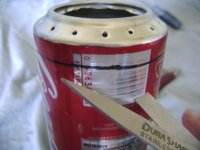 The third phase involves cutting down the top of the stove. By measuring 20mm from the can’s bottom, you would have to cut it to make the top part of the stove. Keeping a regular Sharpie on the table, you have to turn around the can against it.
 To make tabs, you would have to cut the stove top’s edges for many times. The resulted small tabs will ensure that the top will fit in the bottom of the stove correctly. You can make the number of spaced cut around evenly according to your wish or requirement.
 Now, you would have to take another can to cut its bottom. By measuring 25mm from the can’s bottom, you have to cut it. You can make the stove tall or short by adjusting the given measurement.
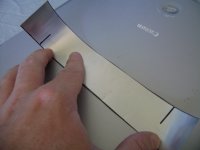 It is the time to make the inner walls. The leftover remains of the earlier cans would be utilized for making it. However, if these remains are not in the usable state, then you might require a third can.
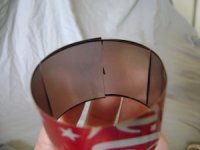 To fix the inner wall in the bottom of the stove, you would have to cut a halfway along the strip on both the ends to make them fasten together. The strip ends would have to be inside while locking.
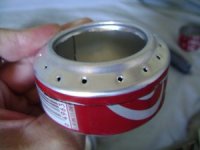 All the three parts now have to be put together. You can begin with setting the inner wall with the down notched ends, then fitting the stove top and inserting the preceding cut tabs at the bottom. All these things will eventually get fixed as a puzzle.
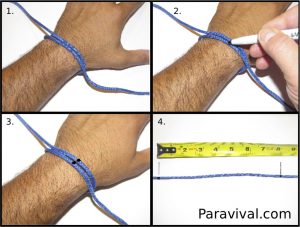 You would have first to measure your wrist by wrapping a nice rope or string around it. Using a marker, create a line of the string. Next, you would have to cut and melt the ends. With the help of a lighter, you have to burn the cord evenly.
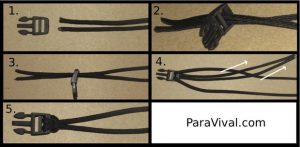 You would have to now fold the paracord of 10ft to work together on both ends. The cord threads have to be inserted through the lower opening of the side release buckle. Now you have to pull the cord’s loose ends along the loop that has been formed on the other side till it forms a tight knot.
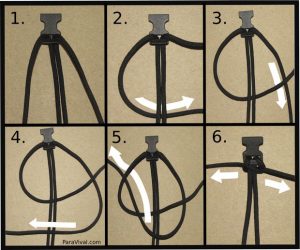 In this step, you would have to take the left cord to thread it beneath the cord of the bracelet and then take the right one to thread under the left one.
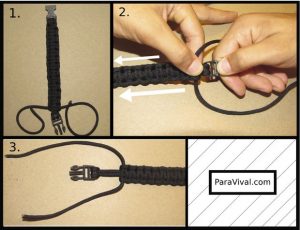 The above process will continue till it reaches the bottom of the buckle. Now, the male buckle has to be pulled towards the female buckle for more limp.
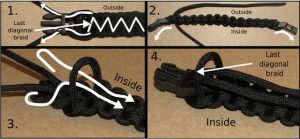 After tightening up the end, the cords’ ends have to be melted to prevent from wearing away. You need to squeeze the melted ends to make them flat. And with this, your paracord survival bracelet will finally form.