How to Make Dehydrated Toothpaste Dots

How to Make Dehydrated Toothpaste Dots


How to Make Dehydrated Toothpaste Dots
Buy at Amazon

Here is a quick tip for backpacking or camping where space and weight is a premium – make Dehydrated Toothpaste Dots.

To make a chewable single use dry toothpaste “mint” lay out foil sheet or parchment and make rows of toothpaste spots.

Allow to dry for 2-4 days.

Sprinkle baking soda on top to keep from sticking.

Repackage in small bags.

I stopped making these Dehydrated Toothpaste Dots when the boy began thinking they were candy.  But they are good for trips and traveling – once you have a can of shaving cream explode, or some shampoo leak into your luggage you begin to think about new ways to pack your stuff.

There really isn’t much more to say about this project other than you should be careful where you let them dry at – you don’t want to leave them in your bathroom because of the bacteria, and you don’t want the to sit out too long because they get really hard and nasty.

If this is not something you want to try, but you still have the issue of packing something light and easy for tooth brushing in the outdoors, you may want to just get a small container of baking soda – but I will warn you – this tastes better.

To use

Pop one Dehydrated Toothpaste Dots in your mouth, chew, then add a small amount of water in your mouth and start brushing.

Using a Pencil Sharpener for Tinder

Using a Pencil Sharpener for Tinder
Buy at Amazon

As far as survival gear goes, I like cheap, light, unobtrusive, and multi-use. Today’s tip of using a Pencil Sharpener for Tinder fits all those things.

If you keep a small pencil sharpener in your gear you can use it to make tinder for your fire. It the outside of the wood is wet from a quick rainstorm, by cutting into the wood you can access dry material.

As a side benefit – the pencil sharpener will put a point on small diameter wood which you could use to make traps, fishing implements, tent stakes – whatever – and in a pinch the razor can be removed and uses as a small knife.

Not bad for something you can buy at the dollar store…

The best thing about using a pencil sharpener for tinder is that it weighs practically nothing, is small and ob obtrusive, and if you take care when selecting it, you may be able to disassemble it to get a razor you could use if needed.

This is a great survival kit idea, it it light, cheap, small, and never goes bad.  I make a point to keep a pencil sharpener in all my tool bags just for those reasons.

Knots: Figure Eight

Knots: Figure Eight
Buy at Amazon

If you are involved in either sailing or rock climbing, it is likely you know the importance of the Figure Eight knot. It is used to stop ropes from running out of retaining devices.

Like the overhand knot, it will jam under strain, but unlike the Overhand, which often causes the rope to have to be cut, the figure of eight is usually more easily undone than the overhand knot.


Tying the Figure 8

  • Pass the tail over itself to form a loop.
  • Continue under and around the standing end.
  • Complete the knot by passing the tail down through the loop

Can also double the rope up and make a figure 8 on a bite to be used for anchoring rope.

When my dad taught me about mountaineering and repelling this was one of the first knots he had me memorize.

He told me that proper knots are more than just pretty.  They were a sign of professionalism and knowledge.  He said that proper knots did the job they were designed to do, and as a rule (with the double fisherman as an exception) were easier to untie than improper knots.

To this day, I cannot tie a load down without thinking of him.

How to Tie a Clove Hitch

How to Tie a Clove Hitch

Knots: Clove Hitch
Buy at Amazon

There are a couple knots that everyone needs to know.  The  Clove Hitch is one such knot.

A clove hitch is used to tie a rope to a cylindrical object (like a fence post or tree).  However, it is unreliable when tied on a square post.

What makes it useful is that if you feed the rope in from either end the knot will loosen.  This makes it adjustable.

Basically it is just two half-hitches tied in a row

This knot is used a lot in lashing.  I have actually thought about doing some how to lash articles.  However, besides doing a tripod lashing article, I just haven’t gotten around to it in the manner I desire.

With this in mind, as the boy gets older I can video teaching him how to do it.  That would work, as many of these videos are really for him anyway.


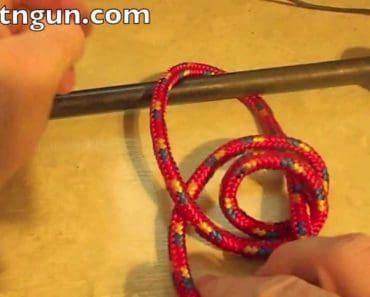
Tying a Clove Hitch

  • To tie a clove hitch at the end of a rope, pass the end around the pole starting at the right, with the end coming around below.
  • Next, put the end around in the same direction to cross over the standing end to be above the first loop.
  • Then, as the end comes around, put it under itself to be over the standing end.
  • Check that both ends are in the middle, emerging in opposite directions.
  • Finally, pull to tighten.

When pulled tighter, the rope passing over itself binds it in place.

How to Make Arrow Fletching With Duct Tape

How to Make Arrow Fletching With Duct Tape


Duct Tape Arrow Fletching
Buy at Amazon

Several years ago I tried out Dave Canterbury’s sling bow. It was fun and I saw that it had potential,  Unfortunately, arrows are expensive.  The short arrows I bought just did not develop enough energy to be useful.

I decided to look into making my own arrows.  Arrow-making has obviously been around a long time.  So it is a pretty developed science.  Feathers arraigned in a 3 feather system are the most common.  However, some use 2 or 4 feathered fletching systems.  Additionally plastic vanes are available commercially.

In today’s article we are going to go “mad max” and create Duct Tape Arrow Fletching.

The Prepper MacGyver’s Most Common Resource is Duct Tape.

The great thing about duct tape is that is common, cheap, is not too stiff so that it can bend as it comes in contact with the bow, but when doubled up is stiff enough to direct the arrow in flight.

To make fletching simply cut three bits of tape about six inches long.

Pick up one piece and bend it lengthwise to form a “U” with the sticky side outwards. The base of this “U” is stuck lengthwise along the shaft – in other words (and the video will help) the middle of the tape is stuck to  1/3 of the diameter of the shaft with the two ends flopping free.

Now pick up the second piece and bend it like the first one. This one will be stuck in position a third of the way around the shaft from the first one, while the first bit of tape is still bent in the “U” position to keep it out of the way. You do not want the two pieces of tape to stick together until you get everything situated. (I find that clipping the loose ends of the first piece of tape together keeps them out of the way.

Once you feel that the two pieces of tape are sitting in the right position, you can allow the two adjacent wings of tape to stick to each other, forming the first complete vane.

Mold the tape against the shaft to get it to stick well. The two bits of tape will sometimes stick without being exactly in the right position thus skewing the vane or making it lumpy.

Apply the third piece of tape is applied in a similar manner.

Tips for Duct Tape Fletching

A challenge with this tape fletching is to get three flat and evenly spaced vanes.

Another problem is to end up with the vanes where you want them in relation to your nock so that you get the conventional “cock and hen feather” configuration with the cock feather at right angles to the plane of the nock.

Once you have the tape into place, you can trim the vanes with sharp scissors.

Keep the vanes tapering down to nothing at the leading end so that they ride nicely past the bow and your bow hand.

Keep the vanes as narrow as possible and make the taper as long as possible.

You can also apply a tight wrap of soft insulation tape over the very front end of these plastic vanes to stop them catching and pulling away.

Obviously this won’t give you a good a result as using proper fletching and a jig like the one below, but it is serviceable and just the thing to use if your using a homemade PVC bow (more on that later).