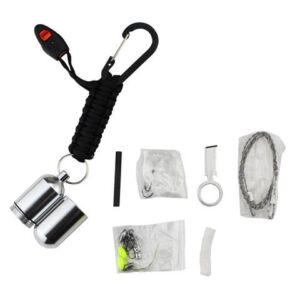
This is a pretty cool little EDC Keychain from Survival Hax. I have reviewed some of there stuff before, and it is perfect for the budget prepper.
The keychain is a simple paracord weave that you can unravel to get a lenght of cord, it has a whistle and an easy to use carabiner to attach it to your gear (my plan is to clip it to the rifle sling of my M6 Scout Survival Rifle.
I really like the contents of the survival kit – the knife is pretty cool and its always nice to have a means to start a fire.
The kit has:
Fishing line
Hooks
Weights
Floaters
Sinkers
Swivels
Eye knife
Cotton tinder
Fire starter rod
Safety pins
Wire saw
With this kit and a nice rifle I could make myself comfortable for an extended stay in the woods. It is a pretty decent set up that is light and small enough to go on all of your outdoor adventures and at under $15.00 its a steal.
I have to say while I did get this keychain for free in order to do a review, I am planning on buying another to go on my the sling of my son’s cricket rifle. (not that he will be outdoors alone, but so he and Daddy can match.
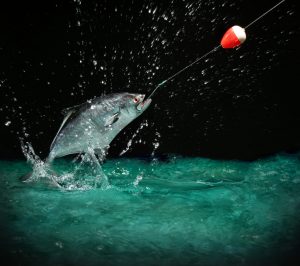
What will happen when you are near a water body and would like to catch some fish without having packed any gear? Well, there are many ways to catch fish without having any gear with you. This article will chow how to catch a fish with your hand
If you have no gear and are not in a position to fashion an improvised fishing rod, hook, line or even a trap, then you can resort to hand fishing.
Hand fishing or otherwise referred to as noodling has been in practice for a long time now. It is not recommended, but if push comes to shove, you may have to resort to it.
You can choose to wade in the water, but you will be susceptible to catching hypothermia. More so, if you opt to practice this craft at night, you will be at risk. During the day the water temperatures are warmer than at night.
If you do not want to get wet, then, you can find a spot where the water is flowing slower than the whole stream and place yourself there. Position yourself at the banks and lie in wait for the fish. Look for areas with a lot of stones lined along the coastline.
Step 2: Patience Pays
In hand fishing, you have to master patience as you lay in wait for the fish to come to you. Your hand will be radiating more heat than the surrounding of the fish. It will spook the fish as it will be a foreign object to it.
Wait for about 10 to 15 minutes for your hand to cool down and be at the same temperature as the surrounding. Once it cools down, the fish will have troubles differentiating your hand from other objects in its habitat.
Step 3: Tricking the Fish
When you resort to hand fishing, you are likely not to have any bait with you. You can either look for worms form below rocks or even use dead insects as bait. If not you can use your hand as bait.
Yes, you got that right. To use your hand as bait, you have to wiggle it like a worm and draw the fish that is likely to be hidden towards you. The motion of your finger will look like that of a worm that is struggling. The fish will move forward and take a bite on your hand.
Once the fish is within reach, act fast by holding it by the gills or the mouth. By putting your hands under its gills, you get an easier grip from the hard cartilage that makes up the gills of the fish. Otherwise, position your hands under the fish and quickly throw it on the bank.
If you used your hand as bait and the fish has gripped at it. Your first reaction may be to pull out your finger, but you have let your hand stay put in the mouth of the fish and pull it towards you.
Tips on How to Ensure Your Success in Hand fishing
Just like any other fishing technique, hand fishing requires precision and making calculated moves. How do you go about this?
➔ Approach the fish from behind. In this manner, your strike will be unexpected to it.
➔ As you place your hand in the water, be slow but steady so as not to startle the fish
➔ Look for holes and rocks along the shoreline. The fish are probably hidden here
Conclusion
Hand fishing is recommended for survival only. However, it is a sporting activity in some other parts of the world. You may step on something sharp as you wade in the water or cut you hand by sticking it almost everywhere.
It is advisable to put on shoes, have long pants on and even put on gloves as a precautionary measure. When catching fish with your bare hands, you are at risk of losing your hand or fingers if you get an infection.
If you have to resort to noodling, then let it be your last best option. You can build traps, improvised fishing rods, etc. These methods may not be as exhilarating, but they sure are safer. Personally I like using a rod and reel, but even then you have to perform reel maintenance so their are drawbacks to that also.
Don’t risk getting hypothermia or frostbite but it will come in handy in survival mode. Have you ever practiced hand fishing? Let us know what your experience was like in the comments section below….
The old adage that says: the best gun is the one you’ve got, applies to not only everyday carry, but also to survival in general. Of course, it’s always better to have a gun chambered in a readily available caliber, should the S ever HTF. But again, whatever you’ve got and have ammunition for is better than a pointy stick.But this begs the question, then:
Are revolvers good survival guns? Let’s take a more in depth look.
Reliability:
Generally speaking, anything mechanical can break. Having said that, one thing that most revolvers have going for them, is their ability to function under almost any circumstances. They have earned the reputation as the ultimate point and shoot handguns, and it’s easy to see why.
Once the cylinder is loaded, it’s ready to fire.Taking it a step further than that, since they’re reliable without recoil springs and many other parts that wear out over time, they won’t need much work to stay running should parts become scarce. Are there inner workings inside a revolver that we don’t generally see? Absolutely.
And, those parts can wear out. They just usually don’t do it as fast as their semi-automatic brethren.Simplicity:There are no slides, safeties, or magazines that you need to manipulate. When the cylinder is loaded, simply aiming and squeezing the trigger are all that’s required for the “bang” to happen. In the rare instance where the gun does not fire, whether due to ammunition or otherwise, there is no need to clear the malfunction.Simply squeezing the trigger again will rotate the cylinder and fire the next round in line.
Limitations:
The main drawbacks to a revolver, is the limited overall capacity to hold ammunition, and the inability to fire it quickly. In other words, a semi-auto with a 12 round capacity magazine is much faster shooting than a revolver with six rounds. The trigger can usually (though not always) be squeezed quicker and there is no need to drop empty casings to reload.
Having said that, anything with practice becomes easier. And, as something becomes easier and you get more proficient with it, you can get faster.
While there are devices to help you load faster, I come from the frame of mind that says less is more. What I mean, is that I don’t want to become dependent upon anything externally, if I may end up losing or breaking it.
The Perfect SHTF Revolver:
What do you want to look for in a survival revolver? Well, it’s hard for me to say what you should look for, instead, I’ll tell you what my perfect survival revolver looks like.
First, it needs the ability to shoot two different calibers. I’d look for a revolver chambered in .357 Magnum, because it will also shoot .38 Special. If ammo is hard to come by, the more options I have, the better off I’ll be.
Second, it needs to hold as many rounds of ammunition as possible, just as long as it stays within my price range. There are plenty of six and seven shot revolvers available, along with a few eight shot revolvers. I would not go lower than a six-shot revolver.
Finally, my best survival revolver would have a barrel of no less than four inches. I love my snub nosed revolver, and while it’s a good travel gun, I wouldn’t hunt with it. All of my survival guns need to serve two purposes: Self-defense and hunting. .357 Magnum is more than capable to hunt deer with, but shorter barrels sacrifice velocity for concealment.
Calibers:
Just a quick word on calibers, before we part .38+p in a .357 magnum is likely my choice. There are plenty of other revolvers out there that, with the use of a part I might lose, could shoot cartridges generally not found in a revolver. While I think 9mm is a great cartridge for self-defense and survival, I would advise against having a revolver in nine that could turn into dead weight if my clip breaks or gets bent.
Larger calibers than .357/.38 are fine, but I won’t be able to find ammo for them for long. The more popular the ammo, the easier it will be to find.
That about does it. What is your go-to survival gun? Is it a revolver? Semi-auto? What is your opinion? Are revolvers good survival guns?
Let us know in the comments below.
Like myself, the Author has been a firearms enthusiast for many years. Joshua has also, served honorably in the US Marines, and has been working in the firearms industry for several years. His work can be found on guns dot com, TTAG, Home Defense Gun, Pew Pew Tactical, Live Outdoors, Concealed Carry, and Gun Carrier. He also owns downrangedaily.com a website the gun minded readers of this site should definitely check out.
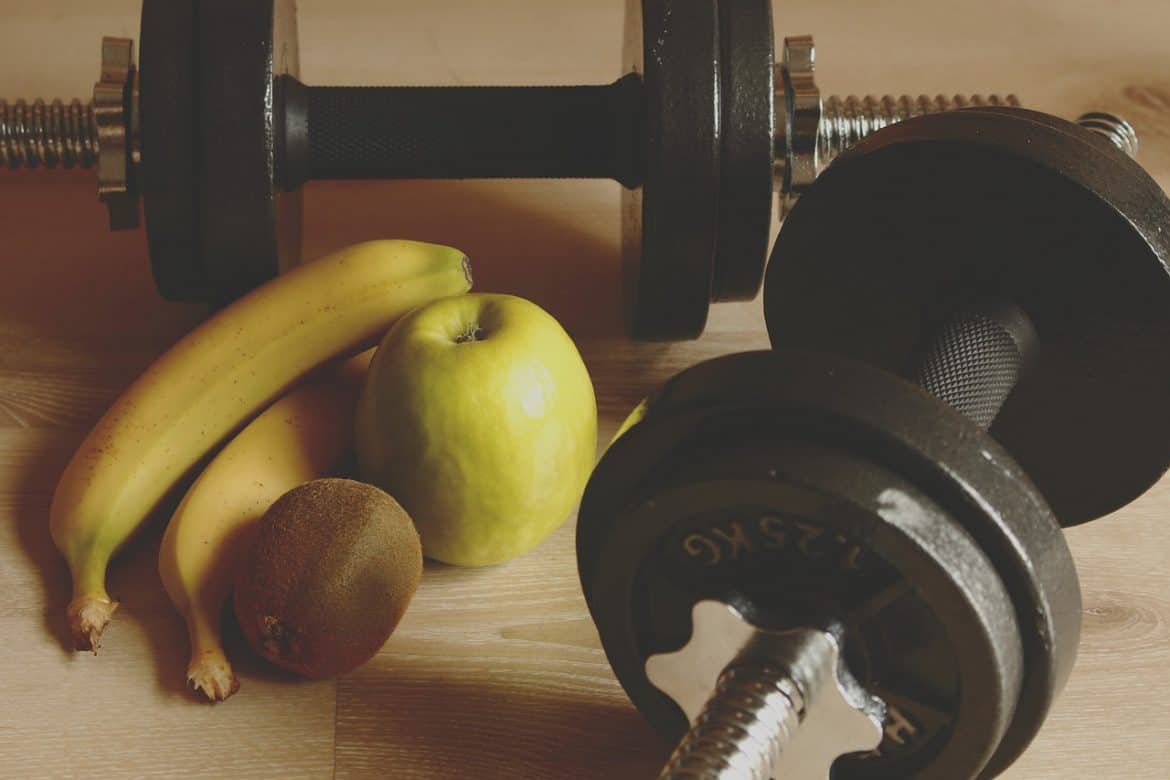
Since you carry a gun for self-defense or to save the life of another, then you are concerned with combative firearms skills rather than shooting merely for the experience of shooting. To reach this goal, you engage in training, mostly in the form of practice on a range. How close you get to your goal will depend on the effectiveness of your training. Building shooting muscle is a big part of proper training regimen.
Since you carry a gun for self-defense or to save the life of another, then you are concerned with combative firearms skills rather than shooting merely for the experience of shooting. To reach this goal, you engage in training, mostly in the form of practice on a range. How close you get to your goal will depend on the effectiveness of your training.
Let’s use weight lifting and body building as an analogy. If you want to get bigger and stronger, we know that you have to concentrate on working the large muscle groups of the legs, back, chest and shoulders. You do this by training mostly with the foundational exercises for these muscles: squats, dead lifts, bench presses, presses, rows, pull-downs and so on. There’s a total of maybe a dozen core exercises on which you spend most of your time. Yet there are hundreds of lifts you could do, and most of these work the smaller muscles. They are useful, but if your goal is size and strength, you use them sparingly, since you have only a limited amount of time and energy. Mostly these ancillary exercises are used to refine your shape and to add variety in your core routine to avoid boredom.
But if you go into any gym, you’ll see people spending their precious training time on these secondary exercises. Either they don’t know any better, or they think they have invented a “better” way, or they read in a magazine somewhere that so-and-so does this exercise, or they’re bored with the core exercises.
Now, go to any range and watch people there. You’ll see a great deal of shooting for tiny groups, with eyes focused on the sights of the pistol — regardless of the range. You’ll see people shooting at ten to thirty yards, rather than at zero to seven yards. You’ll see people standing still as they shoot. And so on.
Now, it is certainly a better marksman and better shooter who can shoot tiny groups, particularly at long ranges. But in the light of our goals, these kinds of skills are secondary. They are far less likely to be needed for our job than other, more foundational, skills. How do we know this? Here’s three sources.
The first is the consistent statistics from law enforcement shootings in which officers were killed. These FBI-compiled numbers have been pretty much the same for many years: 50% of LEOs killed are killed at five feet or less, and 75% killed are killed at ten feet or less. The second source is the Police Marksman Association survey done in 1992 showing the average police gunfight was won at about 20 feet seven yards (but note that this conclusion was from a pretty small sample.) Finally, there is the data from NYPD’s SOP-9 that indicates that from 1994-2000, 69% of their shootings (of all types) were at two yards or less, and 88% were at seven yards of less. These numbers are pretty consistent form year to year.
So what do these statistics mean in terms of training? That the bench press and squats of firearms survival training are the techniques to handle threats at seven yards and in. We detail the techniques relevant to these distances below, but first, a caveat.
We do most emphatically not mean to say that training at long handgun distances (15 to 50 yards) is not useful or even not important. Police officers certainly have to engage in long-range shooting on the job. We are just noting that these long-range skills are less likely to have to be used than close-range skills — that’s just the facts — and thus we suggest that they constitute your ancillary — not core — training. Longer range skills and super-tight marksmanship skills are the equivalent of weight exercises to develop the smaller muscle groups. They are less likely to be used, but they can 1) be useful in and of themselves, 2) they help to keep the training interesting, and 3) they round you out.
Contact distance to 2-3 yards At this distance, if you do not already have your gun out, and you are facing a deadly force attack, you simply will not have time to draw your weapon. The physics of the situation dictate that you will have to at least initially deal with this attack with empty hands techniques. This reality, of course, means that the “equalizing” factor of the firearm — one of its chief advantages — is negated. It also means that life is unfair, as the small, the weak, the injured and the older are at a disadvantage to their undoubtedly younger, more fit attacker. Life is, in fact, not fair. Sorry.
Your only choice here, if you want to honestly deal with your most likely self-defense scenario, is to pick up some vicious empty hand techniques. These, of course, work better if you are in shape, whatever your age. Such techniques are called “combatives” these days, as opposed to “martial arts”. The integration of combatives with the use of the firearm generally goes by the term “extreme close quarters shooting”, and the leading edge material in this area today comes from a man known as “SouthNarc”, for the apparent reason. His DVD on the subject, “Fighting Handgun Volume I” is available from Shivworks, www.shivworks.com, and is highly recommended.
3 yards to 7 yards At this distance, if you are trying to hit an exposed person, the proven method of Applegate-style target focused shooting (as opposed to many other methods of “point shooting”) is the most likely technique to be useful. This is for the simple reason that under a lot of stress (some combination of startle and fear), you are hard-wired to look at the threat, not anything less important from an evolutionary viewpoint, like your sights. (Of course, if you aren’t much startled, or not in much fear, you may well be able to focus on your sights.) Here the gun is held very firmly, the gun raised to intersect the eye/target line, and the trigger pulled. The technique works both one-handed and two-handed, and most people find that that the tighter they hold the gun, the better results they get (relaxed, “firm but not too tight” holds work well, by contrast, for precision and non-stressful shooting.) Since most shooters have been trained to look for their front sight, practicing target-focused shooting takes some mental concentration. Interestingly, when I am having a not-good day on the range with semi-sighted fire at these distances, if I force myself to target-focus, I can often improve results. If you are in a law enforcement or military unit, Lou Chiodo of Gunfighters Ltd (www.gunfightersltd.com) is a great source for instruction in this method of shooting.
7-10 yards and out At these distances, traditional sighted shooting is appropriate. And we strongly recommend that you practice it, and not only because longer range shooting may be necessary. When we cite the distances above, we are assuming that you need to hit a man-sized attacker. Hits anywhere on the torso are acceptable, with most instructors insisting on hits within a roughly 8½ x 11 inch area (the size of a standard piece of paper) as the goal. If you have only a part of your attacker available as a target, then the precision demanded of you increases, and thus the effective distance increases. A half a man target area available at 5 yards is about the same difficulty as a whole man at 10 yards, and so on.
Ever found yourself in a survival scenario within the wilderness with little or no fishing gear at your disposal? Such a situation might be not only stressful but also dire. You’re bound to be hungry and frustrated. Luckily, one way of fending for yourself or your crew is by hitting the local waterway and hauling out some fish. By employing some survival techniques, you should be able to find some fish to eat.
The following are the top 5 fishing tips for survival:
Find Bait That’s Native to The Area
You should find a rotting or old log and then turn it over. The chances are high that you’ll be presented with insects, worms, and grubs that fish love. You should also keep an eye on the shoreline. Most probably, you’ll discover minnows as well as other creatures swimming around. They make excellent bait.
Where you see minnows, grab a stick, and whack the water. By doing that, you’re most likely to kill or stun a few which you can utilize for bait. Since your actions will create noise, ensure you collect as much as you can. Before fishing, you should wait for some time.
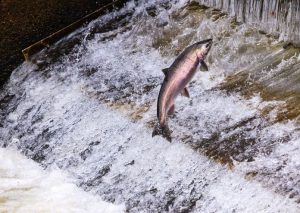
The Best Time to Fish Is at Night
Plenty of fish, especially the bottom feeders, normally feed at night. Consequently, find a great chunk of bait, perhaps some smaller fish that you caught earlier and then keep the line out through the night. It’ll surprise you the amount of fish you’ll catch. As you leave your fish gear unattended, ensure you tie the line tightly to something. Even a tiny 1 – 2 lb fish can be able to pull your fishing gear into the water.
Fish On Flowing Water
An effective fishing tip many people don’t know is that fishing on flowing water is better compared to stagnant water. However, if you’re fishing in a pond or lake, it doesn’t apply. The tip applies to tidal areas and rivers where you should find some little water flow but not a raging current.
Some little flow is great because it’s effective at attracting fish. Feeding fish tends to hang out behind logs or rocks so that they don’t fight the current. When your bait fish swims by, the fish can then ambush it. Therefore, the best places to fish are docks, logs, rocks, etc.
Consider Natural Poisons
While you shouldn’t practice poisoning outside survival scenarios, there’s no harm in utilizing natural poisons in shallow water pools. So what is meant by ‘natural’ poisons? Here are some things that are readily available to poison fish but are harmless to humans:
Lime – You can make it by burning and crushing seashells. They’re great at poisoning fish in the shallow pools.
When used in large adequate quantities, young nut husks from walnuts are effective at poisoning fish.
Plenty of plants can accomplish this goal. However, you’ll have to do extensive research before heading out.
By using this strategy, you’ll be able to gather a substantial fish amount.
Hand Fishing And Grill Net
Hand fishing is as primitive as your fishing can get. In this kind of fishing, you can use your bear hands to pull fish from its watery lair. Based on your geography, various names are used to describe this activity. Some of the names include:
Stumping
Fishing tickling
Grabbling
Gurgling
Catch fisting
Hogging
Graveling
Noodling
All you need to do is put on gloves and step into the murky waters to grab some catfish.
When it comes to gill net, you can utilize the nets to grab fish as they swim through your net’s opening. As they do that, the fish will end up getting entangled. Gill nets are highly effective at different times in different places. Nonetheless, they yield incredible results when fish are on their migratory run.
Tips to cook fish for survival
After looking at some fishing tips for survival, it’s paramount to know how to not only prepare but also cook and store your fish in a survival situation. Improper cooking fish, cleaning or storing it can result in your fish becoming inedible.
You should never consume fish that appears spoilt. It’s important to note that cooking doesn’t transform spoiled fish into edible one. The following are some signs of spoilage:
Peppery or sharp taste
Peculiar odor
Sunken eyes
Suspicious color
Slimy rather than wet or moist body
You should also use the right equipment to prepare and cook your fish. Since fish spoils very fast, after catching, you should prepare and cook immediately. Because in the wild you don’t have tools such as the top electric fillet knives, a pocket knife would be handy to cut out the large blood vessels and gills. While you can cook it over an open fire, the best way to do it is to boil. Doing so will ensure you obtain the most food value.
Conclusion
So tragedy has come your way. You’re on the run and have run out of something to eat … As you ponder about depleting your food supply, you just recall you have an emergency fishing kit. If you find yourself in such a situation, the above are the fishing tips you should employ to help you grab some fish.
We are FOOD Adviser. We always give you in-depth reviews and helpful advice about preserving your food. Our mission is to help you choose the best products with the most affordable prices that match your needs.

 This is a pretty cool little EDC Keychain from Survival Hax. I have reviewed some of there stuff before, and it is perfect for the budget prepper.