How to Make Cold Smoked Cheese


52 Unique Techniques for Stocking Food for Prepper
Buy at Amazon

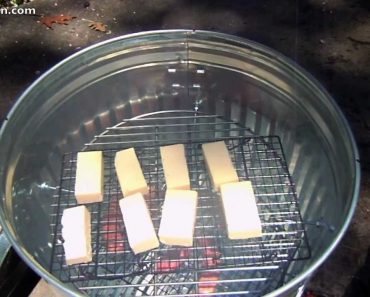
After enjoying the sausage, I had to try some Smoked Cheese – when smoking hard cheese you need to ensure the smoke is less than 175 degrees unless you want to pick melted cheese from the bottom of your smoker.

It does not take very much to smoke cheese – a little goes a long way – I like mine at 45 minutes – but the wife likes hers at about an hour.
It is no different functionally than smoking meat – other than the cooler the better, and it does not take very long.

I also find after doing this a couple times I like my smoked cheese to be of a mild sharpness – which is interesting, because if just eating cheese plain I like it to be extra sharp. I think the smoke adds the extra “bite”.

Smoked cheese makes a great gift – it is something that is unique, and that people generally do not buy for themselves.  I love it when I get it as a Christmas present from those that I know.

And for those that love to make comments about the galvanized metal – the food is not on the gavanized sides, and the heat never reaches high enough to burn off the zinc.  That happens at 200 degrees and above- the cheese melts and drips down off the greats at 175 – so I find it okay – if you don’t that’s great go buy a smoker.

PRN Episode #40 Introduction to Prepper Kits

PRN Episode #40 Introduction to Prepper Kits

52 Unique Techniques for Stocking Food for Prepper
Buy at Amazon

In my plan, Bugging Out is not my first choice.  It makes great survival fiction.  However, I would much rather stay with the majority of my preps and keep my survival systems in place.  That is better than trying to live an unknown amount of time with only the supplies I can carry or scrounge.

However, what I WANT to do, may not be one of the choices on the “Can You Survive” multiple choice test. Therefore, I feel it is important to be able to bug out if needed.

A quick internet search will show you how popular this concept is.  It seems that every internet prepper has coined their own term for the gear associated with being “on the road”.

Prepper alphabet kits such as: BOBs, GOODs, INCHs, IFAKs, EDC, and line gear.  It is enough to make your head spin.

In today’s episode, we cover the common acronyms.  How they are and are not alike – and once the terms are explained, I share with you several EDC tips I picked up over the years.

If you like this podcast – the subject will also be covered in my newest books 52 Prepper Projects – which is available on Amazon.

The show is scheduled for Monday at 10pm central time at this link.

If you cannot listen on Monday, you can always download the podcast for listening at your own leisure.

Opening 7.62x54R Spam Can

Opening 7.62x54R Spam Can
Buy at Amazon

There are a couple different spam cans for surplus ammo – and each has a little different method of opening. Today I am going to open a 300 round can of 7.62x54R on clips.

The 7.62x54R Spam Can is hot dipped galvanized with a soldered on lid.

There is a metal tip on one end.

Grasp that with your pliers (needle nose) and turn the pliers to roll the seam up around the pliers.

Then use the pliers on the side seals, grabbing and peeling away until you can start to roll the lid off.

Its not as hard as it looks on the video – once I got it rolling it came off easy.

The ammo is covered in some cardboard sheet – lift them out to get to the packed rounds.

There are several smaller cardboard coated sections of ammo – each tied with a small string and holding 2 stripper clips of 5 rounds.

Remember – This is the rifle that one man gets “One man gets the rifle, the next man gets some bullets. The second man follows the man with the rifle, and when he is shot, picks up the rifle and carries on fighting!”

All in all this was not that hard to get open, but it sure did protect the contents well.  I need to buy a couple more of these tins of ammo so that when my boy is old enough to clean the cosomoline off of the Mosins I put back for him he has plenty of ammo to learn to shoot with.

When I got my C&R license, it was specifically to buy mosins and other WWII bolt guns.  I figure at $100 for the rifle, and $100 for a 300 round can of ammo, I could afford (over time) to collect enough firearms to outfit all the folks who say that they are coming to my house in a disaster (or repel them – if needed)

DIY Homemade Mouthwash

DIY Homemade Mouthwash Recipe


DIY Homemade Mouthwash
Buy at Amazon

Hygiene is very important in a disaster situation, in a long term catastrophe or in a world without good insurance (Thanks Obamacare) taking care of your teeth will be much harder and much more important.

Products like mouthwash are also pretty expensive so being able to roll your own makes economic sense also.

I like this recipe for homemade mouthwash because few ingredients are needed and the flavor is not horrible.

Also since it uses baking soda, it deodorizes your mouth (just like it does your fridge),instead of masking it with mint.

You should try this DIY homemade mouthwash at least once, or take the time to look at the book “where there is no dentist“.

Oral hygiene is doubly important during a long term disaster where medical resources are not readily available.


Ingredients

  • 1 cup water
  • 1 tb baking soda
  • 5-8 drops peppermint/mint essential oil
  • Some kind of sealable container to keep it in

Procedure

Mix it, gargle it, and tell me what you think

Notes on Homemade Gargle

as you can see the homemade mouthwash ingredients are few, and it is a simple mix.  you can even take it one step further and look at my mint extract video and make your own flavorings if you want to get truly DIY on your homemade mouthwash.  This gargle is not essential for oral health today, but in a large scale collapse or economic downturn it would be handy.

How to Make a Vacuum Former Box


DIY Vacuum Former
Buy at Amazon

Vacuum forming is something I have wanted to play with for some time.

The storm trooper uniforms from star wars are vacuum formed. Many molds – especially for candy- are vacuum formed. What I want to be able to do is form holsters and project boxes to custom specifications. Because of this I had to make a DIY Vacuum Former.

The way vacuum forming works, is that you have a box (called a platen) that has a top full of holes – this box is built to draw a vacuum (hobby platens normally use a shop vac). The second piece is a frame to hold a sheet of thermoplastic.

Whatever you want to mold is set in the center of the platen, the plastic and its frame is heated until the plastic is pliable, and then the hot plastic is set over the platen. A vacuum then pulls the plastic down and over your part, very cleanly and clearly reproducing it in the plastic.

Once cooled, the plastic part is trimmed from the sheet and is ready to be used.

Constructing the Vacuum Forming Box

I used a piece of pegboard to form the top of my platen, and just built a frame out of scrap 2×4. Next, I used a piece of plywood for the base, and used calk to seal everything.

I drilled a hole in the center of the front of the 2×4 frame so I could insert the hose from a large shop vacuum.

For the frame, I bought two sheets of 1/8 board, and drew increasingly small square about 2 inches wide. I cut out each square out of each of the two boards, making several sets of frames.

To use, I put the plastic over one frame, and then bolt the second over the first board.

My idea is that when molding something small, I can set the biggest frame along the outside, and then use each smaller frame inside the larger one until I get to the size I need. The intent is to reduce the amount of exposed holes to maximize vacuum. In practice, I just cover the unused space with duct tape.

I think that in vacuum forming, making the platen a size you will use is more efficient, than making a monster frame for small projects.

As we get time I want to use this to make several other projects, most notably a bedside holster.