This was a kitchen experiment, it worked well, even though an experienced chef may say “Why”?
There really was no reason to try to cook meatloaf in a springform pan other than my wife learned I needed a springform pan to make cheesecake and then went on a diet after the first cheesecake.
I have to use the pan for something, and I thought if I use a springform pan for meatloaf, then removing the meatloaf would be easy.
This worked pretty well, but the typical meatloaf method of making a sling to lift out the meatloaf after cooking works well also.
In actuality I would rather post a video of an awesome cheesecake recipe, but they are an item I am forbidden to cook – so I wait until the wife leaves and clean up all the evidence.
I can only write about it here because she never reads this…..
I know this is probably a pointless post, but on this website I do what I do and post the results no matter if it works or not. I figure if I show my failures and bad ideas you can see I am real.
This may be pointless and silly but its not pointless and silly if it works.
My wife loves make ahead meals, it is so much easier when you have precooked and packaged lunches and dinners for the week. I like them because cooking is cheaper than eating out, and having foods prepared in advance lessens her stress and the likelihood of my getting yelled out (for something I probably deserve – but nonetheless).
However, with her strict diet, I get to make whatever I want since she doesn’t eat what I do, and I don’t have the desire or willpower to stick to hers.
Meatballs are a Easy Meal Prep
This means I make a lot of meatballs, as they are easy, flexible, cheap, and store well. This post shows a recipe for a baked meatball roll that is awesome for a lunch or easy dinner.
I don’t show how to make meatballs, as I have both done this earlier, and it is dead simple. Whatever your meatball recipe make 8 or so of them and get some premade pizza dough (the whomp biscuit kind), some cheese, and some sauce.
Once you have all the ingredients for your rolls, open the dough and cut it in half lengthwise, and cut the half’s in half width-ways to make 4 equal “squares” that are probably a little rectangular.
stretch the dough a little to make it thinner and larger, then simply add a couple spoonfuls of sauce in the center of each bit of dough, add two meatballs and some cheese over the sauce and then close the dough by folding over the ends and the sides.
Preheat the oven to 425 degrees Fahrenheit and place the dough on a cookie sheet, edge side down.
Bake for 15 minutes and remove to either heat fresh or let cool completely and store in sandwich bags for the next days lunch. Either way, this is a great make ahead meal.
Crme Fraiche is a fermented dairy product used in both hot and cold French cuisine.
I think it is important to note that French does not always mean snooty and haughty (most times it does though).
As a practical person, I am a big fan of what is called “peasant food” – local, nutritious, inexpensive, and plentiful food that is used by the lower economic class as staples.
I figure if it was used to keep the average peasant alive in the 1600’s it would work to keep me alive if I had to deal with the End of The World As We Know it…
Now back to French cuisine…
Creme fraiche or (Crème fraîche for the haughty) is a think fermented liquid cream, like yogurt. Because it has greater than 30% fat content It can be used to finish hot sauces without curdling.
Making it is pretty simple, all you do is add a starter culture to heavy cream, and allowing it to stand at appropriate temperature until thick.
What starter culture should you use? – Buttermilk comes to mind.
The ratio of cream to buttermilk doesn’t really matter all that much.
Add more buttermilk and you’ll need less time for it to thicken (but it’ll be less creamy). .
Add more, and it takes longer, but tastes better.
One tablespoon per cup (that’s a 1:16 ratio) is the closest to the European product.
With a 1:16 ratio It will be very rich and creamy about 12-hours after mixing.
You can also halt the process early by just refrigerating it to stop the bacterial action.
This is useful if you want a thinner Mexican-style crema agria for drizzling over tacos or nachos.
Yes we are dealing with room temperature milk, but for the safety nellies, the good bacteria from the buttermilk prevents the dangerous bacteria from taking over.
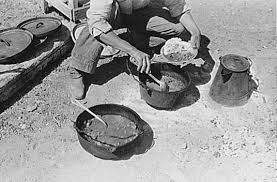
If you are a prepper then a Dutch Oven is a must have item.
The dutch oven tips in this article make it versatile enough that you can use it cook anything you cook in a regular oven.
You can make pies, bread, stew, roasts outdoors using hot charcoal instead of inside using a traditional oven.
Dutch Ovens are just metal cooking pot. Most often they are made of heavy cast-iron. They come in all sorts of dimensions and configurations, but if you plan on cooking on a fire, get one that has three short legs on the bottom, and a tight fitting lid with a rim to hold coals.
Dutch Ovens that do not have legs, are flat on the bottom, and have a highly domed lid without the coal ring are more useful inside the home to cook beans or stews on the stove.
In order to cook using a Dutch Oven you must properly season. I prefer to get “antique” cast iron from auctions, but my current “Kitchen” version was bought new from Lodge. These new ovens come coated with a waxy material to protect it. They call this “pre-seasoned” or even “seasoned”, but in my experience it is not.
Seasoning is needed to create the non-stick properties of a well-used cast iron cooking implement, and it takes some time.
To season your new Dutch Oven:
Wash the Dutch Oven with mild soapy water, rinse, and dry completely.
Grease inside and out (pot, legs, and lid) lightly with a good grade of olive or vegetable oil (I prefer solid shortening e.g., Crisco). If you are not going to use this often do not use lard or other animal products as they can turn rancid!
Do not use a spray in coating, but rather use an oil soaked paper towel or new sponge.
Place greased Dutch Oven upside down on oven rack with lid separate and put aluminum foil underneath to catch any excess oil. Bake in a 300-350 degree oven for at least 1 hour (Do this when your spouse is gone, because it will smoke up the house).
It will take more than this initial seasoning for the pot to obtain the desired uniform carbon coating that makes the pot non-stick as well as protects it from rust.
Luckily the seasoning on your Dutch Oven will improve with each use if it is properly oiled and cared for.
Once your Dutch Oven is seasoned it should never be scrubbed with soap.
Store the oven in a warm, dry place with the lid cracked so air can circulate inside.
Now For Some Cooking Tips:
For easy cleanup, line the bottom and the sides of the Dutch Oven with aluminum foil.
Use a wooden spoon to stir, and always cook with the lid on.
Unless you like ashes in your food, don’t tilt the lid when you remove it.
A Dutch oven seems indestructible, but it will shatter if dropped on hard cement or it will crack if cold water is poured into a very hot Dutch oven.
NEVER, REPEAT, NEVER! pour very cold water into an empty hot pot or you may cause permanent damage to the oven (cracking)!
Heat control is the hardest thing to master when learning to cook with a Dutch Oven. Remember to start with moderate temperatures. You can always add more heat if desired or necessary. Be cautious, as most guests don’t enjoy burned food!
High quality briquettes are recommended. Briquettes provide a long lasting, even heat source and are easier to use than wood coals. (but as preppers learn to cook using coals from a wood fire)
Briquettes will last for about an hour and will need to be replenished if longer cooking times are required.
Group the smaller briquettes and add new ones (hot) as required to maintain the desired temperature.
Rule of thumb: Each briquette adds between 10 & 20 degrees.
Different types of cooking requires different placement of the briquettes. Here are a few general rules for briquette placement:
For Roasting: The heat source comes from the top and bottom equally. This requires twice as many coals on top as on the bottom.
For Baking: The heat source comes from the top more than the bottom. Place 3 times as many coals on the lid.
For Boiling, Frying, Stewing, Simmering: All of the heat comes from the bottom. All coals are placed beneath the Dutch Oven.
Place the required # of briquettes under the oven bottom in a circular pattern so they are at least 1/2″ inside the Dutch Oven’s edge. Arrange briquettes on top in a checkerboard pattern.
Do not bunch the coals as this causes hot spots.
To prevent hot spots during cooking, rotate the entire oven 1/4 turn and then rotate just the lid ¼ turn in the opposite direction. Rotate every 10-15 minutes.
If you use wood coals, remember that the flame will be much hotter than the coals! Avoid direct flames on the pot or turn frequently.
Keep in mind that the weather, ambient temperature, and ground conditions can affect cooking temperature.
Here is a guide for the amount of charcoal briquettes needed for different sized Dutch Ovens to reach a desired temperature level:
8″ DUTCH OVEN:
325 degrees – 15 coals …OR… 10 on top / 5 on bottom
350 degrees – 16 coals …OR… 11 on top / 5 on bottom
375 degrees – 17 coals …OR… 11 on top / 6 on bottom
400 degrees – 18 coals …OR… 12 on top / 6 on bottom
425 degrees – 19 coals …OR… 13 on top / 6 on bottom
450 degrees – 20 coals …OR… 14 on top / 6 on bottom
10″ DUTCH OVEN:
325 degrees – 19 coals …OR… 13 on top / 6 on bottom
350 degrees – 21 coals …OR… 14 on top / 7 on bottom
375 degrees – 23 coals …OR… 16 on top / 7 on bottom
400 degrees – 25 coals …OR… 17 on top / 8 on bottom
425 degrees – 27 coals …OR… 18 on top / 9 on bottom
450 degrees – 29 coals …OR… 19 on top / 10 on bottom
12″ DUTCH OVEN:
325 degrees – 23 coals …OR… 16 on top / 7 on bottom
350 degrees – 25 coals …OR… 17 on top / 8 on bottom
375 degrees – 27 coals …OR… 18 on top / 9 on bottom
400 degrees – 29 coals …OR… 19 on top / 10 on bottom
425 degrees – 31 coals …OR… 21 on top / 10 on bottom
450 degrees – 33 coals …OR… 22 on top / 11 on bottom
14″ DUTCH OVEN:
325 degrees – 30 coals …OR… 20 on top / 10 on bottom
350 degrees – 32 coals …OR… 21 on top / 11 on bottom
375 degrees – 34 coals …OR… 22 on top / 12 on bottom
400 degrees – 36 coals …OR… 24 on top / 12 on bottom
425 degrees – 38 coals …OR… 25 on top / 13 on bottom
450 degrees – 40 coals …OR… 26 on top / 14 on bottom
16″ DUTCH OVEN:
325 degrees – 34 coals …OR… 22 on top / 12 on bottom
350 degrees – 36 coals …OR… 24 on top / 12 on bottom
375 degrees – 38 coals …OR… 25 on top / 13 on bottom
400 degrees – 40 coals …OR… 27 on top / 13 on bottom
425 degrees – 42 coals …OR… 28 on top / 14 on bottom
450 degrees – 44 coals …OR… 30 on top / 14 on bottom
NOTE: For cooking times over an hour additional charcoal may be necessary. Either have another batch ready to go after about an hour and a half or, at about an hour, place unlit briquettes next to those on and under the oven to ignite them.
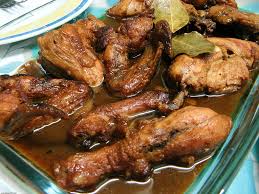
Today’s recipe of cooking chicken with vinegar is a pretty basic cooking skill. This of method cooking meat “Adobo” is a cultural cooking process from the Philippines, where meat is marinated in vinegar, browned, and then simmered in the marinade. This process is worthwhile for preppers, homesteaders, or outdoorsmen to know because leftovers keep well without refrigeration because the vinegar inhibits bacteria.
In my experience it softens up tough meat, and I especially like using this process with rabbit. As a matter of fact, I make “chicken with vinegar” far more often with rabbit more than I do with chicken.
Today we will cook some chicken with vinegar, so you can see that cooking mellows the vinegar, as well as tenderizes the meat – the end result will be about as tart as cooking chicken with tomatoes. It is actually pretty good, and I end up keeping a jug of my homemade wine vinegar near my stove so I can throw in a cup or two into my cooking whenever the wife is not looking….
Ingredients
2 tablespoons olive oil
1 3-pound cubed chicken
Salt and freshly ground black pepper
1/4 cup minced shallots or scallions
1 cup good red-wine vinegar
1 tablespoon butter (optional)
Procedure
Preheat the oven to 450 degrees.
Set a large ovenproof skillet over medium-high heat. .
Add oil
When it is hot, place chicken in the skillet, skin side down.
Cook undisturbed for about 5 minutes, or until chicken is nicely browned.
Turn and cook 3 minutes on the other side. Season with salt and pepper.