Mason Lid Tart

Recipe: Mason Lid Tart

Mason Lid Tart

52 Unique Techniques for Stocking Food for Prepper
Buy at Amazon

Getting into canning means you end up with a lot of Mason jar lids, being a DIY orientated person causes me to look for solutions to problems using materials at hand.

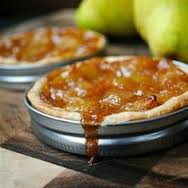
Now to be honest, making tarts is not a huge life problem for me, but after the tuna can cake I thought I would try a mason lid tart.

I enjoyed making single serve desserts, and with my wife wanting me to “get healthy” she wants me to control my portions.

This recipe is adapted from a 10 inch tart shell recipe, so it will make 15 or tarts – if you leave them in the lid for sturdiness, and wrap them they make good gifts.

Ingredients

  • 2 cups all-purpose flour
  • 1/2 teaspoon kosher salt
  • 1 tablespoon sugar
  • 12 tablespoons (1 1/2 sticks) cold unsalted butter, diced
  • 1/2 cup ice water
  • Pear Pie Filling (recipe below)

Procedure

  1. Place the flour, salt, and sugar in a bowl and mix to combine.
  2. Add the butter and mix, until the butter is in small bits the size of peas.
  3. While mixing slowly pour the ice water into the bowl and mix until the dough starts to come together. .
  4. Dump onto a floured board and knead quickly into a ball.
  5. Wrap in plastic and refrigerate for at least 1 hour.
  6. Preheat the oven to 400 degrees F.
  7. Spray your mason jar lids with nonstick spray.
  8. Pull clumps of dough (about 2 tbsp for each mini tart) from the large dough ball and smash them into each lid.
  9. Push the dough so it covers the bottom and sides of each lid.
  10. Refrigerate the formed shells while you prepare the filling.
  11. Set the mason jars on a cookie sheet
  12. Bake for 45 minutes to 1 hour, until the pastry is browned and the pie filling starts to set.
  13. Rotate the pan once during cooking. If the pastry puffs up in one area, cut a little slit with a knife to let the air out.
  14. Loosen the tart with a metal spatula so it doesn’t stick to the edge of the lid. Push the bottom of the lid up, so the ring falls around your wrist.
  15. Allow to cool and serve warm or at room temperature.

Filling

Makes about 28 ounces, enough for a regular size pie

Ingredients

  • 5 cups diced pears (I kept the skin on)
  • 1 cup sugar
  • 1 tsp cinnamon
  • 2 tbsp flour
  • 1/2 a lemon juiced

Procedure

  1. Toss all the ingredients into a large pot, mix until the flour is distributed evenly.
  2. Allow to sit for about 30 minutes.
  3. Turn the heat on medium-high. Stir occasionally with a wooden spoon.
  4. Bring mixture to a boil and lower to low/medium heat. Stir occasionally.
  5. Keep over the heat for about 30 minutes, until it begins to thicken.
  6. Pour into a container, cool, then store in the fridge until ready to use.

How to Use a Magazine Rack for Can Storage

52 Unique Techniques for Stocking Food for Prepper
Buy at Amazon

I am quite happy with my cardboard can organizers.  They have survived a couple moves and several years of can foods being stored in them.  However, they are sized for normal sized cans.

I still need something for can drinks, tuna cans, and tomato paste cans.

Here is a good tip for those odd sized cans.

As soon as I saw a picture on pinterest of someone using a Magazine Rack for Can Storage I knew it was worth exploring.

To be honest, I still like my cardboard can organizer better, and finding the right sized magazine racks can be a chore, but this does work well.  It is probably also sturdier over time than the cardboard can organizers.  I know it would move better if you aren’t someone that stays in one place.

I hope you find it to be useful.

If you have other tips or things you would like to share or see tried out.  Please feel free to contact me.  I am always looking for good ideas to share.  I probably just need to spend more time on Pinterest, but since most of the good ideas are on mom sites, I have to be sure my wife doesn’t think I am out looking for the wrong stuff.

Kitchen DIY: Substituting Honey for Sugar

Kitchen DIY: Substituting Honey for Sugar
Buy at Amazon

If you want to eat healthier, or use honey that you have produced yourself, the first thing you need to know is that the rules for Substituting Honey for Sugar are more like guidelines.

In general, substituting honey for sugar is a matter of preference.

Some use it cup for cup, others prefer 1/2 cup – 2/3 cup of honey per cup of white sugar.

However, because of the water content, reduce the amount of other liquids by 1/4 cup for every cup of honey used.

Honey also causes foods to brown much easier, so lower the oven temp about 25 degrees F to prevent over-browning.

Also, since Honey is naturally acidic, and baking soda is a base add 1/4 teaspoon of baking soda for each cup of honey to your recipe.

If you are using the sugar to can, use 7/8 cup of honey for every cup of sugar, but don’t change the other liquids. Honey may be substituted effectively for up to half the sugar called for in a canning syrup recipe. (test this for jellies)

Remember that Honey has its own unique flavor. In general it is a light and pleasing flavor, but if it conflicts with the desired taste of your recipe, there’s not much you can do about it. However, the flavor depends on the flowers the bees used to make it, and some flowers give an off taste.

If you are diabetic, as I am, keep in mind that honey does not reduce the calorie or carbohydrate content of the sugar syrup, and thus is not acceptable sugar replacements for people on diabetic diets. However, it is less processed, and there is some evidence that it a much healthier sweetener in other ways.

You can also use honey as a substitute for other sweeteners

Brown Sugar: Follow the equation for plain table sugar under General Recommendations, but also substitute molasses for a portion of the honey to retain the expected flavor – (brown sugar is just unrefined White sugar -they take the molasses out).

Corn Syrup: Use exactly the same amount, but reduce any other sweet ingredients, since honey has more sweetening power than corn syrup.

Molasses: Use exactly the same amount. The resulting flavor and color will be lighter and less heavy. The reverse is true if you swap molasses for honey.

Recipe: Chicken Zucchini Poppers


Recipe: Chicken Zucchini Poppers
Buy at Amazon

Chicken zucchini poppers are a low carb, 21 day fix compliant recipe that tastes good and is easy to prepare.

This is important because ever since Genny started getting serious with the 21 day fix lifestyle she has constantly looked for ways to incorporate the foods she is supposed to eat into tasty recipes that she WANTS to eat.

I personally don’t like zucchini, but these chicken zucchini poppers are pretty good.  They also get bonus points because the boy likes them also.

You can watch the video above, or follow the recipe below to make a great zucchini popper.

Ingredients:

1 lb. ground chicken breast
2 Cups grated zucchini
2-3 sliced green onions
3-4 TBSP minced cilantro
1 Clove minced garlic
1 TSP salt
1/2 TSP pepper

Instructions:

1. Mix ground chicken and all other ingredients in large mixing bowl.

2. Spoon out 8-10 nugget sized pieces onto the a greased frying pan.

3. Cook the chicken poppers on medium heat for five minutes and then flip and repeat on other side.

4. You can eat plain or serve with your favorite dip or sauce.

These poppers were pretty easy to make, and they did not cost very much.  Once Genny started making them they kept showing up on the table on a pretty regular basis.

How to Melt Crystallized Honey the Easy Way


Kitchen DIY: Melting Crystallized Honey
Buy at Amazon

Honey never spoils or goes bad, but it may crystallize. This is not a bad thing, as a matter of fact, some beekeepers intentionally cause their honey to crystallize and sell it as premium “creamed honey“.

If your honey solidifies into a thick mass of honey crystals it is a simple process to reverse it. Simply heat it up in a gentle manner.

In the video I show my preferred method of slowly melting crystallized honey in a crock pot.

I have done this in a double boiler on the stove, but that requires more care and attention. In this method, you can set it and forget it.

Don’t get excited about finding your stored honey converted to crystals. You should try it as a spread on your morning toast or on a peanut butter sandwich. It doesn’t change the taste, but It does give it an interesting mouth-feel.

One point of caution as you melt your crystallized honey using any method. Honey will never spoil. However, If you dilute it with water it will ferment.

If you take the single precaution of ensuring the water in the pot does not mix with the honey, melting crystallized honey is easy and makes your honey much easier to pour.