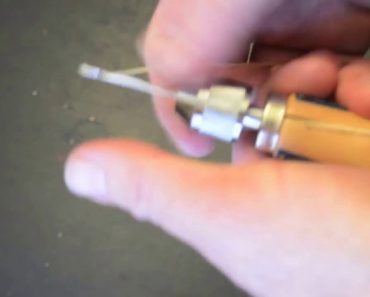
Speedy Stitcher Sewing Awl is one of those pieces of equipment that I bought on a whim, and kept a couple around for decades without ever using it because I felt it was an essential tool to own just in case, but that I never actually tried out.
The other day I had a radio holster that broke and rather than buy another one I decided to fix it. Since I did not have a strong enough needle to go through the ballistic nylon I dig out one of my Speedy Stitcher.
It did not take long at all to figure out how it works and it made a very strong repair.
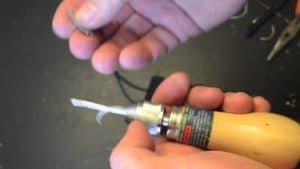
I am not very good at sewing, but I find that I need to fix things from time to time. This speedy stitcher is great for farm and shop repairs.
It is easy to use and has a pretty short learning curve. The problem is, it also has a lack of good instructions in the box. I had to experiment and sort through google to figure it out.
Once I learned the basics, it was pretty easy.
I would recommend using waxed thread and going slow.
Being a DIY’er is a lot like being a gun guy. Any self respecting gun guy has (at one time or another) bought a gun simply because he had either a holster or an odd box of ammunition that he didn’t have a gun for.
This DIY Battery Pack project is like that. I had batteries, so I needed to do something with them.
Recently I was gifted some sealed lead acid batteries from a hospital. Like smoke detector batteries these get replaced on a time table that does not account for useful life. Sometimes it’s better to spend a little extra than risk a failure of a piece of life safety gear. So now I have three neat little batteries and am compelled to find a way to use them.
Anyway these are small sealed 12 volt batteries. They don’t have enough capacity to do very much useful work by themselves. However, they were fully charged and designed to be recharged over and over.
I figure having a small battery pack would be a lot easier to tote than a dirty car battery. While I am at it, having some inputs like a cigarette lighter socket and some terminal posts would make it even better. Add in some lighted switches and I would have a full fledged project.
Since I had three small batteries I had to decide how to wire them together. I could either wire them in series to make them stronger, or in parallel to make them last longer.
Series
In series you basically wire them end to end. Like in a flashlight where the positive terminal of one battery is in contact with the negative terminal of the next. If you do this then you make one big battery. Three 12 volt batteries wired in series would give me 36 volts. However, they could not last very long. It’s like having three jugs of water and dumping them all out at the same time. You get a lot of water, but it runs out fast.
Parallel
Since I don’t have any 36 volt gear to run, and I would rather get more time I decided on wiring them in parallel. That is running a wire from one positive terminal to the next and running a separate wire from the negative terminal to the next. This daisy chains all the like terminals together. Using the water jug analogy, this would be stacking the jugs on top of each other and poking holes so that each jug fills the jug below it.
Consequently, this gives me the same flow as a single jug, but for a longer time. Running in parallel does not increase the voltage. What is does is to increase the time I have to use the batteries.
What I Needed
I went to the local electronics store and bought some spade connecters. The spades were small enough to fit on the battery terminals. The lugs were large enough to fit two 14 gauge wires. I needed to fit two wires, as each spade clip needed to be wired to the battery before and after it.
ITwo lighted 12 volt automotive switches, two sets of terminal posts, two sets of 12 volt cigarette lighter outlets, and some shrink tube were also purchased.
My plan was to insert a rectifier diode to each end so one set of switches and outlets would be for charging. However I could not find the right sized diodes.
My solar kit has a charger controller with multiple inputs and fuses. I plan on using that in my upcoming projects because it has a built in meter and I won’t have to worry about back feeding.
Any radios I may use with this pack also have fuses on the input wires so I don’t have to worry about blowing them up either. Basically this is just a portable battery with some fancy switches.
Check Before Boxing Up
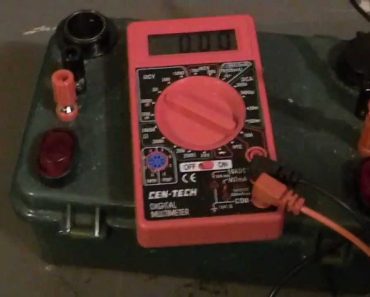
After I wired everything up, I checked it to make sure it all worked and I didn’t have any shorts. Then I had to find a decent looking project box for it.
I had originally planned on using a metal ammunition can for the project box. After some careful consideration, I decided that putting a bunch of wiring and batteries inside a metal box might not bode well for my homeowner’s insurance.
What I ended up using was a small military surplus plastic first aid kit box. A very sharp chisel lifted the embossed writing and cross from the top of the box. Fine sandpaper made it smooth enough. Rattle can green spray-paint covered up the majority of my mistakes with the chisel.
I then took the appropriate sized drill bits and drilled holes for the switches and plugs. Of course I first made sure everything would fit after installation.
Finally, it was a tight fit, and I had to electric tape the batteries together so I could get them in just the right place to close the box. However, I think that just makes everything easier. Now there won’t be any shifting inside to cause damage to my poor soldering skills.
Hot Glue Matches Cooling on WorkbenchBuy at Amazon
Have you ever needed to fix something but did not have a hot glue gun handy?
Today’s hot glue matches project shows how to combine strike anywhere matches with hot glue so you always have the ability to use hot glue no matter where you are.
It is not hard, and all you really need is some matches and a hot glue gun.
I store mine in an old pill bottle and keep them in the glove box of my truck.
Mine are not as pretty as the video from Facebook where I got the idea, but then again I made several of these in just a few minutes.
The big thing I learned was to cool them standing upright do the glue flowed where I wanted it rather than away from the match head.
I think that if I took more time and continued to swirl the match in my hands as the hot glue match cooled, then the resulting bead would be much more even. However, even if this was not a pretty project it works and is simple enough to add in a small repair kit for emergency repairs on the go.
One of my more vivid childhood memories is sitting around a campfire with my dad as I made a burned bowl using coals.
This a fun way to make a useful item. Additionally, this technique has been used by natives to build much larger items. Things as large a log canoes were built this way.
I mention in my spoon carving post, that you can also use this to make the bowl of a spoon.
It is very simple to do, and doesn’t take much time. However, as with any fire project, you need to take care not get burned. You should ensure you have some means to extinguish fire close at hand.
Material:
Small or medium sized piece of solid wood.
Campfire
Boiled linseed oil or vegetable oil
Tools:
Metal tongs, or a green limb trimmed in the middle and bent into tongs
Metal spoon, sharp rock or other scraper
Fire extinguisher, water hose, or bucket of sand.
Knife
Straw (Optional)
Sandpaper
Rag
Procedure:
Light a campfire and let it burn to coals.
If you don’t have a set of metal tongs, make one, Find a straight length of green branch about 2 feet long and as big a round as an adult thumb. Make sure this is from a non-poisonous hardwood tree like oak.
Next, trim off any small side branches. Carefully scrap down a few inches of the branch in the center of the limb. Scraping down a little past halfway through the green branch. You should be able to bend it without breaking.
Finally, trim the ends to make a semi flat end to enable you to use the bent branch as tongs to pick up small rocks. Don’t cut too much or the hot coals may burn through.
Once the fire is burned to hot coals, use tongs to pick up a couple coals and place them on the center of the wood.
Then. blow gently on the coal where it meets the wood. A straw may help direct the air. The idea is to carefully burn small areas of the wood in a controlled area.
Once the wood chars a little, dump out the coal and scrape out the charred area.
By strategic use of the coals, air, and scraping, a depression can be burned out of the log.
Once the log is burned deep enough to make a bowl that satisfies, scrape it out completely.
Next, sand it until you are happy with both the inner bowl and outer wood.
Once sanded, pour oil onto the bowl and rub it in with the rag*. It may take several coats and a couple days. Eventually the oil will soak in and harden and make a very pretty and useful bowl.
*Oils and natural rag fibers can become hazardous. As the oil oxidizes in the rag it will make heat. Many shops have burned when the heat ignites the rag. I always burn my rags after using them with oil.
Lessons Learned:
This project teaches the confidence of mastering fire. It shows that with knowledge and care dangerous things can be mastered and turned into tools.
It is also a primal outlet for creativity and artistry. These bowls are useful, but they can be beautiful and valuable works of art.
It also can be used to grow appreciation for modern items like plastic bowls.
If you ever listen to Jimmy Buffet and know about blowing out a flip flop then this post is for you.
I am notorious for ripping the thong out of the sole of flip flops. While you can press it back in the hole. Once it is ripped out the flip flop is never the same.
What you need for flip flop repair is some sort of washer. You need something larger than the hole the thong fit in originally. It is also helpful if the washer is split so you can snap it right over the thong.
I find that the plastic clips that hold bread bags closed works perfect as a quick flip flop repair.
They are study, free, large enough to keep the thong from pulling through the hole in your flip flop, However, they are also thin enough so that they aren’t uncomfortable.
You don’t even have to wait for the flip flop repair to be needed. You can simply snap them on BEFORE you need them so that your flip flops last a long time.
This is a pretty simple tip, and probably something that you already knew about, but I remember the first time I tried it. It worked well and I had to share.