Tueller Drill Test

Tueller Drill Test
Buy at Amazon

You can’t be a serious practitioner of armed self defense if you don’t understand the legal and moral implications of lethal force.  One tool used to discuss such things is a concept called the Tueller Test.

Today we are going to talk a little about lethal force and handgun deployment. Over the course of this blog, I have been very clear that in Tennessee before a person is legally justified in using deadly force they have to Believe their life is in immediate danger, and the person against whom they are employing deadly force has the ability to kill or seriously injure them at the present time. Meaning, even though the peta guys that threaten to kill me over the butchering videos may have the ability to kill me, as long as they are expressing the threat over the internet, deadly force is not applicable because they can not kill me right now.

This is a pretty clear standard, but sometimes we may need a little clarification.

Back in the early 80’s Salt Lake city had some police officers hurt by knife wielding scumbags, and their Sergeant wanted to know how a cop with a gun was being hurt by a drunk with a knife. Basically the officers were hesitant to draw their firearms because they felt that they were safe as long as the guy with the knife was standing across a room.

Sgt. Tueller, than began experimenting to see exactly when a knife fighter was a threat. Obviously to use a knife effectively you have to be in contact range of your target (we are specifically ignoring thrown knives as they are generally tactically ineffective and not the reason for the experiment). However, an officer’s reaction time to an attack, coupled with the attackers speed combine together to allow a criminal to close the distance and strike an officer before the cop can draw his firearm and neutralize the threat.

Sgt, Tueller had volunteers test to see how fast they could draw their weapons, and other volunteers were timed how far they could run and stab a target. Based upon the good sergeants work, we now know that the typical individual can cover 21 feet and inflict a lethal wound in under 1.5 seconds. We also know that the typical officer takes 1.5 seconds to realize they are being attacked, draw, and fire their pistol.

Sometimes this is misunderstood – and I would recommend that you read the original article “How Close is too Close” in the 1983 edition of SWAT magazine. You cannot shoot someone with a knife just because they are 21 feet from you and threatening you, but if you do not act, they most likely can hurt you before you can react.

Basically, if someone has a knife, and they are threatening you with it, you would most likely be justified (unless of course you started the fight) in drawing your firearm and telling the person to “back off”. That way, if they do decide to initiate the attack and charge you, your reactionary gap is lessened, and you can defend yourself.

In my firearm classes, I normally demonstrate this by getting a volunteer, arm them with a holster and an air-soft pistol. I then explain the two rules of deadly force, and then stand about 21 feet away. I then ask the student for some money, they generally laugh and tell me no. I then pull out a large rubber knife and ask again. Sometime during the resulting conversation I begin moving my 350 pound body toward them as rapidly as possible.

The results are generally as follows;

  • They stand on one leg, and raise the other towards their chest and try to assume a standing fetal position.
  • They draw their gun, paddle holster still attached and then look at the holstered gun in their hand.
  • They run away.
  • They shoot two rounds into the floor in front of me, or off to my side.

In ALL the years I have taught this I have been shot twice – once was by a correctional officer that shot me the second I pulled my knife (I didn’t even get a chance to threaten – pulled knife – received welt from plastic bb) he sheepishly said “better judged by 12…” The other was a recently discharged Recon Marine taking an Armed Security Upgrade so he could work security at a nuclear plant. He simply drew and double tapped me right below my sternum with a speed that the majority of us will never practice enough to achieve.

I am a big believer in this demonstration as it allows an in depth discussion about what actually constitutes a lethal threat, and the proper methods of response.

However, for the video, I chose a test instead of a demonstration, the way we performed the demonstration in the video below gives an individual a INDICATOR as to whether they are below or above the 1.5 second reaction time average.

I had one student with a holstered, and loaded firearm stand and face a target. A second student stood shoulder to shoulder with the armed student, but he faced up range. This student held a 1 pound lead weight wrapped in a bandanna. He is will represent the knife armed aggressor.

At a time of the aggressors choosing, and without warning he will begin to race up range (away from the shooter and his target). When he begins to run, the shooter is told to draw and fire two shots at center mass of the target. He is told that shoot as rapidly as he can, but that he needs to hit the target.

As soon as the aggressor hears gunfire, he drops the weight – this signifies how far he could stand AWAY from the shooter and still inflict a lethal blow.

Remember, even if you hit the attacker, he still would have hit you at that distance. This gives the shooter an average of where he is justified to be worried if he is threatened by an attacker holding an impact weapon.

https://www.youtube.com/watch?v=FL1zX-SrBH0

How to Make an Inexpensive PVC Target Stand

How to Make an Inexpensive PVC Target Stand

https://www.youtube.com/watch?v=JC4-K-h80JU


How to Make an Inexpensive PVC Target Stand
Buy at Amazon

The following guide shows how to make a PVC target stand construction should help you make a portable inexpensive option that is easily made at home with common tools.

One of the troublesome aspects of shooting can be finding a place to staple up your targets.

All too often we as shooters compromise a well prepared practice one more session because of a lack of suitable range equipment.

If you have looked into purchasing portable target stands, undoubtedly you have noticed that most equipment sold is either poorly designed or manufactured, awkward to set-up or transport, or expensive.

This makes a great target stand, but I have also used it as a barricade when teaching how to shoot from behind cover.

It works great for this because it cannot stand a lot of leaning and the shooter should learn how to shoot from behind cover without leaning on the object they are hunkered down behind.

PVC Target Stand Construction

Material list: 

  • 5 feet 3/4 inch PVC pipe
  • 4 3/4 PVC “T” fittings
  • PVC pipe glue

Tools:

  • Miter box with Saw
  • Knife

Instructions:

  • Using miter box and saw, cut PVC pipe into 3 one foot sections, 2 eight inch sections, and 2 four inch sections.  Carefully trim away rough edges on cut sides of pipe.
  • Glue one foot pipe into end of “T” fitting.  On other end of fitting glue one four inch pipe.
  • Repeat once.
  • Take remaining foot long piece of pipe and glue it into the “T” fitting in a 90-degree angle to the first length of pipe.
  • Glue the next section to the other end of the pipe forming a “U”
  • Next, glue an unused “T” fitting to an eight-inch pipe.  Glue a four-inch pipe into the other end of the “T” fitting.
  • Repeat once.
  • Glue each new pipe section into the “U” so as to form an “H”.  Take care so that when gluing the pipes together, when the completed stand is lying on the ground, the second “T” is pointed upwards.

Once the target stand is completed, preparing it for use is simple.  Staple your target to a framework made of wood lathe.  Place the ends of the target into the open “T”.  Once the target is standing in the frame, you are ready shoot.

This is Not the Only Method

There are a lot of ways to make this kind of PVC Target Stand.  The article shows how I made mine.  However, I added a video from another YouTube creator to show an alternative method.

In my book reviews section I actually reviewed two books on PVC projects.  Follow the links and you can get more information on PVC Projects for Outdoorsmen and Volume II More PVC Projects for Outdoorsmen.  Both of these books have a lot of information on making gear out of PVC, things like target stands – and much more.  If you want to get wild, I also have a review for a book on how to make a weaving loom out of PVC.

Clint Smith on Defensive Firearms

https://www.youtube.com/watch?v=R00cdYREFLc


Clint Smith on Defensive Firearms
Buy at Amazon

Clint Smith is an expert on the use of Defensive Firearms.  He is a Marine Corps Infantry vet, SWAT officer, and has been running Thunder Ranch since 1993.

Since I Graduated high school in 1993 I readily admit that he has probably forgot more about defensive firearms use than I know.  And that’s okay with me as I haven’t stopped learning yet.  This video is a great tool use to learn some great concepts and proper mindset on the proper use of a defensive firearm.

I like his style, this thought process, and how he teaches.  When I teach firearms classes, there are several techniques and lessons that I share that I gleaned from Mr. Smith.

I have searched YouTube for good training videos to share, and I have found several clips of Thunder Ranch training videos.  Think of them as advertisements for their full length training videos.  (I don’t gain anything from this, but I do think there videos are a valuable and worthwhile purchase.)

Clint Smith is entertaining, but his content is unparalleled.  I love watching him and have used many of his videos to influence my training style.  Its good to be entertained as you are educated.

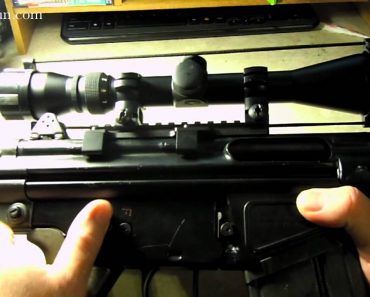
Cheap CETME/G3 Scope Mount


Cheap CETME/G3 Scope Mount
Buy at Amazon

I do not normally advocate mixing airsoft with “real” gun gear.  However, on occasion it works if you know what you want.  Just understand that airsoft accessories are not built as strongly as accessories build for actual guns.

I would not use airsoft lasers or airsoft rated under barrel flashlights or optics because they cannot handle the vibration.

In this case, I was able to find some Cheap CETME/G3 Scope Mounts for $10, where actual CETME claw mounts are over $100 for the exact same design.

The claw mounts bolt to the receiver and I tightened them down just as I would the actual gun rated mounts.

They have held up to about 100 rounds of sustained fire.  Not quite rapid fire, but one good shooting session.

This isn’t my main rifle, and is really just an experiment gun.  If it was a gun that I foresaw using for defense of my life I would buy the higher dollar mounts.  Life is not worth risking over $90.

Wither you use the $10 or the $100 mount be careful as you tighten the claw mount, people have been known to tighten it so much that they “crushed” the receiver mounting points.