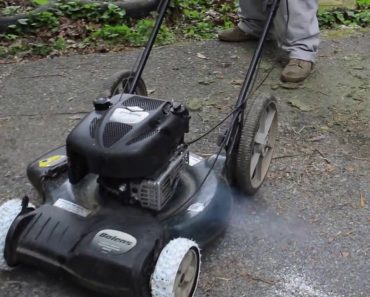
How to Retread a Lawnmower Tire


DIY: Retreading Lawnmower a Tire
Buy at Amazon

I saw this on a youtube video a few years ago and kept it in mind for the day I needed it.

Basically both the originator of this idea and I both used an old bike tire to cheaply retread a lawnmower tire.

This takes a little work, but it is much cheaper than buying new tires.

I simply measured around the circumference of my lawnmower drive wheels and cut the tire into a strip long enough to wrap around the tire.

Next, I cleaned the tire really well and glued the bike tire to the plastic lawnmower tire.

I additionally used self driving sheet metal screws to both hold the bicycle tire to the lawnmower wheel, but also to create “spikes”

Once the glue tried I tried it out, and my retreaded tires really made a difference in how my third hand lawnmower worked.

This Saved Me Money on a “Garbage” Mower

A co-worker thought he was taking advantage of me by selling me this lawnmower for $20.

However, a simple carb cleaning, blade sharpening, and tire retreading made this lawnmower work like a champ.  The so called “garbage” mower worked well for me for 2 years.

Once again, a little ingenuity  and the willingness to try new things has made my life a little easier.  Especially when my yard is very hilly and slick.

This may not be a go to trick for retreading a lawnmower tire, but it was cheap and worked well.

I am sure I will do this again.  This is the kind of money saving DIY project that I love to share on my site.

However, I kinda also want to get a reel mower.  I like how they are quiet, even if they may take a little more work.

Tiny House Delivery

Tiny House Delivery
Buy at Amazon

EDIT:  It took so long to post this that the guy that was going to pay his rent by working on the land to “heal the land” actually caused more problems than he solved – meaning dumping his composting toilet (5 gallon bucket) out on the grass, rutting over the septic lines, and basically refusing to do any work.) The tiny house is no longer on the property, instead I am working to level out an area for a small shed/pole barn to hold tools while I construct a dog trot cabin.

It took me a while to post this, as we were quite busy preparing the shed for the winter, but I am glad I finally was able to post this.

It did not take a long time for the actual Tiny house delivery.  I was amazed at how efficient the shed delivery person was.  He brought it in on a flatbed and used a little two wheeled powered tractor and some small wheels to maneuver the shed into a very tight spot between the power pole and the trailer.

I had about 30 minutes of film, but most of it had James, Smitty, and I talking and some of it wasn’t meant for some of the more gentle ears that may watch my videos – that and 30 minutes of watching a flat bed tilt a shed up and off would be boring to most people.

I was quite exited about the tiny house delivery, It has always been a dream of mine to have a homestead, and the delivery of the shed was a great first step.

We had bought some cap stones to help level the shed, but the builder supplied his own.

Once he delivered the shed and maneuvered it into place, he dropped one end on some cement blocks and then did some final adjustments to the location.

Once the tiny house was delivered exactly where we wanted it, the builder used levels and high lift jacks to ensure it was perfectly level.

Our 12×20 shed delivered cost about 4,000 including tax, while we could have done it ourselves a little cheaper, this was much easier, faster, and more efficient.

Once the shed was delivered, James and Smitty spent a lot of time building a sleeping loft, plumbing a sink, insulating, and wiring it.  I helped with the windows and wiring, but I got a little frustrated over discussions of a composting toilet (pooping in a bucket and covering it with sawdust) – especially when I ensured the shed was in the best spot to plumb into the existing septic tank.  I also didn’t like the idea of a wooden “Japanese soaking tub” in the shed when I had a brand new tub.  So, instead of having a blow up, I took some time to work on projects at my house until the building was how James wanted it – especially since he was living there…

Water Line Installation


Homesteading: Water Line Installation
Buy at Amazon

Today we are going to test and discuss my water line installation.  I rented a trencher to put in a new water line and while I was at work my buddy installed a water hydrant like the one pictured here.

He also put in an underground connection for the tiny house.  Additionally Smitty put in a stub so that later we can branch off and run water to a future goat barn.

To ensure we have no leaks before we fill the hole back in Smitty put in a temporary stand pipe and attached an air gauge.

We attached an air line and pressurized the system to 80 psi for about 4 hours.  If the pressure stays in the system there are no leaks.

If the pressure drops then you know you have a leak.

To find the leak add three drops of dish soap into a bottle of water.  Simply spray the water around the couplings and air the system back up.  Leaks will blow bubbles with the solution.

You can then fix your water line installation problem.

We also put the water line to the tiny house in a bucket buried in the ground and added a shutoff.  This is useful because if the plumbing in the house needed to be worked on, you can shut it off from the outside so that you don’t have water leaking all in the building.

How to Make a Homemade Cable Snare


Building a Homemade Cable Snare
Buy at Amazon

My friend William Smith, who used to trap in Alaska and now builds very inexpensive, but quality snares.  He agreed to show me how he builds homemade cable snares.

The Parts are Pretty simple

  • 3/32 aircraft cable
  • Sure-lock snare lock
  • Double ferrule
  • Single ferrule.

To Build a Homemade Cable Snare:

  • First, you run the cable through the sure-lock device, make a loop, and then run it back through
  • Next, lock it in place with a single ferrule on the loop end.
  • Then, run the long end of the cable through the double ferrule, loop it around, and put the free end back into the ferrule to make a loop for a swivel or to attach to the tree.

As you can see it is pretty easy to make a homemade cable snare.  When Smitty gets his shed wired so we don’t have to yell over the generator I want to show how to make a snare lock using a penny.

I plan on buying some of his snares, but before I do that, I have to get him to show me how to wax and dye them so I can actually catch some meat with them.

Setting a Power Pole


Setting a Power Pole
Buy at Amazon

Once the meter box was removed I went to the electric company to see about getting a power pole.

Originally I was simply going to take the entire meter box and weather head off the trailer and bolt it to a shed.   However, after talking to the utility and the shed builder we were convinced that getting a stand alone pole and getting it set up with an RV hookup was the cheapest and simplest method.

Basically I was told that if we installed the meter box on the shed the inspector would require the shed meet residential code.  While that is no problem the $3000 fee was completely out of the budget.

This means we had to set a power pole.

As you can see in the video I had nothing to do with actually setting the pole.  I watched the power company come in with their power pole setting equipment.

They came, drilled the hole, set the pole, and left in about 30 minutes.

Since a 30 foot utility pole needs to be set in the ground 5 feet.  If I had to hand dig to the proper power pole setting depth in the rocky limestone soil I would have been at it for much longer than that.

The utility used a truck with a hydraulic auger.  After asking which of us would be climbing the pole (he kept looking at me) the equipment operator dug in a couple extra feet setting the pole at 8 feet deep.  He said it would give extra stability when we had to climb the pole.

They also used a hydraulic tamper.  It acted like a pogo stick. The tamper compacted the dirt as they filled the hole. It stabilized the power pole and made me feel really good realizing how much work the power company saved us.

Since now the pole was only 22 ft high we could get away with not setting a guy wire – which greatly improves the land use around the pole.

Beware of Code

Code says the power line has to be at least 12 feet above ground and 18 ft over a road – so setting our weather head 20+ feet in the air gives us a good measure of safety.

In later articles, we will discuss the RV box in more detail, but the idea is to have an outlet we can use to power things like a cement mixer without using a generator, and not having the issues with setting up a temporary pole.

Plus, once the trailer is demolished we can plug a tiny house or an RV right into the pole.

In case you are keeping score it cost us $280 for the 30 ft pole and install.  Which I feel is a bargain.  Plus another $300 in various inspection fees, deposit and hook up fees to the electric company.

As of this point beside the land purchase of $7500.  The almost $600 we paid to the electric company is our only large expense.

If you have never seen a utility pole being installed, you can watch the video. I found it very exciting.  It is one large step toward my future Independence.